This article may contain affiliate links. We may earn a commission when you sign up through our links — at no extra cost to you. Our recommendations are based on independent evaluation and are not influenced by commissions.
TL;DR: Before you buy inventory software, audit what you’re actually tracking, list your must-have features such as barcode scanning, mobile access, alerts, and bulk import, then test a basic Sortly workflow in about 10–15 minutes. Use the full six-step checklist to get a first usable setup in about 30 minutes: (1) List the data you currently track, (2) choose essential software features, (3) create your account, (4) build a folder structure, (5) import existing inventory with CSV or Excel, and (6) set minimum levels or alerts and invite your first team member.
Where this guide fits: This checklist helps you audit your inventory workflow before choosing software. If you want a visual inventory app, read the Sortly review. If you are ready to set up the workflow, continue with the Sortly inventory setup guide.
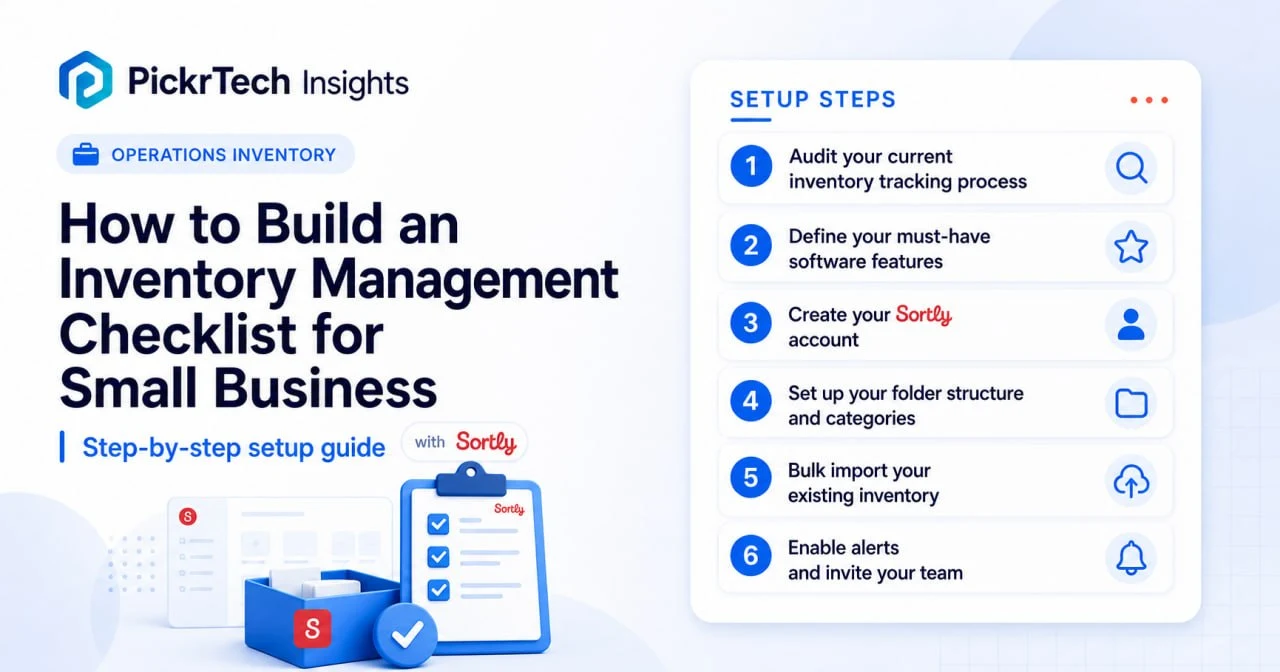
Inventory management checklist for small business showing six Sortly setup steps and workflow panel
Before you begin
Account requirements
You’ll need a valid email address to sign up. Sortly currently lists a free plan for getting started, with 100 unique items and 1 user license. If you want the hands-on version after this checklist, see our Sortly inventory setup guide. Verify the current signup, trial, and payment requirements directly on the Sortly pricing page before choosing a plan.
Data needed
Gather any existing spreadsheets, handwritten inventory notes, or database exports you currently use. Perform a quick physical count of key items to verify your data is accurate. Have ready: SKU numbers, item descriptions, cost of goods sold (COGS), physical locations (warehouse sections, shelves, storage units), and current quantity on hand.
Estimated time: 10–15 minutes for basic account and folder setup; about 30 minutes for a first usable setup with import, alerts, and one team invite
Difficulty: Beginner
Cost implications: Free plan available for basic testing, with paid tiers needed as item count, user licenses, QR label creation, or advanced features grow
Step-by-step walkthrough
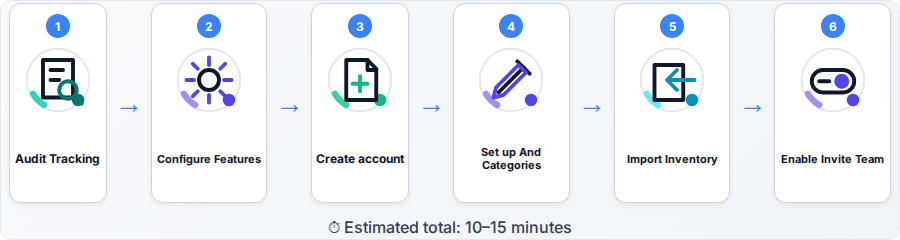
The diagram shows the basic setup flow. Allow about 30 minutes if you also import a spreadsheet, configure minimum levels, and invite your first team member.
Step 1: Audit your current inventory tracking process
Before switching to new software, reconcile what you’re currently tracking with physical reality. Open your most recent inventory spreadsheet or database and list every data point you record.
Document the columns: Do you track SKU numbers? Item descriptions? Cost per unit? Physical location (aisle, bin, shelf)? Quantity on hand? Reorder points? Supplier names?
Next, do a quick physical count of 10–15 high-value or fast-moving items. Compare your counts to what the spreadsheet says. Note any discrepancies—these reveal gaps in your current process.
Expected result: You have a clear, written list of all data points your business currently tracks and you’ve identified at least one reconciliation gap that proves why you need better tracking.
💡 Pro tip: Take photos of your current workspace layout (warehouse aisles, storage closets, shop shelves). You’ll reference this when organizing your digital folder structure.
Step 2: Define your must-have software features
Small business inventory needs vary significantly by industry. Review the essential features for inventory software and identify which ones matter most to your operation:
- Barcode scanning — Can the tool scan barcodes via phone camera or barcode reader? This cuts manual entry time dramatically.
- Mobile app — Do you need to check stock from the warehouse floor, not just a desktop?
- Low-stock visibility — Can you set minimum levels, review low-stock reports, or receive alerts when items fall below your threshold?
- CSV or Excel import — Can you bulk-upload your existing inventory data instead of entering items one by one?
- User permissions — Can you control what different team members can view or edit?
- Reporting — Do you need basic stock-level reports or detailed audit trails?
Create a numbered checklist of the features you absolutely need versus nice-to-have features. This checklist becomes your evaluation scorecard when you test the software.
Expected result: You have a written feature checklist with 4–6 must-have items that reflect your actual business workflow.
Step 3: Create your Sortly account
Navigate to https://www.sortly.com/ in your browser. Click the “Start Free Trial,” “Get Started Free,” or “Sign Up” button shown on the current page. Enter your email address and create a password. Sortly may send a verification email—click the link to confirm your account if prompted.
You’re now logged into your Sortly dashboard. You should see an empty workspace with options to create folders or import items.
Expected result: Your Sortly account is active, you’re logged in, and you see a blank dashboard ready for setup.
Step 4: Set up your folder structure and categories
Your digital folder structure should mirror your physical warehouse or retail space. Think of folders like the sections of your actual building.
Look at your photos from Step 1 or mentally walk through your facility. Create primary folders for each major area: “Warehouse A,” “Retail Floor,” “Back Stock,” “Shipping Station,” or “Office Supplies.” Avoid creating too many nested sub-folders—this makes the mobile app harder to navigate. Instead, use tags and filters to organize items within each folder.
To create a folder in Sortly, use the Items area and select the option to add a folder. Name it clearly using your actual location names. You can rearrange folders later, so don’t overthink the order.
Expected result: You have 3–6 primary folders representing your main storage areas. The structure mirrors your physical layout and is flat enough to navigate quickly on a mobile phone.
💡 Pro tip: Name folders with location prefixes (e.g., “WH-A-Shelving”) to make them sortable and searchable later.
Step 5: Bulk import your existing inventory
To avoid manual entry, transfer your existing data using Sortly’s bulk import feature. In Sortly, go to the items area and choose Bulk Import. Sortly’s help documentation describes Basic, Quick, and Advanced import options, with support for CSV or Excel files depending on the import type.
Open the relevant template in Excel or Google Sheets.
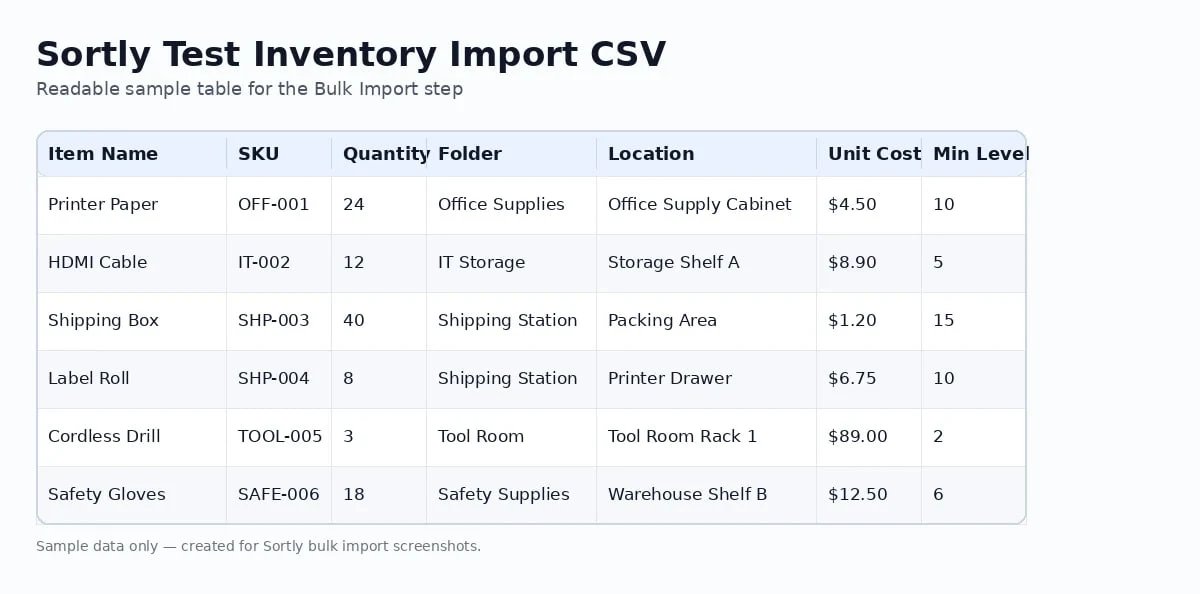
Sortly inventory import CSV template with sample item fields
Take your spreadsheet from Step 1 and reformat it to match the template headers. Common fields include item name, SKU, description, quantity, folder or location, unit cost, and reorder level. Ensure there are no merged cells, special characters in headers, or mismatched data types (e.g., don’t put text in a quantity or currency column).
Upload the completed file via Sortly’s import tool. The system should preview the import and flag common errors before committing. Review the preview carefully—verify that quantities, SKUs, and folder assignments look correct.
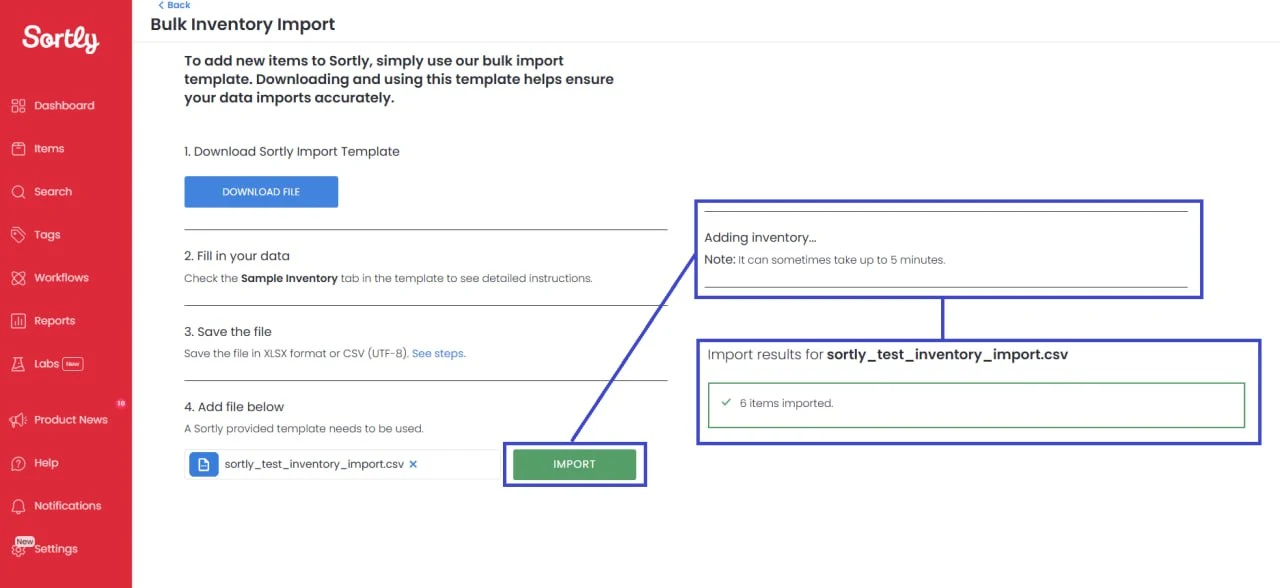
Sortly bulk inventory import screen with CSV upload and success result
Expected result: Your existing inventory is now in Sortly. Cross-check the item count on your dashboard against your original spreadsheet to confirm all items imported.
⚠️ Common issue: If the import fails, export your spreadsheet as a clean CSV and try again. Sortly may support Excel imports, but CSV is usually the safest troubleshooting format because it strips hidden formatting and merged-cell issues.
Step 6: Set minimum levels and invite your team
Keep your stock levels healthy and your team aligned by configuring minimum levels or quantity alerts next. Start with your most important items and set a minimum level—the quantity at which you want to review or reorder. For example, if you stock widgets and rarely want to fall below 10 units, set the minimum level or alert threshold to 10.
Then use Sortly’s low-stock reporting or alert features available on your plan to monitor items that fall below those thresholds. The exact menu names may vary, so check the current Sortly interface and help center if the path has changed.
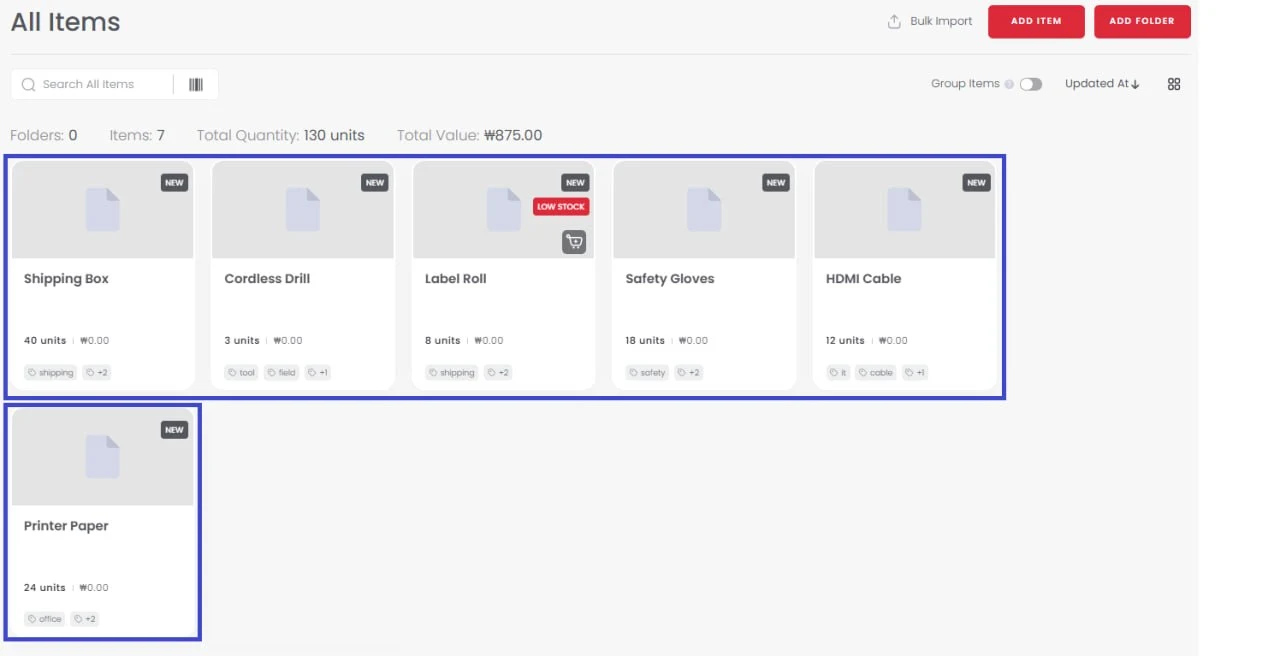
Sortly all items view with imported inventory cards and low-stock label
Next, invite your team members. Go to Settings → Manage Team, select Invite User, enter their email address, assign a role, and set folder access. Use Admin roles sparingly; most warehouse or field staff only need enough access to view items, scan labels, or update quantities.
Expected result: Minimum levels or quantity alerts are configured for your key items. At least one team member has been invited and accepted their invitation. Test the workflow by lowering a sample item’s quantity below the threshold and confirming that the low-stock report or alert behavior works as expected.
Recommended first 30-minute setup order
1. Create account (1 minute). Sign up at sortly.com with your email. Verify the confirmation link if Sortly asks you to confirm your account.
2. Build folder structure (5 minutes). Create 3–4 primary folders representing your main storage areas. Keep the hierarchy flat.
3. Prepare and import your spreadsheet (15 minutes). Choose the relevant import template, reformat your spreadsheet, and upload it. Review the preview before confirming.
4. Set minimum levels and invite one user (5 minutes). Configure thresholds for your top 5 products, then send a team invite to one person. You can expand team access later.
5. Quick verification (4 minutes). Count items on the dashboard, spot-check a few SKUs, and manually test whether a low-stock report or alert is triggered.
Setup mistakes to avoid
Avoid these common pitfalls to ensure a smooth inventory setup process.
Overcomplicating folder structures. New users often create deeply nested folders for every product variation (Widgets > Red Widgets > Size Large > Bulk Orders). This slows down mobile navigation and defeats the purpose of digital inventory. Keep folders limited to physical locations, and use tags or custom fields for product attributes instead.
Ignoring import template formatting. The most common import failure happens when headers don’t match the selected template or the file contains merged cells. Sortly supports CSV and Excel-style imports in some workflows, but the selected template still matters. If troubleshooting, export a clean CSV and remove hidden formatting before trying again.
Not setting minimum levels immediately. If you set up the system but skip thresholds, you lose one of the biggest automation benefits. Your team will still be manually checking quantities. Define at least 5 reorder thresholds before you go live with the system.
Failing to assign user roles correctly. Giving everyone Admin access creates audit trail chaos and security risks. Use higher-permission roles only for people who manage the system, and give warehouse or field staff the minimum access they need to update quantities or scan items. Test access levels before rolling out to the full team.
Common problems and fixes
Use these troubleshooting steps if you encounter issues during setup.
Import fails with an error message
⚠️ Cause: The file uses the wrong template, hidden formatting, merged cells, or column headers that do not match the selected Sortly import option.
🔧 Fix: Open Sortly’s template side-by-side and verify every header spelling, capitalization, and spacing. Delete any test rows or comments. If Excel import continues to fail, save a clean CSV version and try again.
Imported items are missing data or displaying incorrectly
⚠️ Cause: The spreadsheet contains merged cells, invalid characters, line breaks inside cells, or mismatched data types such as text in a number column.
🔧 Fix: Open your CSV in a text editor to inspect the raw data. Look for special characters, line breaks within cells, or non-numeric values in quantity or price fields. Clean the data and re-export as CSV from Excel or Google Sheets.
Folder structure becomes cluttered and hard to navigate on mobile
⚠️ Cause: Too many nested sub-folders or overly specific folder names cause the app interface to become confusing.
🔧 Fix: Flatten your hierarchy. Keep primary folders to location names only (Warehouse, Retail Floor, Storage). Use custom tags or item fields to capture product type, supplier, or other attributes instead of creating folders for each variant.
Team members don’t receive low-stock alerts
⚠️ Cause: Minimum levels or quantity alert conditions were not set, the relevant report is not being checked, or the user’s notification settings are disabled.
🔧 Fix: Confirm that minimum levels are set for key items, then review Sortly’s Reports or Alerts area depending on your plan. Ask team members to check their notification settings and test the workflow by reducing a sample item’s quantity below the threshold.
You can’t find items after import because location data didn’t transfer
⚠️ Cause: Your spreadsheet had location data in a column that did not map cleanly to Sortly’s folder, location, or custom field structure.
🔧 Fix: Use Sortly’s bulk edit feature to manually assign items to the correct folders. Or, re-import using the selected template’s exact field names and verify folder assignments in the preview before confirming.
Verification checklist
- Your Sortly account is created and you can log in from desktop and mobile app
- Folder structure is created and matches your physical storage areas (3–6 primary folders, no more)
- Existing inventory items have been imported through the selected CSV or Excel workflow, and the total item count matches your spreadsheet
- At least 5 minimum levels or quantity alert thresholds are configured for your top products
- At least one team member has been invited and has accepted their invitation
- A sample item has been reduced below its threshold and the low-stock report or alert behavior has been checked
- You can scan a barcode with the mobile app (if your product supports it) or manually add an item via the app
- The dashboard shows accurate inventory levels when you spot-check 3 random SKUs against physical stock
When to consider a different approach
Sortly is ideal for visual, location-based inventory with a small-to-medium team. However, depending on your scale, it might not be the optimal fit for every business.
If your operation requires or anticipates needing advanced manufacturing features (bill of materials, work order tracking, or multi-stage assembly), Sortly’s simple hierarchy will feel limiting. Similarly, if you need deep integration with accounting software (automatic COGS posting to QuickBooks, real-time P&L impact), Sortly’s focus on tracking quantities rather than financial reconciliation may leave you doing manual spreadsheet work.
If you manage a large retail chain with hundreds of locations and need enterprise-grade reporting, user permission controls, or custom API integrations, Sortly’s free and lower-tier plans won’t scale. You’d be better served by dedicated ERP systems.
For a product-level evaluation of Sortly itself, read our Sortly review. If your workflow outgrows Sortly, compare broader database software options before moving to enterprise-grade systems.
Frequently asked questions
Here are answers to common questions about setting up Sortly.
Q: Can I import inventory from multiple spreadsheets or locations at once?
A: Sortly supports bulk import workflows using CSV or Excel files. You can format separate spreadsheets for different locations or suppliers, then upload them sequentially or combine them into a single file before importing. Each import adds to your existing inventory, so verify your item counts don’t double up.
Q: What happens to my data if I upgrade from the free plan to a paid plan?
A: Your data should remain intact. Upgrading typically unlocks additional limits or features, such as more unique items, more user licenses, reporting, integrations, or API access. Verify the current plan matrix before upgrading.
Q: Can I export my data if I leave Sortly?
A: Sortly’s help documentation describes export options through reports, including CSV or Excel exports. You should be able to move your data to another system, though you may need to reformat it to match the new tool’s template.
Q: How often should I do a physical count to reconcile with Sortly?
A: Best practice is a full physical count once per quarter, with spot checks monthly on high-value or fast-moving items. Use reports and activity history available on your plan to track discrepancies and identify problem areas.
Q: Do I need to manually update quantities, or can Sortly sync with my point-of-sale system?
A: That depends on your plan and integrations. Basic setups usually rely on manual updates, scanning, or imports. API and webhook options are typically higher-tier features, so check Sortly’s current integrations and plan limits before assuming POS automation is available.
Next steps
- If Sortly looks like a fit, read the Sortly review.
- If you are ready to implement, follow the Sortly inventory setup guide.
- If your inventory data needs custom tables, compare options in the small business database software guide.
Sources and notes
- Sortly official pricing page — used to verify free plan limits, user licenses, paid tiers, QR label creation, QuickBooks Online integration, and API/webhook availability
- Sortly Glossary – Inventory Management — inventory management concepts and process context
- Sortly Help Center – Set Up Your Inventory — folder structure and inventory setup guidance
- Sortly Help Center – Add Folders — creating folders on web and mobile
- Sortly Help Center – Bulk Importing New Items/Folders — CSV and Excel import templates and troubleshooting
- Sortly Help Center – Setting Min Levels — item-level minimum threshold setup
- Sortly Help Center – Quantity Alerts — quantity alert behavior and notification use cases
- Sortly Help Center – Reports Overview — low-stock reports, inventory summary, and exportable reports
- Sortly Help Center – User Roles and Licenses — team invite flow, user roles, and license limits
- Sortly Help Center – Export Inventory — CSV, Excel, and PDF export options
Disclaimer
This guide is for general informational purposes only and does not constitute professional accounting, tax, legal, or financial advice. Pricing, features, plan limits, and menu names were checked against Sortly’s official website and help materials as of June 2026 and may change without notice. Always consult a qualified professional for advice specific to your business situation. PickrTech may earn a commission when you sign up through our links at no extra cost to you. Our recommendations are based on independent evaluation and are not influenced by compensation.
Last reviewed: June 2026 by the PickrTech editorial team.