This article contains affiliate links to UpdraftPlus. If you purchase through those links, PickrTech may earn a commission at no additional cost to you. This does not affect our editorial evaluation.
TL;DR: UpdraftPlus protects your WordPress site against data loss, hacking, and accidental deletions. The free version connects to Google Drive, Dropbox, Amazon S3, and other cloud storage. Install the plugin, link your cloud account, set a daily backup schedule, and run one test backup. Total setup time: about 15 minutes. For a deeper dive into features and pricing, see our full UpdraftPlus review.
Where this guide fits: This setup guide is for readers who already chose UpdraftPlus. If you are still comparing WordPress backup plugins, start with the plugin comparison. After you finish setup, use the backup testing guide to confirm that your restore process works.
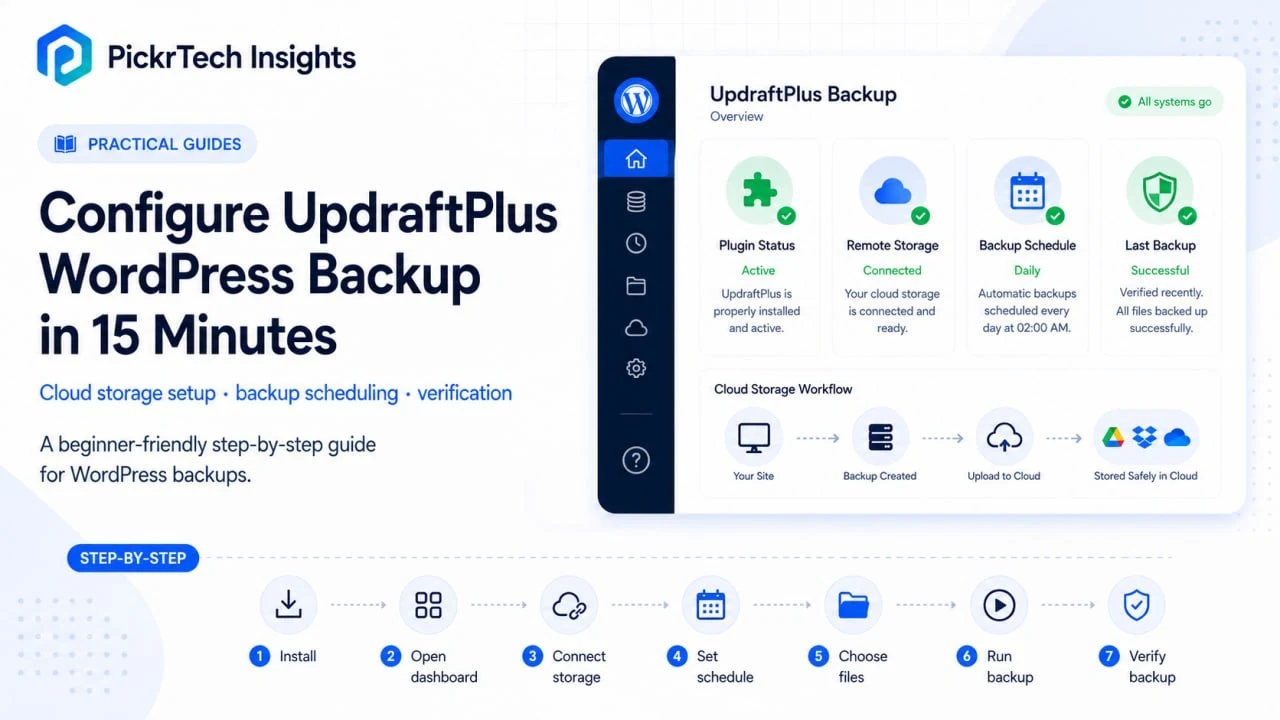
UpdraftPlus WordPress backup setup overview with cloud storage, schedule, and verification workflow.
What you need before you start
WordPress version and hosting. Any reasonably current self-hosted WordPress install will run UpdraftPlus. The developers support WordPress versions going back many years and PHP up through the 8.x series, so unless your host is running something ancient, you’re covered. Shared, VPS, and dedicated servers all work. To check what you’re running, go to Tools > Site Health > Info in your WordPress admin — it lists both your WordPress and PHP versions.
A cloud storage account. The free version supports Google Drive, Dropbox, Amazon S3 (and S3-compatible services), Rackspace Cloud Files, DreamObjects, OpenStack Swift, plain FTP, and email delivery. Pick whichever service you already use — your existing credentials work fine. One catch worth knowing upfront: Microsoft OneDrive, Azure, Backblaze B2, and SFTP are Premium-only destinations. If your organization lives in the Microsoft ecosystem and OneDrive is your only option, factor that in before you start.
Administrator access. You need admin privileges to install plugins and configure backups. If you’re managing a client site, gather those login details first.
Time and difficulty. About 15 minutes from installation to your first test backup. Beginner level — no coding required; everything happens through point-and-click menus.
Cost. The free tier handles most small business backup needs, and this guide covers only the free tier. There’s a full 12-month cost breakdown further down.
Set up UpdraftPlus step by step
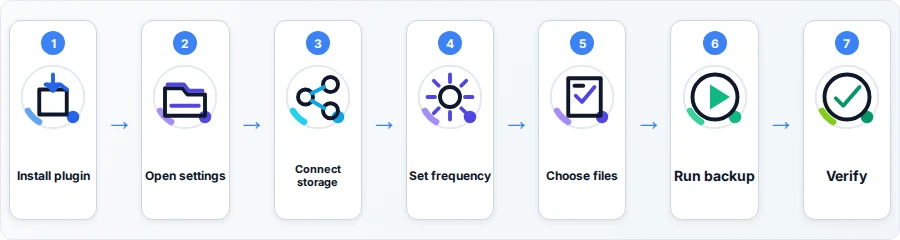
Step 1: Install and activate the UpdraftPlus plugin
Log into your WordPress admin dashboard and go to Plugins > Add New in the left sidebar. Type “UpdraftPlus” into the search box and press Enter. You’ll see “UpdraftPlus – Backup/Restore” with a blue icon.
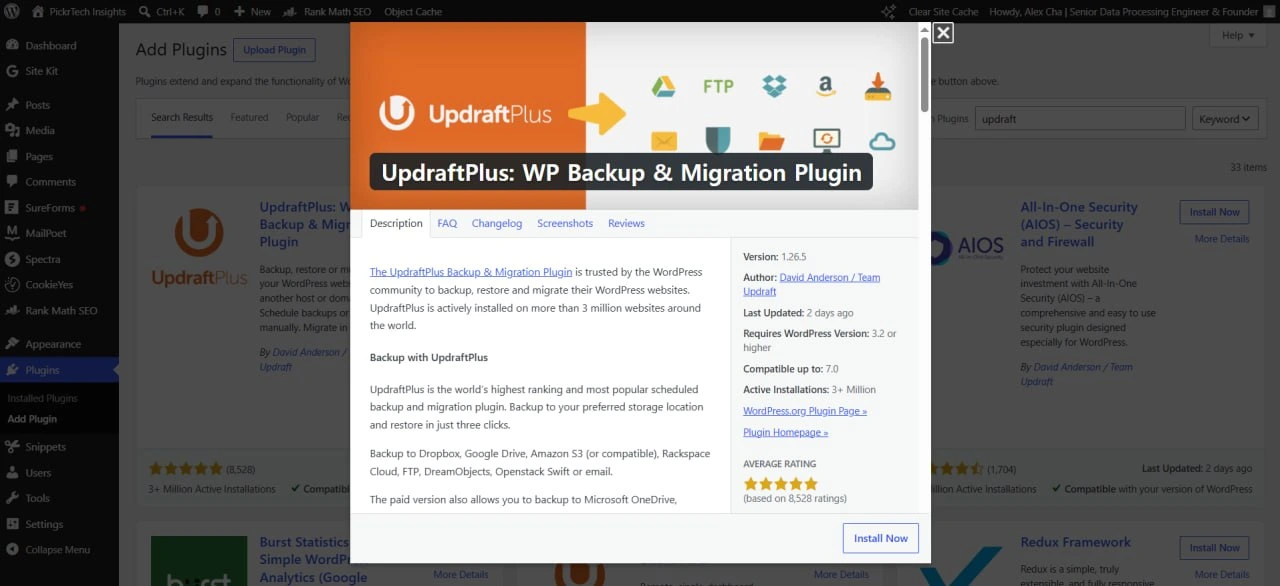
UpdraftPlus plugin details in the WordPress plugins screen before activation.
Click Install Now. WordPress downloads and prepares the files, then the button changes to Activate. Click it to turn on the plugin. You’ll see a success message and a new UpdraftPlus menu item, though the main settings live under Settings.
Expected result: The plugin is installed and active.
Security check: Confirm that the free plugin is version 1.26.5 or later, or that Premium is version 2.26.5 or later. TeamUpdraft released these versions in June 2026 to patch a serious vulnerability that could allow full site takeover on affected installs. If WordPress shows an older version, update it before connecting storage or running a backup. See the official TeamUpdraft security update.
💡 Pro tip: If UpdraftPlus doesn’t appear in search, confirm you’re searching the WordPress.org repository (the default). Some hosts restrict access — if that’s your situation, download the plugin from wordpress.org and use Plugins > Add New > Upload Plugin instead.
Step 2: Open the UpdraftPlus settings dashboard
Go to Settings > UpdraftPlus Backups in your admin sidebar. This opens the main dashboard with several tabs:
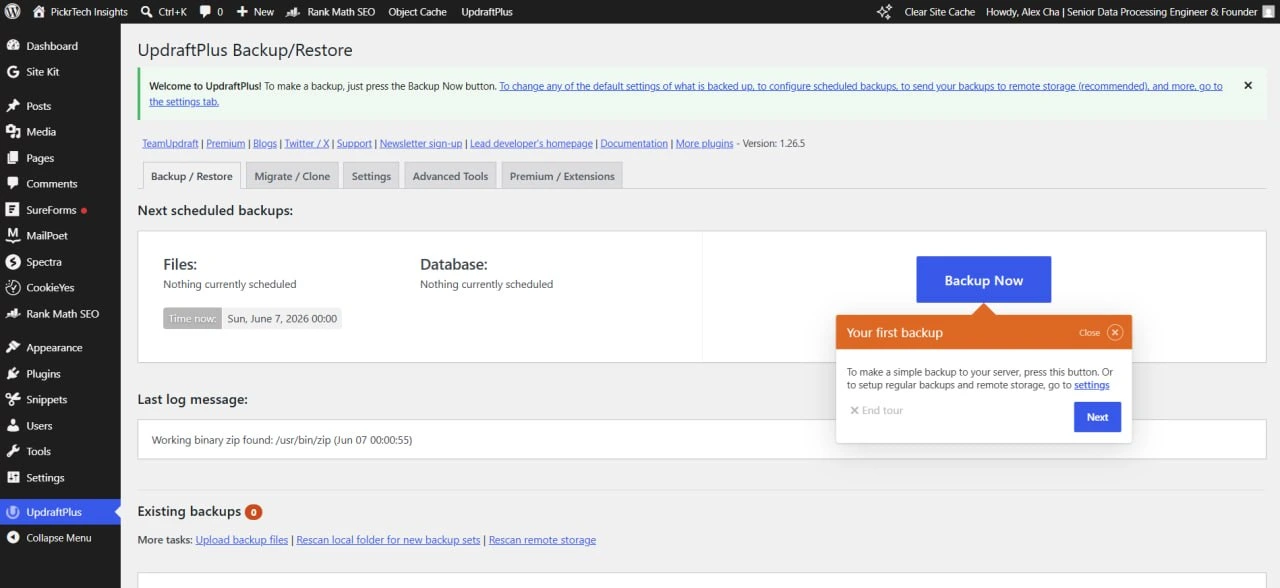
The UpdraftPlus dashboard is where you trigger a manual backup and review backup status.
- Backup Now — Creates a backup immediately
- Existing Backups — Shows completed backups and restore options
- Settings — Configures schedule, file selection, and remote storage
- Advanced Tools — For troubleshooting, site information, and expert utilities
The dashboard displays your last backup (or “No backups yet” if this is new). You’ll spend most of setup in the Settings tab.
Expected result: You can see the UpdraftPlus dashboard with all tabs visible.
Step 3: Connect your cloud storage provider
In the Settings tab, scroll to “Choose your remote storage.” This tells UpdraftPlus where to store your backups. Click your provider’s icon — Google Drive, Dropbox, Amazon S3, or another free-tier option. Icons for Premium-only destinations like OneDrive and Backblaze appear here too, but selecting one just prompts you to upgrade.
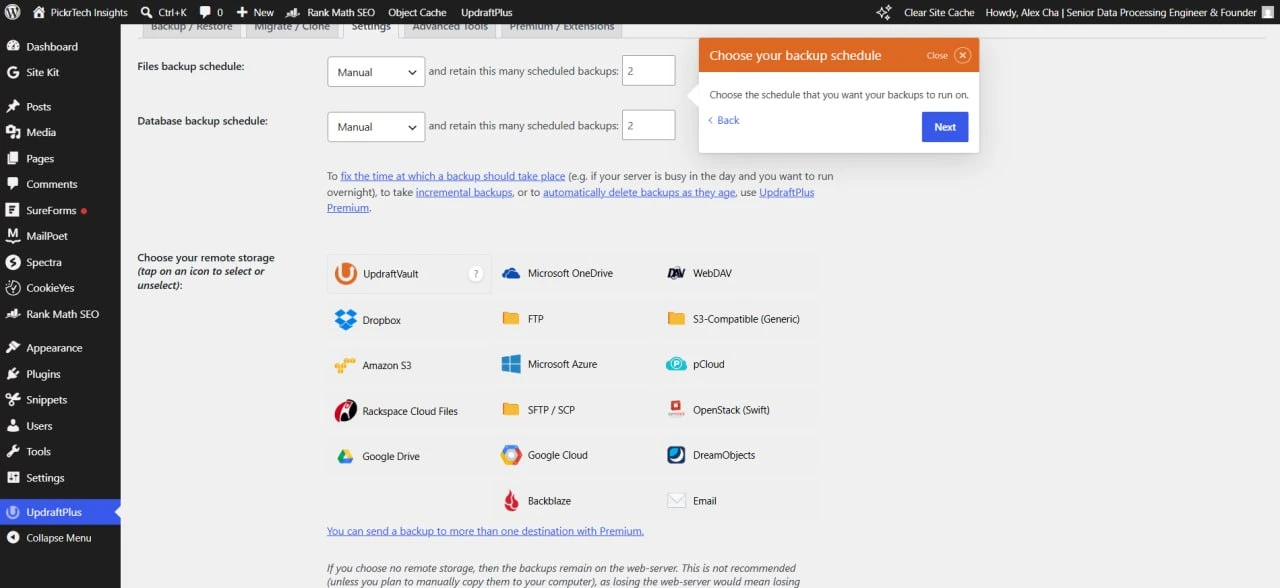
Remote storage settings let you choose where backups are stored and how they are scheduled.
After you choose your provider and save, an Authenticate link appears. Click it. Your browser opens a new window and prompts you to log into your cloud service and grant UpdraftPlus permission to upload files. UpdraftPlus needs write access to create and store backups, so click Allow or Grant Access (wording varies by provider). The browser then redirects back to your dashboard.
You’ll see confirmation that remote storage is connected — usually a green checkmark. If the connection fails, see the setup problems section below.
Connect remote storage — don’t skip this. If you set up UpdraftPlus but never connect a cloud provider, backups stay in the wp-content/updraft folder on the same server as your site. If that server fails, your site and its backups disappear together. A remote provider is what makes the backup survive a server loss.
Expected result: Your cloud storage account is linked and ready to receive backups.
💡 Pro tip: Backing up to more than one cloud provider at once is a Premium feature, but nothing stops a free user from keeping an occasional manual download on a local drive alongside the cloud copy. For a first setup, one connected provider is fine.
Step 4: Set your backup schedule
At the top of the Settings tab, find the “Files backup schedule” and “Database backup schedule” dropdowns. By default both are set to “Manual,” meaning no automatic backups happen unless you run them by hand. For each, choose a frequency — options range from every 2 hours up to monthly (2, 4, 8, and 12 hours; daily; weekly; fortnightly; monthly).
For most small business sites, Daily for both files and database is the sweet spot — your backups never fall more than 24 hours behind. If your content changes constantly, every 12 hours is better; if your site changes once a week, weekly is enough. (Running backups at a specific time of day, like 3 a.m., is a Premium feature — the free version picks the time based on when you saved the schedule.)
Next to each schedule dropdown is a “retain this many scheduled backups” box, set to 2 by default. This is your retention policy: once a third scheduled backup completes, the oldest is deleted automatically, which keeps your cloud storage from filling up.
One thing to understand before you rely on the schedule: UpdraftPlus uses WordPress cron, which needs visitor traffic to trigger scheduled backups. Low-traffic sites may go days without an opportunity. If that’s you, run backups manually each week or set up a server-level cron job. While you’re here, tick the Email checkbox so a report reaches your admin address after each backup — otherwise a silent failure can go unnoticed for months. When you’re done, scroll down and click Save changes.
Expected result: The schedule is saved, and the “Next scheduled backup” timestamp updates.
Step 5: Choose which files to include
Still in Settings, scroll to “Include in files backup.” The free version backs up everything inside your wp-content directory, split into four checkboxes:
- Plugins — every plugin you have installed
- Themes — your active theme plus any others on the site
- Uploads — your media library (images, PDFs, videos)
- Any other directories found inside wp-content — caches, language files, and folders created by other plugins
Keep all four checked. Combined with the database backup, this covers everything unique to your site. The one exception: if your uploads folder is massive (tens of gigabytes of video, say), you can uncheck it to reduce backup size and back it up separately on a slower schedule. Plugins and themes should always stay checked — restoring a database without them breaks your site layout, because the database holds your posts and settings but not the theme and plugin files that render them.
⚠️ Know what the free version does NOT back up: WordPress core files (wp-admin, wp-includes) and your wp-config.php file are excluded — backing those up requires Premium’s “more files” feature. For disaster recovery this is usually fine: you reinstall a fresh copy of WordPress (which replaces core files anyway), then restore your UpdraftPlus backup on top. But two consequences follow. First, if you’ve customized core files, those customizations aren’t protected. Second, after a total server loss you’ll need to re-enter your database credentials in a new wp-config.php, so keep those somewhere safe off the server.
Below the checkboxes, an exclusion field is pre-filled with entries like backup* and *backups — these stop UpdraftPlus from backing up its own backup files. Leave them alone, then click Save changes.
Expected result: File selection is saved with your preferences.
Step 6: Run your first manual backup
Setting a schedule is not the same as proving it works, so run one backup now. Go back to the first tab and click the big Backup Now button. A dialog appears with three checkboxes:
- Include your database in the backup — posts, pages, comments, settings
- Include your files in the backup — plugins, themes, uploads
- Send this backup to remote storage — uploads the archives to the cloud account you connected in Step 3
For your first test, keep all three checked so the full process gets exercised, then click Backup Now. A progress indicator shows the backup running; it typically takes 2–10 minutes depending on site size. Don’t close the tab or navigate away. Once complete, the backup appears in the Existing Backups tab with its timestamp, the components it contains, and download/restore buttons.
Expected result: A complete backup appears in Existing Backups with download and restore options.
💡 Pro tip: If the backup times out, it’s almost always a site over 500MB hitting a PHP limit. Increasing PHP limits fixes most cases; alternatively, lower the “Split archives every” value (default 400MB) under Settings > Show expert settings so each chunk finishes faster.
Step 7: Verify the backup reached your cloud storage
A backup only counts if it actually left your server. Open a new tab and log into your cloud storage. Google Drive users will find a folder named “UpdraftPlus”; Dropbox stores backups under Apps > UpdraftPlus.com. You should see a set of archives sharing the same date-stamped filename prefix:
- A -db.gz file (compressed database backup)
- Several .zip files — one each for plugins, themes, uploads, and “others,” split into numbered parts if large
Those files confirm UpdraftPlus connected and uploaded successfully. If you see nothing new after 15 minutes, check the log (Settings > UpdraftPlus Backups > Existing Backups > View Log) for upload errors. Back in WordPress, confirm the backup is listed under Existing Backups too — that means both WordPress and your cloud provider agree it exists.
Expected result: Backup files are visible in both your cloud storage account and the Existing Backups list. This confirms your restore point actually lives off-server — but it does not prove the backup can be restored. Run a real restore drill using the backup testing guide.
What a year of backups actually costs
For many small business sites, the first-year cost is $0. For the comparison below, assume one backup set is 100MB–500MB and the retention limit is 2, so stored backups use roughly 200MB–1GB. Actual size depends mainly on the media library and other files inside wp-content. The table uses U.S. prices checked in July 2026; Google One pricing can vary by country and account.
| Setup | Plugin cost | Storage cost | 12-month total |
|---|---|---|---|
| Free UpdraftPlus + Google Drive free tier (15GB) | $0 | $0 | $0 |
| Free UpdraftPlus + Google One 100GB (media-heavy site) | $0 | $19.99/year (U.S.; check local pricing) | $19.99 |
| UpdraftPlus Premium Personal (covers 2 sites) | $70/year | $0 | $70 |
Most single-site owners never need to pay. If you decide Premium is worth it, you can get UpdraftPlus Premium; for the full tier breakdown by site count (Business, Agency, Enterprise, and Gold), see our UpdraftPlus review. Plan prices are TeamUpdraft’s published annual rates, checked on the official pricing page.
Two problems most likely to hit during setup
Two failures account for most first-time setup trouble. Both are fixable without touching code.
Cloud storage won’t authenticate
Symptom: You click Authenticate in Step 3, but the connection fails or never returns a green checkmark.
Likely cause: OAuth providers require a secure HTTPS connection with a valid SSL certificate. If your site still runs on HTTP, or the certificate is expired or self-signed, the provider blocks the handshake. Security plugins can also intercept the OAuth redirect.
Fix: Confirm your site loads over HTTPS (look for the lock icon). If it doesn’t, ask your host to enable SSL. Clear your browser cache and cookies, then retry. If you run a security plugin like Wordfence, temporarily allow the OAuth callback URL in its firewall, then reconnect.
Scheduled backups never run (but manual ones work)
Symptom: A manual Backup Now works, but the scheduled backup you set in Step 4 never fires.
Likely cause: UpdraftPlus relies on WordPress cron, which only runs when your site gets visitor traffic. Low-traffic sites can go days without triggering it, and some hosts disable the loopback requests WordPress cron depends on.
Fix: Check the “Next scheduled backup” timestamp in Settings. If that time passes with no backup, WordPress cron is probably not firing. Ask your host whether they support loopback requests and WordPress cron; if not, set up a server-level cron job to call wp-cron.php hourly, or simply run a manual backup each week.
For other errors — backups that time out on large sites, uploads that finish in UpdraftPlus but never appear in cloud storage, or “permission denied” on upload — work through the symptom-by-symptom UpdraftPlus errors guide.
Confirm your setup is complete
Run through this before you consider the site protected:
- UpdraftPlus is installed and active (visible under Settings > UpdraftPlus Backups)
- Cloud storage is connected (green checkmark or success message)
- Schedule set to at least Daily for both files and database
- Plugins, themes, and uploads are all included in the file backup
- First manual backup completed and shows in Existing Backups
- The -db.gz and .zip archives are visible in your cloud account
- “Next scheduled backup” shows a time within 24 hours
- Email reports are enabled so failures reach your admin address
When a different backup approach makes more sense
UpdraftPlus with daily cloud backups is the standard choice for small business owners and freelancers. A few situations call for something else:
Busy WooCommerce stores. A daily backup means an 11 p.m. crash can lose a full day of orders, and even the tightest free schedule (every 2 hours) leaves a gap. Stores taking orders around the clock are better served by real-time services like Jetpack VaultPress Backup or BlogVault, which capture each order as it happens.
Sites with regulated or sensitive data. If a backup contains health information, payment-card data, or other personal data, confirm the required encryption, access-control, retention, audit, and cross-border transfer controls with your compliance owner. UpdraftPlus Premium can encrypt the database backup, but that feature alone does not make a WordPress backup process HIPAA-, PCI DSS-, or GDPR-compliant. A managed WordPress host or backup service with documented controls and contractual commitments may be a better fit.
Frequent staging and development work. If you regularly test changes before deploying, you need clone and staging tools, not just backups. Many managed WordPress hosts provide separate staging environments with controlled push-to-live workflows. UpdraftPlus provides temporary staging through paid UpdraftClone tokens, which may fit occasional tests better than a continuous development workflow.
If one of these fits, compare offsite backup alternatives, and if you’re evaluating vendors formally, build a software evaluation scorecard before committing.
Frequently asked questions
Is cloud storage included in the free version of UpdraftPlus?
Yes. The free version fully supports Google Drive, Dropbox, Amazon S3, and several other providers, using your own existing accounts — so UpdraftPlus never charges you for storage. Paid plans add extra destinations (OneDrive, Backblaze, SFTP, and more) plus 1GB of the company’s own UpdraftVault storage, but cloud backup itself is free.
Will UpdraftPlus backups fill up my cloud storage?
Not with the defaults. The “retain this many scheduled backups” setting — next to the schedule dropdowns — is set to 2, so older scheduled backups delete automatically. A typical site produces 100MB–500MB per backup, so you’re usually storing under 1GB total. More granular time-based retention (keep one backup per month for a year, say) is a Premium feature.
Can UpdraftPlus restore my site if my web host goes down?
If your entire server fails, the backups in cloud storage survive because they’re stored separately. To restore, you’ll set up new hosting, install a fresh copy of WordPress with UpdraftPlus, then use the restore feature to import your old backup. This works reliably but takes a few hours, so for faster recovery some owners pair UpdraftPlus with a host that also offers server-level backups.
Next steps
- Choose the right storage destination with our local vs cloud backup guide.
- Run a restore drill with the WordPress backup testing guide.
- Hit an error? Work through the UpdraftPlus errors guide.
- Building a broader company backup strategy? Review the 3-2-1 backup plan.
Sources and notes
- WordPress Plugin Repository – UpdraftPlus — free-version storage destinations, schedule options, and free vs. Premium feature split
- TeamUpdraft – UpdraftPlus Premium pricing — Personal, Business, Agency, Enterprise, and Gold plan prices and site counts
- TeamUpdraft – Back up more WordPress files — confirmation that WordPress core and wp-config.php backups are a Premium feature
- Google One – Plans and pricing — free 15GB account storage and the 100GB Basic plan; regional pricing may vary
- TeamUpdraft – June 2026 security update — minimum patched versions for UpdraftPlus free and Premium
Disclaimer
Pricing, features, and plan details were verified against each product’s official website in July 2026 and may change without notice.
Last reviewed: July 2026 by the PickrTech editorial team.