This article may contain affiliate links. We may earn a commission when you sign up through our links — at no extra cost to you. Our recommendations are based on independent evaluation and are not influenced by commissions.
TL;DR: Before you update plugins or themes, test your backup on a staging site or local environment to make sure your data actually restores. You’ll need an existing UpdraftPlus backup, a staging domain (or Local by Flywheel on your computer), and about 45–60 minutes. The payoff: peace of mind that you can recover your site if something goes wrong.
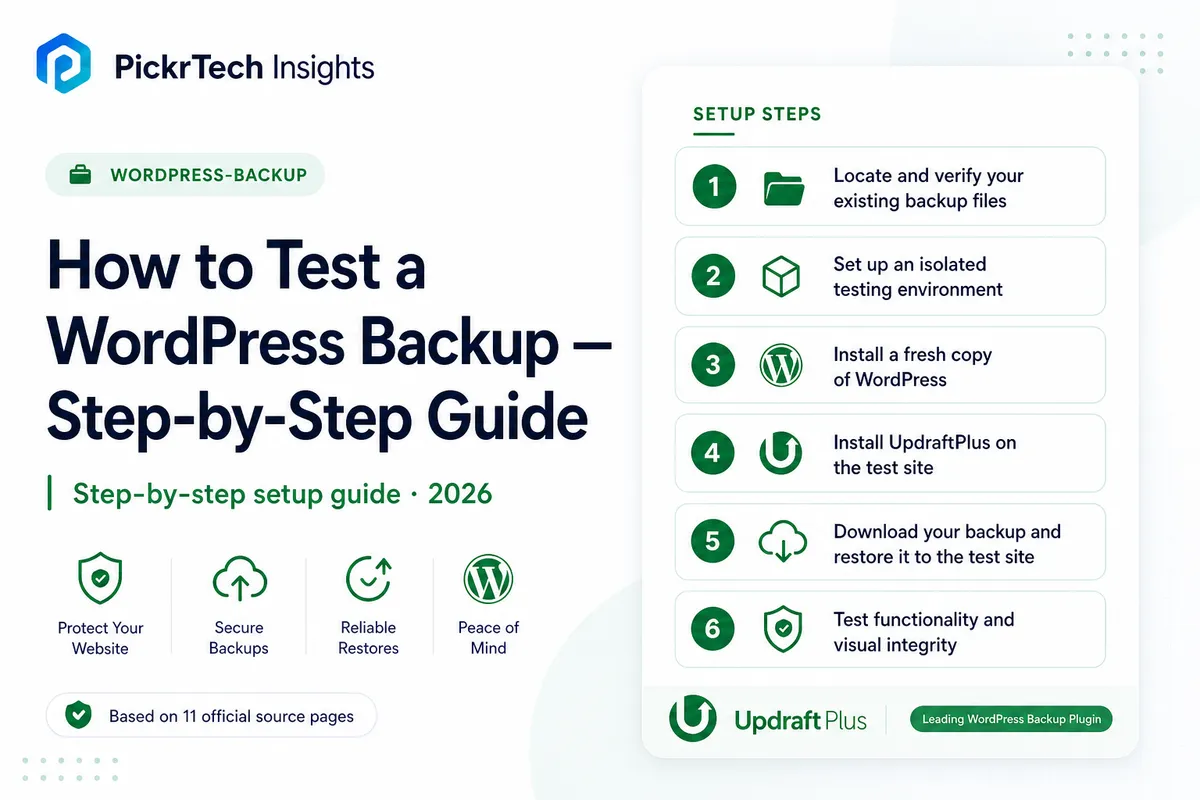
How to test a WordPress backup — 6-step setup guide featuring UpdraftPlustest a WordPress backup
Before you begin: What you’ll need
Account requirements
You need a WordPress hosting account for your live site, plus the ability to create a staging environment. Most hosts offer a staging feature through their control panel. If you prefer working on your own computer, download Local by Flywheel (free for Mac, Windows, and Linux).
Data needed
You must have at least one complete backup created by UpdraftPlus that includes your database, plugins, themes, and uploads folder. Ideally, this backup is no more than 1–2 weeks old so it reflects your current site. Don’t have a recent backup? Create one now before proceeding.
Software and tools
If testing locally, grab Local by Flywheel from localwp.com. Otherwise, you’ll use your hosting provider’s staging tool (check your hosting dashboard for a Staging or Clone Site button). You’ll also need UpdraftPlus installed on both your live site and your test environment.
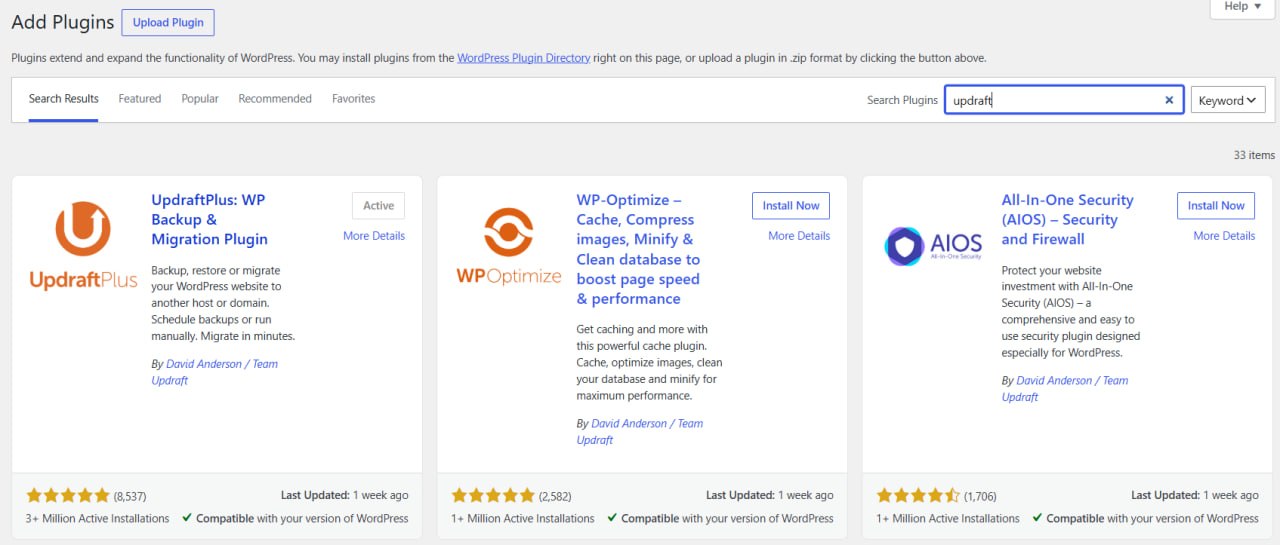
Search for UpdraftPlus in the WordPress Add Plugins screen and activate it before testing your backup
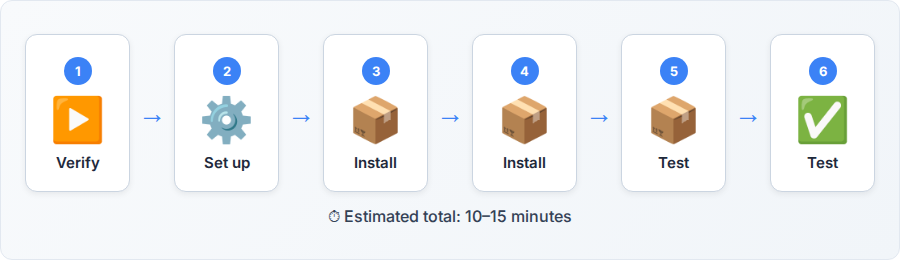
Estimated time: 45–60 minutes (mostly waiting for backup downloads and restore processing)
Difficulty: Beginner
Cost implications: Free. UpdraftPlus offers everything you need in its free version, and Local by Flywheel is free. No paid plans required.
Step-by-step walkthrough
Step 1: Locate and verify your existing backup files
Log into your WordPress dashboard and head to Updraft Plus > Existing Backups. You’ll see a chronological list of all your backups, each showing the date, time, size, and a green checkmark if all components are present.
Look for a backup containing four core items: database (posts, pages, settings), plugins, themes, and uploads (media files).
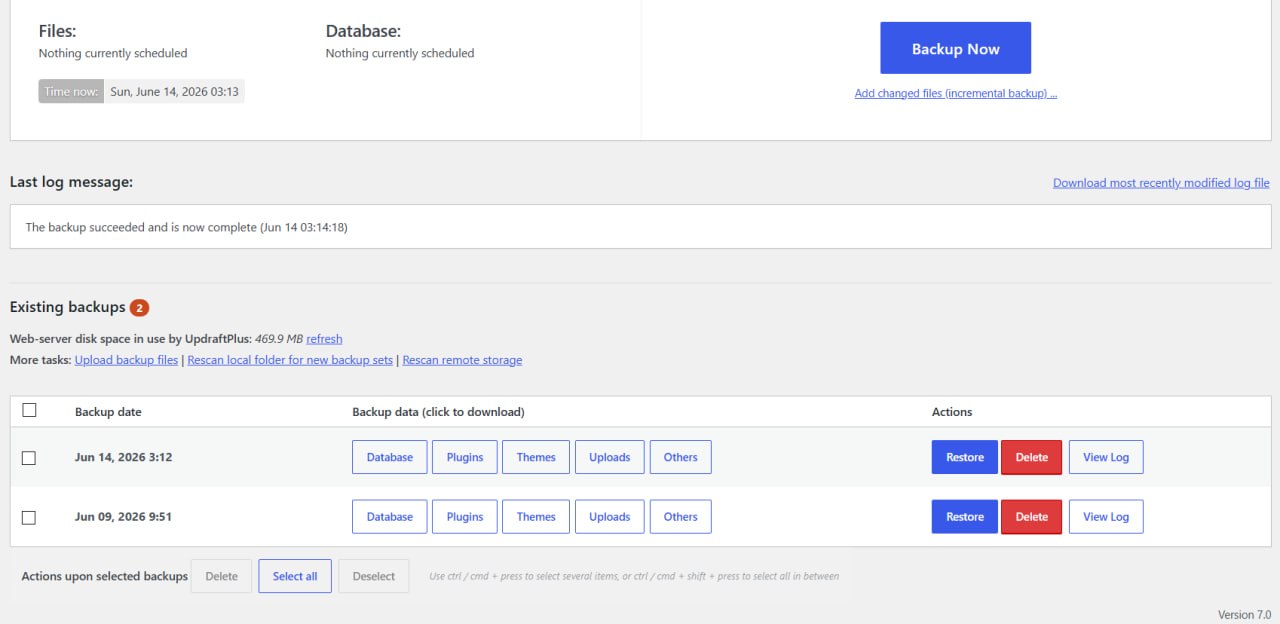
UpdraftPlus Existing Backups showing two backup sets with Database, Plugins, Themes, Uploads, and Others components
According to UpdraftPlus, a complete backup must include all four. If you don’t see a recent backup with all four components, click Backup Now to create one immediately.
Expected result: You’ve confirmed a complete backup exists with today’s date or very recent. If it’s older than two weeks, create a fresh one now.
💡 Pro tip: Large sites (over 500 MB) may take 5–10 minutes to back up. Let it finish before moving on.
If you haven’t set up automated backups yet, take a few minutes to configure UpdraftPlus on your live site before proceeding.
Step 2: Set up an isolated testing environment
You have two paths: use your hosting provider’s staging feature, or build a local test site on your computer.
Option A: Hosting staging site — Log into your hosting control panel (cPanel, Plesk, or your host’s dashboard) and look for a Staging or Clone Site button. Click it and follow the wizard to create a copy of your live site on a staging subdomain (e.g., staging.yoursite.com). This typically takes 5–10 minutes. The staging site is isolated, so restoring there won’t touch your live site.
Option B: Local environment — Download Local by Flywheel from localwp.com and install it. Open Local and click Create a New Site. Name it something like “site-backup-test”, keep the default environment settings, and click Create. Local will spin up a local WordPress installation on your computer in about 2–3 minutes.
Expected result: You now have either a staging subdomain or a local site running on localhost. Do not use your live site for testing — restoring over live data risks overwriting your real content and creating conflicts.
Step 3: Install a fresh copy of WordPress
If you chose staging, your host probably provided a blank WordPress install automatically. If not, use your host’s one-click installer to set up WordPress on the staging domain.
If you chose Local by Flywheel, WordPress is already installed. Open Local, find your test site in the sidebar, and click Admin to access the WordPress dashboard.
Expected result: You can access a blank WordPress dashboard at your staging URL or localhost. The site has no content yet — just default WordPress.
Step 4: Install UpdraftPlus on the test site
In your test site’s WordPress dashboard, go to Plugins > Add New. Search for “UpdraftPlus” and click Install Now on the official plugin by DiskLatch Limited. After installation, click Activate.
You’ll see a new Updraft Plus menu in the left sidebar. Click it to open the UpdraftPlus dashboard — this is where you’ll upload and restore your backup files.
Expected result: UpdraftPlus is active on your test site. The plugin dashboard is accessible, and you see tabs for “Current Status”, “Existing Backups”, and “Settings”.
💡 Pro tip: You don’t need to configure remote storage on the test site. Just install the plugin and move to the restore.
Step 5: Download your backup and restore it to the test site
Go back to your live site’s WordPress admin and navigate to Updraft Plus > Existing Backups. Find the backup you verified in Step 1. Click the Download button next to it. A zip file will download to your computer (this may take several minutes for large backups).
Once downloaded, switch to your test site’s WordPress admin. Go to Updraft Plus > Existing Backups and scroll to the bottom to find the Upload backup files section. Click Choose Files and select the zip file you just downloaded. Then click Upload.
After the upload completes (5–10 minutes depending on file size), click the Restore button next to your uploaded backup. A dialog will ask which components to restore. Select all four: Database, Plugins, Themes, and Uploads. Click Restore and let the process complete.
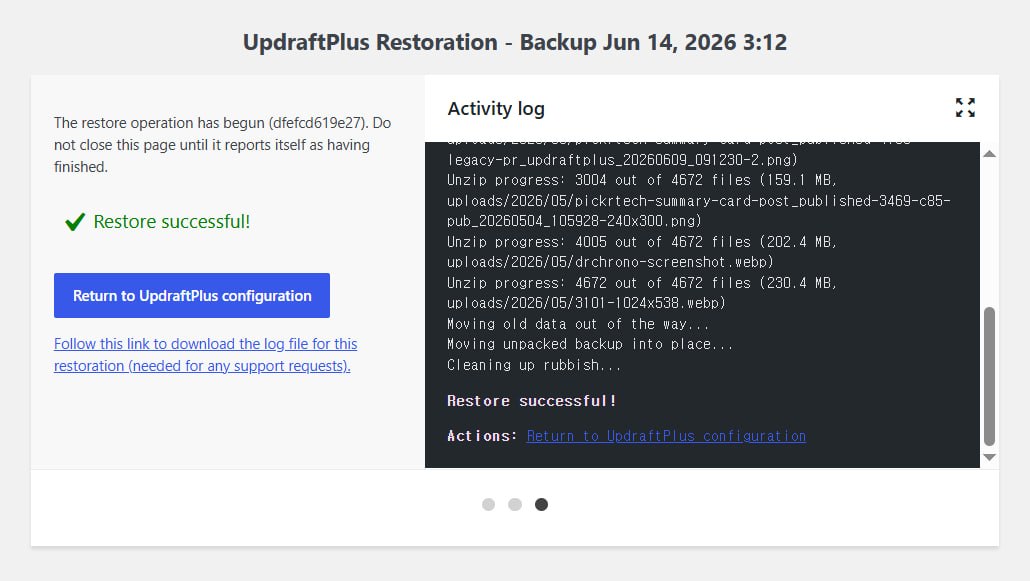
UpdraftPlus restore successful confirmation with activity log showing unpack and restore completion
You may see a “restore in progress” spinner — this is normal and can take 10–20 minutes for larger sites.
Expected result: The restore finishes without errors. You see a “Restore successful” message. Your test site now contains all the content, plugins, themes, and media from your live site.
⚠️ Important: If the restore fails midway with a white screen or timeout error, see the “Common problems and fixes” section below.
Step 6: Test functionality and visual integrity
Once the restore completes, log out and visit your test site’s homepage as a regular visitor. The site should look identical to your live site. Click through several pages, test navigation, and try any contact forms or interactive features.
Check the Media Library by going to Media > Library in the dashboard. All images and files should be present. Visit a page with embedded images and confirm they load (they may temporarily show broken-image icons if the domain changed, but this is easily fixed).
Test user login by attempting to log in with a test user account from your live site. If login fails, check that the database restore completed fully.
Navigate to Settings > Permalinks and click Save Changes without modifying anything. This regenerates the .htaccess file and fixes broken internal links that often occur after a database restore to a different domain.
Expected result: The test site works like your live site. Pages load, forms submit, images display, and menus function. If something is broken, document it and refer to the “Common problems and fixes” section.
💡 Pro tip: Create a simple document listing which pages you tested and any issues found. This helps you decide whether your backup is safe to restore, or whether you need to investigate plugin conflicts before your next update.
Common problems and fixes
You may encounter specific errors during the restore process.
Internal pages return “404 Not Found” errors after restoring
⚠️ Cause: The database restore changes your site’s URL structure, which resets the WordPress permalink routing rules in the .htaccess file.
🔧 Fix: Log into the test site’s WordPress dashboard, go to Settings > Permalinks, and click Save Changes without modifying anything. WordPress will regenerate the .htaccess file and fix the broken URLs.
The restore process fails halfway through with “Fatal Error” or white screen
⚠️ Cause: The test server’s PHP memory limit is too low to process your backup file. Large backups (over 200 MB) often exceed the default 128 MB memory limit.
🔧 Fix: Via SFTP or your host’s file manager, open the test site’s wp-config.php file. Find the line define('WP_MEMORY_LIMIT', '40M'); (or similar) and change it to define('WP_MEMORY_LIMIT', '256M');. Save the file and retry the restore. If using Local by Flywheel, right-click your site in Local, choose Settings, and increase the PHP memory limit to 256 MB.
Images in the Media Library are missing or broken after restoring on a local environment
⚠️ Cause: The uploads folder wasn’t included in the original backup, or it failed to extract properly during the restore process.
🔧 Fix: First, verify that your live site’s UpdraftPlus backup includes the uploads folder by checking the backup details. If it does, download the backup again and retry the restore. If images are still missing, manually download the wp-content/uploads folder from your live site via SFTP and upload it to the test site’s wp-content directory. Then refresh the Media Library page in WordPress.
Site URL shows your live domain instead of the test domain
⚠️ Cause: The database restore includes your site’s URL settings, which now point to the live domain (e.g., www.yoursite.com) instead of the test domain (e.g., staging.yoursite.com).
🔧 Fix: Go to Settings > General in the test site’s dashboard. Change the “WordPress Address (URL)” and “Site Address (URL)” fields to match your test domain. Save changes. This tells WordPress to use the correct domain for links and assets.
Plugins are inactive or show as “Must-Use Plugin” after restore
⚠️ Cause: Some plugins require license keys or server configurations that don’t match your test environment. Others may have hardcoded file paths that break during a domain or server change.
🔧 Fix: Go to Plugins > Installed Plugins on the test site. Manually activate any inactive plugins, starting with your most critical ones. If a plugin won’t activate and shows an error, check its settings page to see if it needs reconfiguration (e.g., API keys, license verification). If it’s broken, document this and contact the plugin developer or consider a replacement.
Verification checklist
Use this checklist to confirm your restore is fully functional.
- Backup file contains all four components (database, plugins, themes, uploads)
- Test site was created on an isolated domain or local environment (not on live)
- UpdraftPlus is installed and active on the test site
- Backup restore completed without fatal errors or white screens
- Homepage and key pages load and display content correctly
- Images in the Media Library are present and display on the front-end
- Contact forms or other interactive features submit successfully
- Permalinks are regenerated (no 404 errors on internal links)
- User login works with a test account from your live site
- Site URL in Settings > General matches the test domain
When to consider a different approach
This backup testing workflow using UpdraftPlus and a staging site works well for most WordPress sites. However, a few scenarios may warrant different tools.
If your site uses custom post types, complex database relationships, or proprietary plugins tied to your live server’s file structure, restoring to staging may expose configuration conflicts that don’t show up in a standard restore test. In these cases, tools like Duplicator or All-in-One WP Migration handle custom architectures more gracefully.
If your hosting provider offers a native backup and staging feature (like WP Engine’s Genesis or Kinsta’s WordPress staging), using those tools may be simpler than managing UpdraftPlus backups separately. These host-provided tools are tightly integrated with your server environment.
For very large sites (over 2 GB) or complex setups with multiple database-driven subsystems, testing locally may expose server resource constraints that don’t affect your live hosting. For these scenarios, test your backup directly on a staging subdomain through your host to ensure the test environment matches production specs. You might also want to review WordPress backup tools on PickrTech to explore other backup and staging solutions that fit complex setups better.
Frequently asked questions
Here are answers to common questions about testing backups.
Q: Will testing my backup on a staging site affect my live site?
A: No. A staging site is completely isolated from your live site. Any changes, restores, or plugin tests on staging do not touch your live data. This is why testing on staging (not on live) is crucial before major updates.
Q: How often should I test my backup?
A: Test your backup at least once per month, or whenever you plan a major update (like a new WordPress core version or plugin update). This ensures your backup strategy is working and you catch any issues before they become emergencies. Regular testing builds confidence that you can recover if something goes wrong.
Q: What if my backup is too large to download, or the restore times out?
A: Increase the PHP memory limit and max_execution_time on your test server (see “Common problems and fixes” above). For backups over 1 GB, ask your hosting provider about uploading the backup via SFTP directly to the test site instead of downloading and re-uploading it through the WordPress dashboard. This is faster and avoids timeout issues altogether.
Q: Can I test a backup from UpdraftPlus if I’m using a different backup plugin on my live site?
A: Not directly. Each backup plugin uses its own backup format. If you’re using a plugin other than UpdraftPlus on your live site, download a backup from that plugin and restore it using that same plugin on the test site. However, UpdraftPlus sometimes includes an option to import backups from other sources — check the UpdraftPlus settings for “Restore from another source” or migration tools to see if your plugin is supported.
Q: My test restore looks good, but I’m nervous about restoring to live. What should I do?
A: Confidence in your backup comes from repeated testing. Test your backup again in a few weeks, and you’ll see that the process is consistent and reliable. Before applying major updates, always do one more test run. If you’re concerned about plugin conflicts, test your updates on staging first (before applying them to live), then run a fresh backup. This workflow ensures you’re always backing up a stable site.
Recommended first 30-minute setup order
1. Create or access your staging site (5 minutes). If your host offers staging, create one now via the control panel. If using Local by Flywheel, download and install it, then create a test site. Don’t overthink the configuration — default settings are fine.
2. Download your backup to your computer (5–15 minutes). While your staging site spins up, log into your live WordPress admin, find your most recent UpdraftPlus backup, and download it. Depending on size, this may take a few minutes. Leave the download running in the background.
3. Install WordPress on staging (5 minutes). Finish setting up a blank WordPress install on your staging domain or in Local. You’ll see a default WordPress dashboard with no content.
4. Install UpdraftPlus on staging (3 minutes). Go to Plugins > Add New, search for UpdraftPlus, install and activate it.
5. Upload and restore your backup (10–20 minutes). Once your backup download finishes, upload it to your staging site via UpdraftPlus and start the restore. Let this run while you grab coffee — it may take 10–20 minutes depending on size.
6. Quick functionality check (5 minutes). Once restore completes, visit the homepage, check one page with images, test a form, and regenerate permalinks. If everything looks good, you’re done.
Total: 30–65 minutes depending on backup size. Smaller sites (under 100 MB) will finish in 30 minutes. Larger sites may take 60+ minutes, mostly waiting for downloads and restore processing.
Setup mistakes to avoid
Avoid these common pitfalls to ensure a safe and effective test.
Testing on your live site. Restoring a backup directly to your live WordPress install will overwrite your current database, plugins, and theme files. If the restore fails or corrupts data, your live site goes down. Always restore to staging or local first. This is the single most critical rule.
Restoring an incomplete backup. Before restoring, verify that your backup includes all four components: database, plugins, themes, and uploads. If uploads are missing and you restore, your site will lose media files and show broken-image icons everywhere. Check the backup details in UpdraftPlus before starting the restore.
Ignoring PHP version or server mismatches. If your test server runs PHP 7.4 but your live site runs PHP 8.1, some plugins may not activate or work correctly during testing. Check your live site’s PHP version (in the WordPress admin under Tools > Site Health) and ensure your test environment matches it. If they don’t match, adjust the test server’s PHP version or note the difference in your testing documentation.
Forgetting to regenerate permalinks after restore. A common oversight is skipping the “Settings > Permalinks > Save Changes” step after restoring. This leaves your internal links broken (404 errors). Make this step automatic: every restore test must include a permalink regeneration.
Sources and notes
- UpdraftPlus official site — used to verify backup components and restore procedures
- Official FAQ – UpdraftPlus Backup Contents — confirms the four core backup components
- Local by Flywheel — free local WordPress development environment
- WordPress Documentation – Best Practices for Restores — official guidance on backup and restore safety
- Official Guide – Migrating and Restoring WordPress — detailed UpdraftPlus restore workflow
- Official FAQ – Restoring to a different domain — handling URL changes during restore
- WordPress Codex – Fixing Permalinks — troubleshooting broken links after restore
Disclaimer
This guide is for general informational purposes only and does not constitute professional accounting, tax, legal, or financial advice. Pricing, features, and plan details were verified against each product’s official website as of June 2026 and may change without notice. Always consult a qualified professional for advice specific to your business situation. PickrTech may earn a commission when you sign up through our links at no extra cost to you. Our recommendations are based on independent evaluation and are not influenced by compensation.
Last reviewed: June 2026 by the PickrTech editorial team.