This article may contain affiliate links. We may earn a commission when you sign up through our links — at no extra cost to you. Our recommendations are based on independent evaluation and are not influenced by commissions.
TL;DR: This guide builds one working Trello board you can hand to a small team the same day: four lists with clear movement rules, three labels, a standard for what every card must contain, and one automation. The full build takes about 20 minutes on the free plan (10 boards, 10 collaborators, 250 automation runs per month). Run the readiness test near the end to decide whether the board is actually ready before you invite anyone.
Where this guide fits: This guide is for building your first working Trello project system. If you are still choosing a tool, start with the project management software comparison. Once this board has survived real work, turn it into a repeatable structure with the Trello board templates guide — standardizing and reusing a board across projects is a different job from getting your first one running.
⚠️ Before you build your whole process on the free plan: Trello’s free tier caps each workspace at 10 boards, 10 collaborators, and 250 automation runs per month, with a 10MB per-file attachment limit. These are the walls small teams actually hit — usually the board cap first if you run one board per client, or the automation cap if you lean on Butler rules. Check the official pricing page before committing. Plan details and prices in this guide were verified against Trello’s official pricing and Atlassian support documentation in July 2026.
The starter system you’re building
Most Trello guides hand you an empty board and a list of buttons. That is how teams end up with a tidy-looking board nobody updates by week two. This guide instead gives you one small, opinionated system: four lists, three labels, and a rule for what a card must contain before anyone touches it. Build exactly this first. The rules matter more than the buttons, so read this section before you create anything.
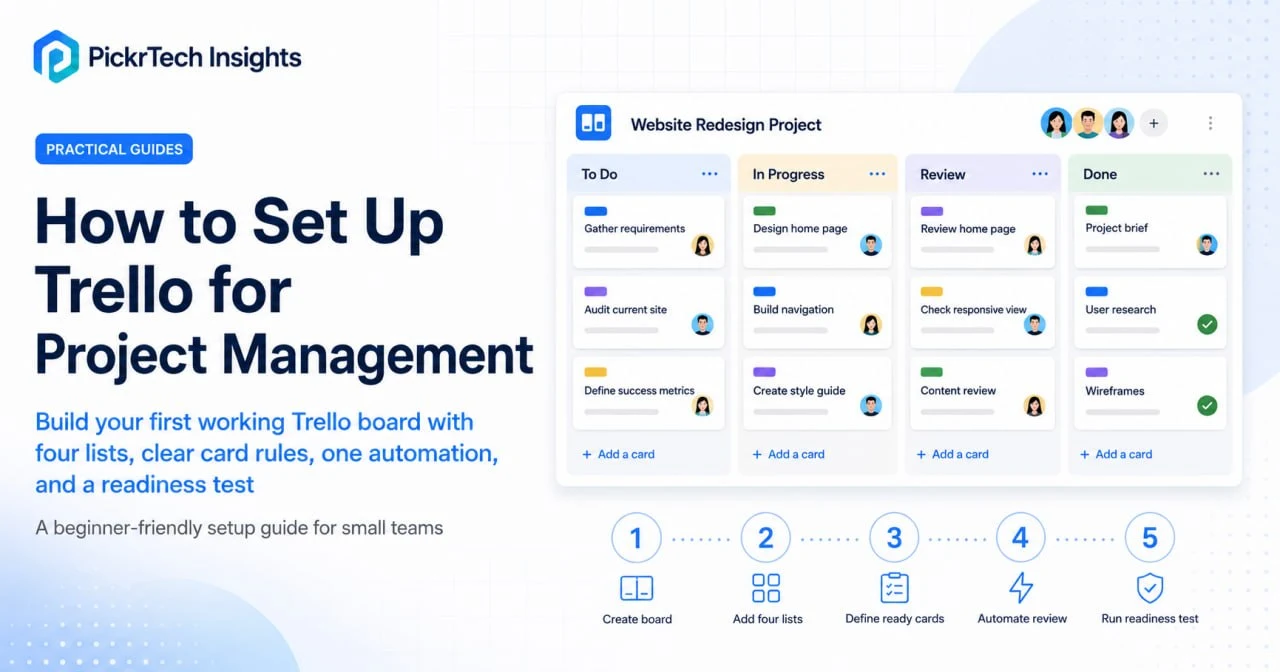
The four lists — and the rule that governs each
- To Do — defined work that is ready to start. A card is allowed here only after it meets the card-ready standard below.
- In Progress — actively being worked. A card enters only when it has one named owner. Cap this list with a work-in-progress limit of about two cards per person; if it becomes a pile, work has stopped moving.
- Review — finished by the owner, waiting on a check or sign-off. Moving a card here means “I’m done — someone else needs to look.”
- Done — accepted work. Only the reviewer moves a card to Done, never the owner. Archive completed cards in this list once a week to keep the board fast.
Three labels, and no more yet
Add just three labels to start: a High priority label, a Blocked label, and one label for the work type or client that matters most to you. Resist adding a fourth until you actually feel its absence. Label sprawl is the fastest way to make a board unreadable, and a new team cannot hold ten colors in their head.
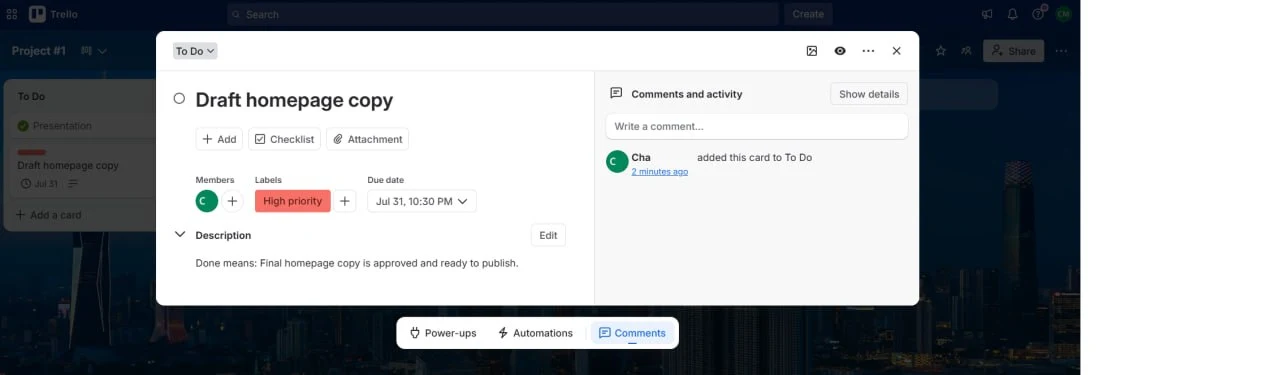
The card-ready standard
This is the rule that does the most work. Before a card is allowed into “To Do,” it must have:
- an action-oriented title — a verb plus an object (“Draft homepage copy”), never a bare topic (“Homepage”);
- exactly one owner;
- a due date;
- a one-line “Done means…” note in the description, so anyone can tell when the card is finished without asking you.
These four requirements are what separate a working board from a wish list. Every rule later in this guide exists to protect them.
Build the board (about 20 minutes)
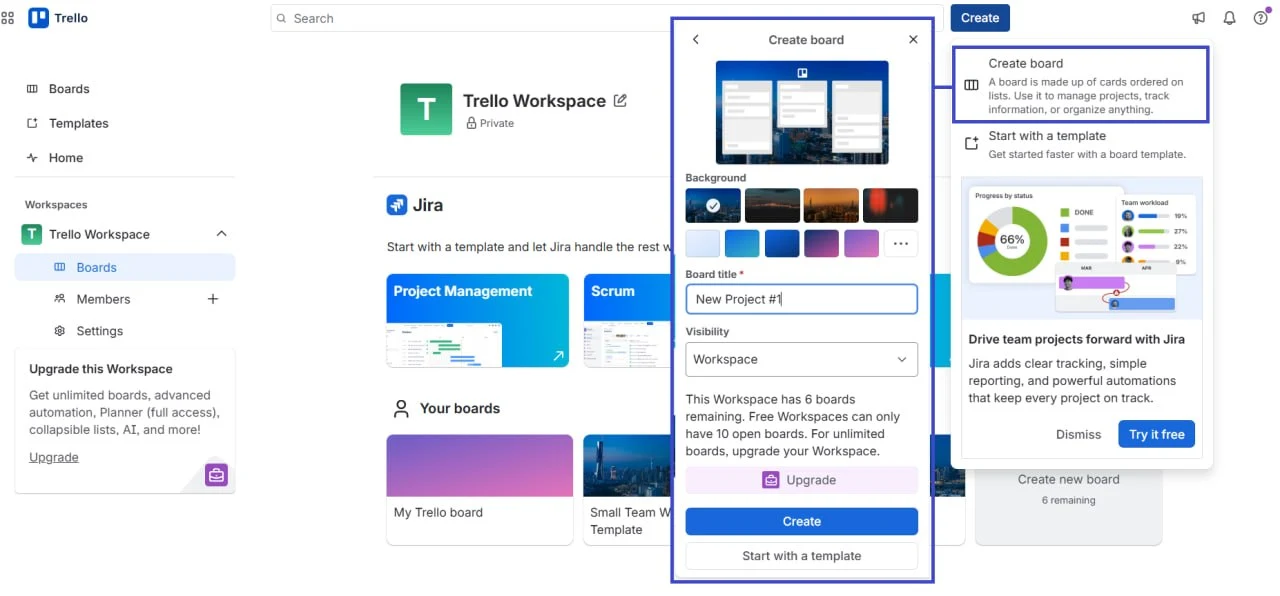
Step 1 — Create your account and an empty board
Go to Trello and create or sign in to an Atlassian account. Create one board and name it after the project — for example, “Website Redesign Q1 2026.” Set its visibility to Workspace or Private so the work stays contained; avoid Public for client or internal projects.
If Trello’s first-run onboarding drops you into a starter board with “Today,” “This week,” and “Later” lists, rename or archive them — you’ll build the four lists deliberately in the next step.
Step 2 — Add the four lists, and remember their rules
On the empty board, click “Add another list” and create the four lists in order: To Do → In Progress → Review → Done. The left-to-right order is the flow of work. Lists are cheap to create; the rules attached to each one (from the system above) are what make them useful, so keep those rules in mind as you go rather than adding extra stages you don’t need yet.
Step 3 — Fill “To Do” using the card-ready standard
Add three to five real cards to “To Do” — actual work you have this week, not placeholders. Open each card and bring it up to the card-ready standard: an action title, one owner, a due date, and a one-line “Done means…” in the description. Apply a label only when it is true (High priority, Blocked, or your type label). Skipping the “Done means…” line is the single most common reason a board quietly dies, so do not skip it.
The one automation worth setting up — and the 250-run math
Open “Automation” from the board menu. Trello still uses the Butler name in some older documentation, but the current board interface labels the feature Automation. Resist the urge to automate everything on day one. Set up exactly one rule to start: when a card is moved to “Review,” post the comment “@card Ready for review.” This creates an explicit handoff for the members already attached to the card without relying on someone to remember a manual mention.
Now the math, because the free plan gives you only 250 automation runs per month, and every time a rule fires counts as one run. Assume a small team moves roughly 6 cards to “Review” on each of about 22 working days: that is around 132 runs per month for this one rule — comfortably inside 250, with headroom to spare. Add a second rule that fires on every card creation, though, and a team creating about 10 cards a day burns roughly 220 more runs; combined, you cross 250 well before month’s end. Watch consumption in the automation dashboard. If you consistently exceed 250, that is your concrete, specific trigger to move to Standard (1,000 runs) — not a reason to upgrade preemptively.
Is the board ready to hand to your team?
Before you invite anyone, run these five checks. If any one fails, fix it first — an unclear board on day one trains people to ignore it, and that habit is hard to reverse.
- Pick any “To Do” card at random: could a teammate tell what “done” means from the card alone, without asking you? If not, the card-ready standard hasn’t been applied.
- Does every “In Progress” card have exactly one owner — not zero, not two?
- Is “In Progress” within your work-in-progress cap, or is it already a pile of started-but-unfinished work?
- Move a finished card to “Done,” then archive it — can you still find it afterward under the board menu’s “Archived items”? (You can: archiving is reversible, deletion is not.)
- Is it clear that only the reviewer, not the owner, moves a card to “Done”? Ambiguous sign-off is where accountability leaks.
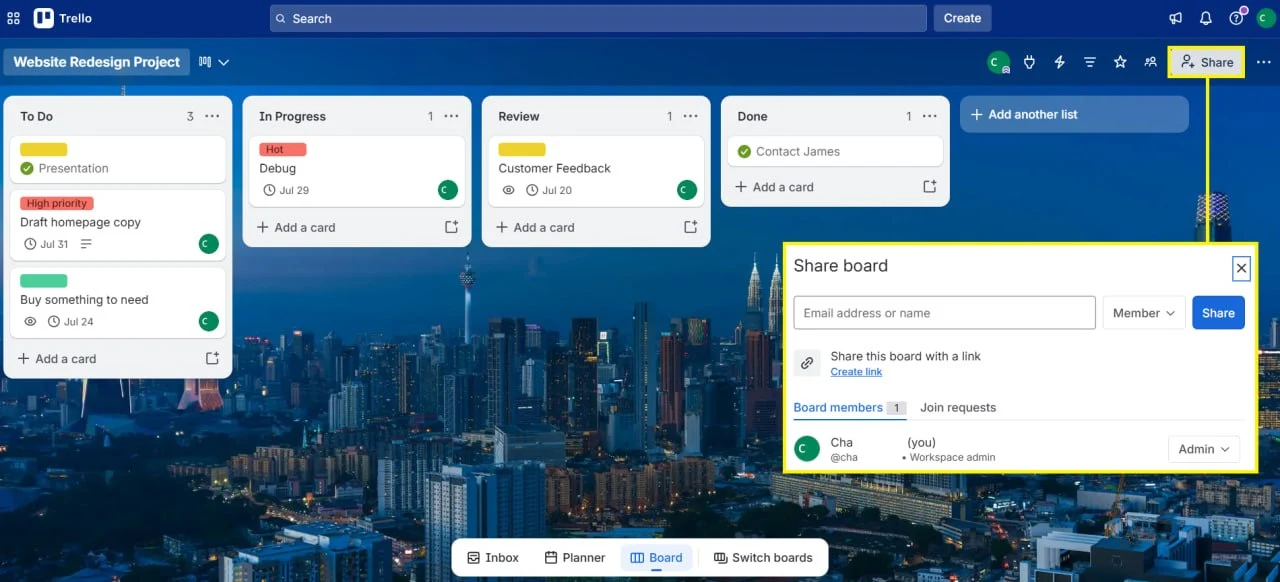
Invite your team once the board passes
Now that the board passes the readiness test, invite the people who will use it. Click “Share” at the top right of the board and enter their email addresses. On the free plan a workspace holds up to 10 collaborators; if your team is larger, this is the point where Standard ($5 per user/month, billed annually) becomes unavoidable rather than optional. Assign cards by opening a card and choosing an owner — and hold the line on the one-owner rule from the start.
What Trello costs over 12 months
Trello’s setup is free, but most teams eventually bump into a paid tier. Here is what a representative 5-person team pays over a year, and what actually triggers each upgrade (US prices, billed annually).
| Plan | Per user/month | 5-person team, 12 months | What forces the upgrade |
|---|---|---|---|
| Free | $0 | $0 | — (start here) |
| Standard | $5 ($6 monthly billing) | $300 | More than 10 boards or 10 collaborators, 250 automation runs/month exhausted, files over 10MB, custom fields |
| Premium | $10 ($12.50 monthly billing) | $600 | Unlimited automation, Calendar/Timeline/Dashboard views, CSV export |
The practical read: a 5-person team running one to three boards with light automation can stay on Free indefinitely. Standard at $300/year is the cheapest meaningful upgrade in this category, and Premium’s $600/year mostly buys extra views and unlimited automation rather than core workflow features. Don’t upgrade preemptively — wait until you hit a specific wall from the table above.
Common Trello setup problems and quick fixes
| Problem | ⚠️ Likely cause | 🔧 Fix |
|---|---|---|
| Team members don’t receive email invitations | Email entered incorrectly, or the invitation landed in spam | Have team members check their spam or promotions folder. Resend the invitation and verify the spelling of the address. |
| Cards aren’t moving to the next list automatically | Automation rule conditions don’t match the card’s properties | Open the automation rule and confirm the trigger (due date, label, assignee) matches actual card data, then adjust it. |
| Butler automations stop working mid-month | The free workspace has used its 250 automation runs for the month | Check usage in the automation dashboard. Disable less critical rules, or upgrade to Standard (1,000 runs) or Premium (unlimited). |
| Board is slow to load or lags when scrolling | Too many cards, lists, or attachments on the board | Archive completed cards, remove unused lists or large attachments, then refresh the page. |
| Can’t find the Share button to invite team members | The board menu location varies by Trello version | Look for “Share” or “Members” at the top right of the board. If absent, open the board menu (three dots) and select “Share.” |
When Trello is the wrong tool for the job
Trello excels at simple task tracking and team collaboration for small to medium projects. Three situations, though, call for a different tool from the start:
- Complex timelines and Gantt charts. If you need critical-path analysis or resource-level scheduling, Trello’s list-based structure is limiting. Its Timeline view is a Premium feature ($10 per user/month) and stays lightweight even then.
- Heavy resource allocation and capacity planning. Balancing workload across people or tracking utilization needs dedicated resource-management features, which Trello does not natively provide.
- Multi-project portfolio oversight. Managing 10+ projects with a bird’s-eye view of statuses, dependencies, and budgets calls for cross-project dashboards and rollup reporting that Trello’s single-board focus isn’t built for.
If any of those describes your team today, start with the project management software comparison rather than forcing Trello to stretch.
Frequently asked questions about Trello setup
Can I recover a deleted Trello card?
No — in Trello, deleting a card is permanent and cannot be undone, which is why Trello makes you archive a card before the Delete option even appears. Archive instead of delete: archived cards live in the board menu under “Archived items” indefinitely, and “Send to board” restores them at any time. Only delete when you are certain the card will never be needed.
How do I export or back up my Trello data?
Every plan, including Free, can export a board to JSON: open the board menu, choose “Print, export, and share,” then “Export as JSON.” CSV export — the format you can open directly in a spreadsheet — is limited to Premium workspaces. JSON captures lists, card titles, descriptions, labels, and due dates, and is the format most migration tools accept.
Can I use Trello solo for personal work?
Yes. The same four-list system works for a single person — set the board to “Private” to keep it separate from team work. Many freelancers and individual contributors run Trello as their personal productivity system and add collaborators only when a project genuinely needs them.
Does Trello include board templates?
Yes. Trello offers built-in templates for common workflows like Kanban, Scrum, and sales pipelines — look for the “Templates” option when creating a board. Once your starter board is proven, the more useful move is to turn your own working structure into a reusable one; see our Trello board templates guide for small teams.
Is Trello a good project management tool for small teams?
Yes — Trello is still one of the fastest ways to give a small team visible structure without introducing heavy process too early. If you are moving from scattered chat and informal tracking to a shared board people will actually use, build the system exactly as described above, keep the four-list workflow and the card-ready standard, and stay on the free plan until you hit a concrete limit. That setup carries most small teams for a long time at zero cost, and $300/year for a 5-person team on Standard when it doesn’t.
The one caveat: don’t ask the board to become a planning system. Once work depends on cross-project reporting, workload balancing, or complex dependencies between teams, forcing more structure into Trello creates friction instead of solving it — at that point, evaluate the dedicated tools in our resource management software guide rather than overbuilding the board.
Next steps
- Turn your proven board into a repeatable structure with the Trello board templates guide.
- If Trello feels too simple, compare project management software for small teams.
- If your team is overbooked across projects, compare resource management tools.
Sources and notes
- Trello Pricing — used to verify plan prices, free-plan limits (boards, collaborators, attachments), and automation quotas.
- Trello Support: Getting Started with Trello — used to confirm Trello’s beginner workflow and its initial Today, This Week, and Later list guidance.
- Trello Support: Changing Board Visibility — used to verify board privacy and access-control settings.
- Trello Support: Archive or Delete a Card — used to confirm that card deletion is permanent and archiving is the recoverable path.
- Trello Support: Export Data from Trello — used to confirm JSON export on all plans and CSV export as a Premium feature.
- Trello Support: Automation Quotas and Limits — used to verify that each triggered automation counts as one run and to confirm the monthly run quotas for each plan.
- Trello Guide: Advanced Automation Features — used to verify automated comments and the use of the “@card” mention in an automation.
- Trello Enterprise — used to confirm that Trello Enterprise is intended for organizations with 50 seats or more.
Disclaimer
This guide is for general informational purposes only and does not constitute professional accounting, tax, legal, or financial advice. Pricing, features, and plan details were verified against each product’s official website as of the research date and may change without notice. Always consult a qualified professional for advice specific to your business situation. PickrTech may earn a commission when you sign up through our links at no extra cost to you. Our recommendations are based on independent evaluation and are not influenced by compensation.
Last reviewed: July 2026 by the PickrTech editorial team.