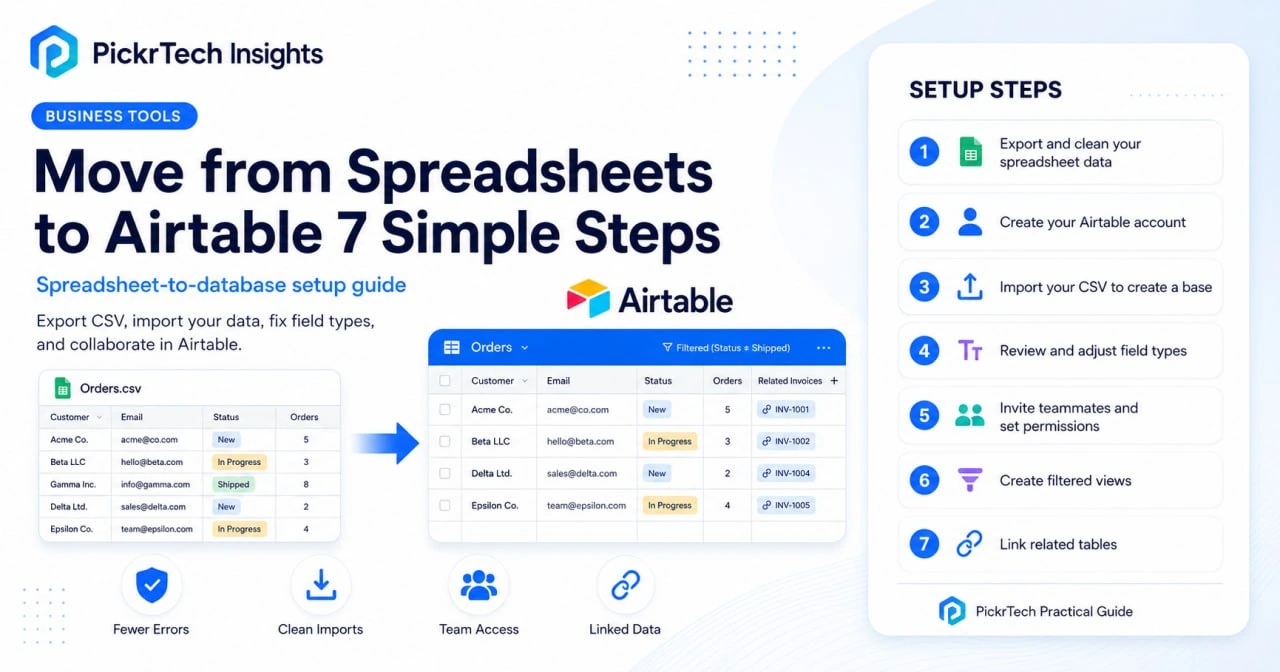
The migration at a glance: clean your data, import the CSV, set field types, invite your team, and organize views.
TL;DR: Your spreadsheets are slowing you down if they’re full of formula errors, duplicate data, and scaling problems. Airtable fixes this in about 15 minutes—just export your Excel as CSV, create a free account, and import your data with proper field types. The free plan covers 1,000 records per base and 5 editors, which handles most small teams. If you’re managing customer, inventory, or project data across multiple files or team members, it’s time to switch.
Where this guide fits: This guide helps you clean and migrate spreadsheet data into Airtable. If you are still choosing a database-style tool, compare options in the small business database software guide. If your spreadsheet is mainly inventory, start with the inventory management checklist. If you are deciding whether inventory should stay in a spreadsheet or move into dedicated software instead, read Inventory Spreadsheet vs Software: When to Switch.
Before you begin: What you’ll need
Account requirements
Sign up for a free Airtable account at airtable.com/signup using your email or Google single sign-on. You’ll receive a verification email—click the link to activate your account before you can create bases or add team members.
Data needed
Have your current Excel file or CSV export ready. Make sure your first row contains column headers like “Customer Name,” “Email,” or “Phone.” Before importing, delete any empty rows and columns—they’ll create unwanted blank fields in Airtable.
Estimated time: 15 minutes for the core migration (Steps 1–4). Add another 15 if you invite teammates and set up views on the same day.
Difficulty: Beginner
Cost: Free plan available (no credit card required), with up to 1,000 records per base and up to 5 Creator or Editor collaborators per workspace; read-only collaborators are unlimited. A new account’s first workspace starts with a 14-day Team trial, after which you can remain on the Free plan or upgrade. The Team plan runs $20 per billable collaborator per month billed annually, or $24 billed monthly (pricing and plan limits checked July 2026 against Airtable’s pricing page).
Does this sound like you?
You probably need a database if:
- Your spreadsheet has grown beyond 5,000 rows or you’re juggling multiple linked files
- Team members keep creating duplicate entries or accidentally overwriting each other’s changes
- You’re stuck maintaining fragile VLOOKUP formulas that break whenever columns shift
- Multiple people need simultaneous access without stepping on each other’s work
- You’re manually policing consistent values—status labels, categories, date formats—that dropdown fields and structured types would enforce for you
Step-by-step walkthrough
Work through these in order. If you have several spreadsheets, start with the messiest or most business-critical one so the payoff is visible to your team right away, and leave linking, automations, and rollups until the basics are working. The core migration (Steps 1–4) takes about 15 minutes.
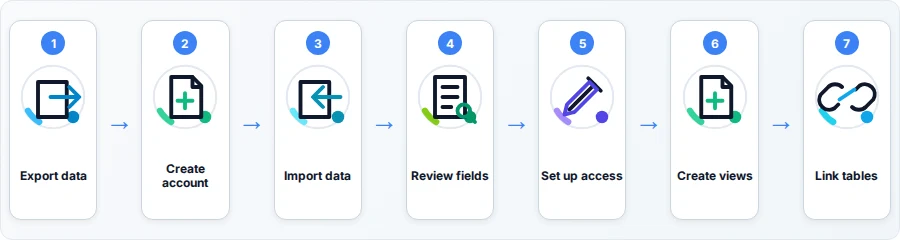
Step 1: Export and clean your existing spreadsheet data
Open your Excel file and scan it for empty rows or columns—these cause parsing errors during import. Delete any blank rows between your data and remove columns you no longer need. This cleanup matters: if you skip it, Airtable imports merged cells, scattered blanks, and concatenated values (like “John Smith, john@example.com” in one cell) exactly as-is, and you’ll spend far longer fixing them inside Airtable than you would in Excel now.
Your first row should have clear, simple headers. Use “Customer Name” instead of “Cust. N.” or “C_Name”—Airtable converts these directly into field names, so descriptive labels matter.
Save the file as CSV UTF-8. In Excel, go to File > Save As and pick CSV UTF-8 (.csv) from the format menu. This ensures compatibility with Airtable’s import system.
What you should have: A clean CSV file with headers in row one and no empty rows interrupting your data.
💡 Pro tip: After saving, open your CSV in a text editor to verify headers are separated by commas. This catches formatting issues before they cause import headaches.
Step 2: Create your Airtable account
Go to airtable.com/signup in your browser. Choose email or Google SSO. If you use email, enter your address and create a password. If you pick Google, click the Google button and follow the OAuth prompt.
Airtable sends you a verification email. Open it and click the verification link. This activates your workspace and lets you create bases.
Once verified, you’ll land on your Airtable dashboard. You should see an “Add a base” button in the main interface.
What you should have: An active Airtable account with an empty workspace ready for a new base.
Step 3: Import your spreadsheet to create a base
From Airtable Home, create a new blank base. Inside the base, click “+ Add or import” beside the table tabs, then choose “CSV file.” This matches the current Airtable import path shown in the screenshots below.
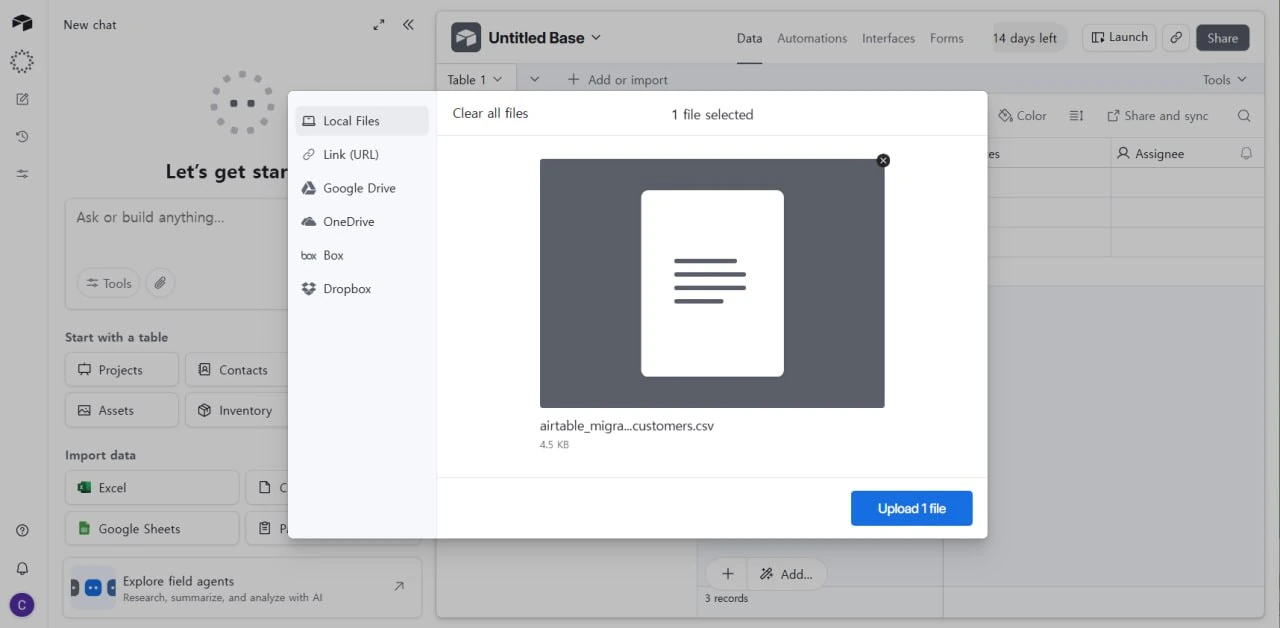
Airtable CSV upload dialog showing a selected customer CSV file ready to import into a new base.
Click the upload area or drag your CSV directly into the dialog. Airtable shows a preview—verify your headers appear in the first row and all your rows are visible.
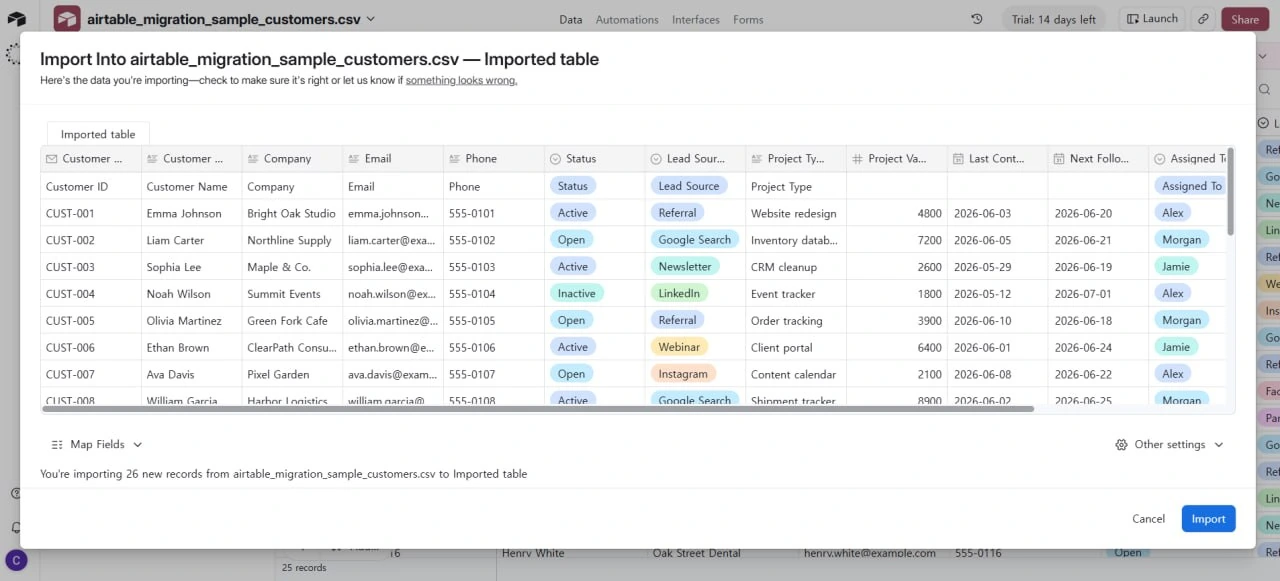
Airtable import preview showing CSV headers, sample records, and the Import button before adding the table.
Click “Import.” Airtable’s native importer accepts CSV files up to 100 MB and Excel files up to 5 MB. The 25,000-row limit applies to the separate CSV Import Extension, not this native import flow. For the workflow shown here, the practical ceiling is your plan’s record limit: 1,000 records per base on Free and 50,000 on Team. Airtable adds the imported data as a table in the new base.
What you should have: Your data now lives in Airtable as a table in your new base. Grid view shows all records with columns matching your original headers.
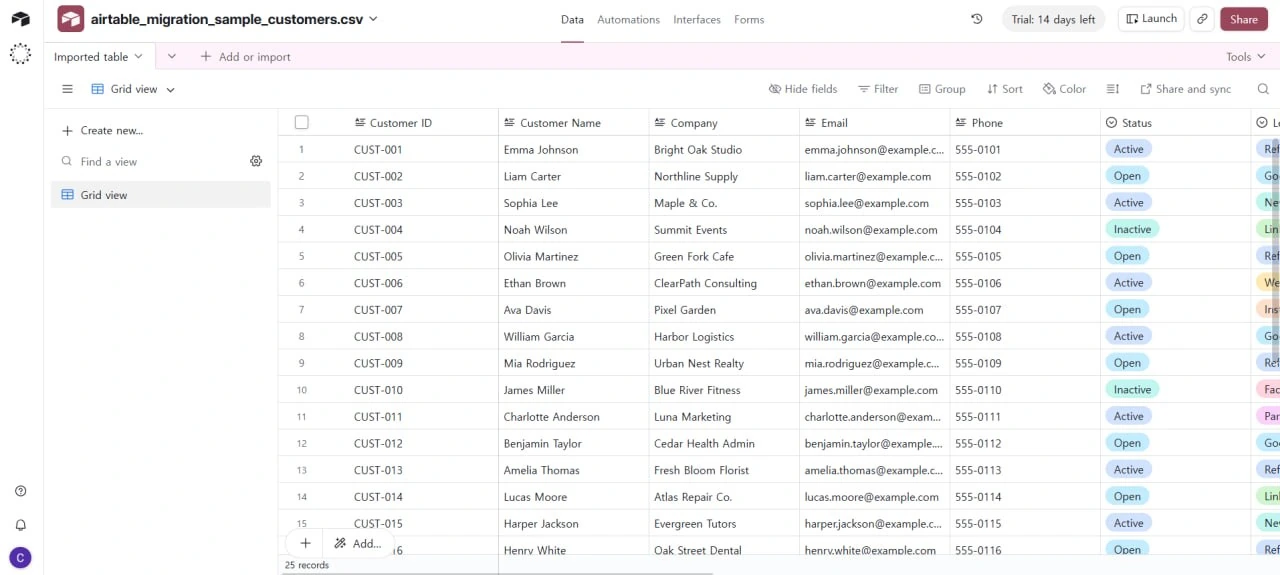
Airtable grid view displaying imported customer records after the CSV has been turned into a working base.
Step 4: Review and adjust field types
After import, click on each column header to check the field type. Airtable auto-detects types (text, number, date, etc.), but manual review ensures each column behaves the way it should—dates that sort, numbers that calculate, emails that open your mail app. Don’t skip this: Airtable defaults conservatively to “Single line text” whenever it is unsure, and text columns lose sorting, calculations, date pickers, and dropdown enforcement.
Change “Email” columns from “Single line text” to the “Email” field type so Airtable treats the values as email data and provides email-specific display and actions. In the base grid, the field type itself should not be treated as a strict format validator.
If you collect records through an Airtable form on a paid plan, open the field’s Rules and enable “Validate email.” Airtable will prevent form submission until an invalid email address is corrected. For grid-based data entry, use a formula or another review workflow when you need additional validation.
Set date columns to the “Date” type rather than text. Check numeric columns as well: if Airtable imported numbers as text, switch them to the “Number” field type so sorting and calculations work correctly.
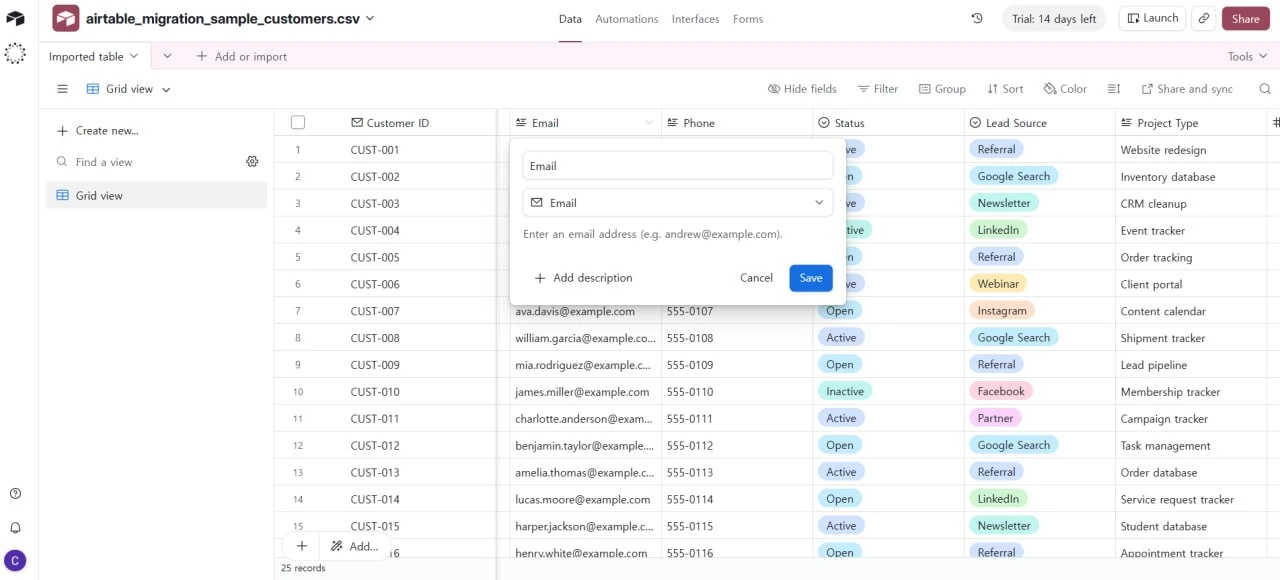
Airtable field settings with the imported Email column converted to the Email field type.
Field types improve data quality in two different ways. Types like Single select and Date actively constrain input—a dropdown only accepts its defined options, which makes select fields Airtable’s real enforcement tool for things like status and category columns. Types like Email and Phone standardize display and behavior rather than policing format. So wherever a column should only ever hold a handful of known values (status, category, priority), convert it to Single select to stop inconsistent entries at the source.
What you should have: All field types correctly assigned. Email addresses display as clickable links, dates sort chronologically, numbers allow calculations, and any select fields only accept their defined options.
Step 5: Set up user permissions and invite your team
Click the “Share” button in the top-right corner of your base. Enter a team member’s email address. Airtable offers four permission levels for base collaborators:
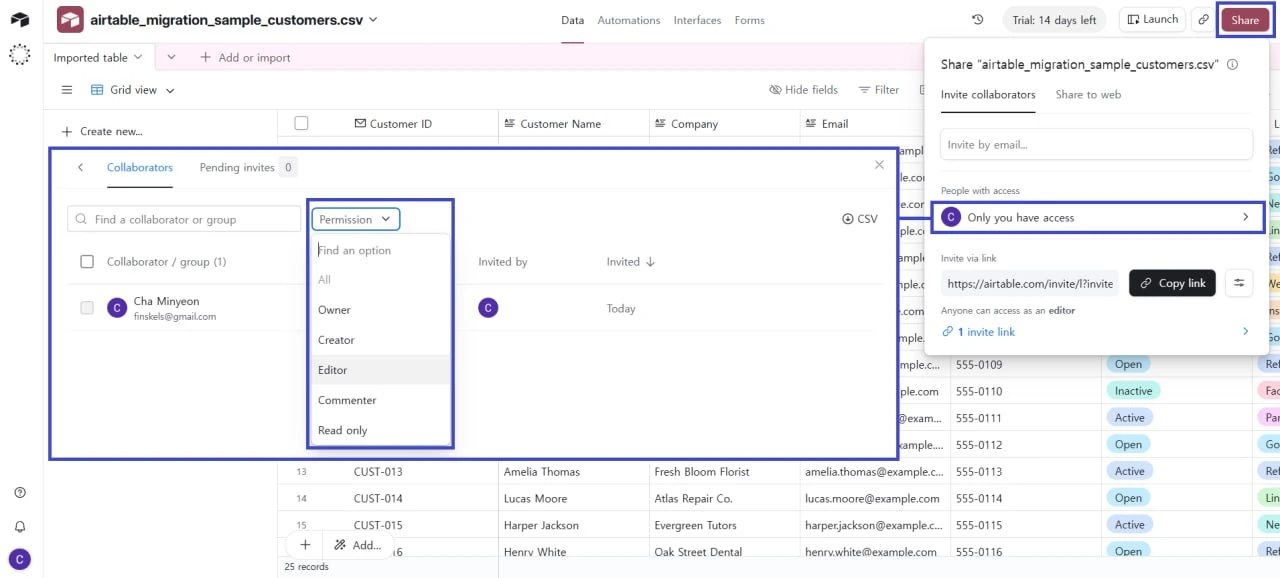
Airtable share and collaborator permissions panel showing how to invite teammates and assign access levels to a base.
- Creator: Full control, including changing the base structure (adding tables and fields)
- Editor: Add, edit, and delete records and views, but can’t change the base structure
- Commenter: View and comment, but can’t edit
- Read-only: View only, no edits
Assign permissions based on their role. A data entry person gets Editor access; a manager reviewing reports gets Read-only. Click “Invite” and Airtable sends an email with a base link.
⚠️ Watch your editor count: The free plan allows a maximum of 5 people with Creator or Editor access per workspace. Read-only viewers and commenters don’t count against this limit, so give edit access only to people who actually enter or change data. Inviting a sixth editor triggers an upgrade prompt to the Team plan.
Team members accept the invitation and gain immediate access. Changes sync in real-time—no more emailing spreadsheets back and forth.
What you should have: Team members receive invitations and can access the base with their assigned permission level.
Step 6: Create filtered views to organize your data
In the left sidebar, you’ll see “Views.” Click the “+” icon to add a new view. Choose a type: Grid (default), Calendar, Kanban, or Gallery. Start with Grid for structured data.
Name your view something useful, like “Active Customers” or “Open Projects.” Click the “Filter” icon in the toolbar. Add a filter rule—for example, “Status” “is” “Active.” Now this view shows only matching records without hiding data from other views.
Create multiple views for different workflows. Your sales team uses “High-Priority Leads” filtered by deal value; your support team uses “Unresolved Tickets.” All views tap the same underlying data, so an update in one view appears everywhere.
What you should have: At least two working views (like “All Records” and “Active Records”) that filter your data based on conditions.
Step 7: Link related tables (optional but recommended)
If your data includes relationships (customers and their orders), create a second table for the related data. Click “Add a table” in the left sidebar and name it—for example, “Orders.”
Add a field in your Orders table called “Customer.” Click the field type dropdown and select “Link to another record.” Choose “Customers” as the linked table. Now each order references one customer, and you can view all orders for a customer in one place.
Linked records replace many VLOOKUP-style relationship workflows by connecting each order to a specific customer record. If you want the customer’s email to appear in the Orders table and stay current when it changes, add a Lookup field that pulls Email from the linked Customers record.
Update the email once in Customers, and the lookup value in linked Orders reflects the current source value. You can also add rollup fields to aggregate related data—for example, “Total Order Value” across linked orders. Resist the temptation to rebuild your old VLOOKUPs and pivot tables as Airtable formulas: linked tables, lookups, and rollups do the same job with far less to break.
What you should have: Two tables connected. Clicking a customer’s link in an order row takes you to that customer’s full record.
What Airtable costs over 12 months
For a typical small business with 5 people who edit data, here’s the realistic budget picture. On paid plans, Airtable bills every collaborator with edit permission to at least one base in the workspace; read-only collaborators, form submitters, and share-link viewers are always free. One nuance worth checking against Airtable’s plan comparison before you count seats: commenters can be treated as billable on the Team plan but are included at no charge on Business. The table below models five billable editing seats.
| Plan | Monthly cost (5 editors) | 12-month cost | What triggers this tier |
|---|---|---|---|
| Free | $0 | $0 | Up to 1,000 records/base, 5 editors, 1 GB attachments/base |
| Team (annual billing) | $100 ($20/user) | $1,200 | 1,001st record, 6th editor, or need for Gantt/timeline views and sync integrations |
| Team (monthly billing) | $120 ($24/user) | $1,440 | Same as above, without the annual commitment |
| Business (annual billing) | $225 ($45/user) | $2,700 | 50,001st record, SSO requirement, or advanced admin controls |
Two budgeting notes worth knowing before you commit. First, record limits are cumulative across all tables in a base—a base with a 600-record Contacts table and a 500-record Orders table is already over the free cap. Second, there’s no way to buy extra records or automation runs à la carte; when you hit a limit, the only options are deleting data or moving up a full tier. If your dataset is growing steadily, budget for the Team plan from the start rather than treating the free plan as permanent.
Common problems and fixes
Import fails or data appears in a single column
⚠️ Why this happens: Your CSV uses semicolons or tabs as delimiters instead of commas, or the file was saved in a non-UTF-8 encoding.
🔧 How to fix it: Open your spreadsheet and re-save it as CSV UTF-8. If the issue persists, open the CSV in a text editor and verify headers are separated by commas. Some regional versions of Excel default to semicolons, but Airtable’s import tool usually detects this automatically.
Field type auto-detection is incorrect (dates appear as text, numbers as text)
⚠️ Why this happens: Your spreadsheet had inconsistent formatting—some cells formatted as text, others as numbers. Airtable defaults conservatively to text when it detects mixed formats.
🔧 How to fix it: Manually change field types after import. Click the column header, select the correct type from the dropdown, and confirm. For dates, use a standard format in your original spreadsheet (YYYY-MM-DD works universally).
Invited team members don’t receive invitation emails
⚠️ Why this happens: The email address is misspelled, or the invitation ended up in spam or a promotions folder.
🔧 How to fix it: Double-check the email address in your Share dialog. Ask the team member to check their spam folder. You can also copy the direct base link and send it manually. If they already have an Airtable account, they might see the base in their workspace without needing to accept an invitation.
Data appears duplicated or some rows are missing after import
⚠️ Why this happens: Your CSV had empty or inconsistent rows, the file exceeded the native importer’s size limit (100 MB for CSV or 5 MB for Excel), or your base reached its plan’s record cap.
🔧 How to fix it: Compare the Airtable record count with the original file. If the numbers do not match, clean inconsistent or blank rows and import again. If the file exceeds the native size limit, split it into smaller files. Free bases support 1,000 records; if you exceed that limit, upgrade to Team (50,000 records per base), archive unnecessary records, or redesign the data across separate bases.
Changes made by one team member aren’t visible to another
⚠️ Why this happens: The second person may be in a different filtered view, looking at hidden fields, or using a browser session that temporarily lost its connection.
🔧 How to fix it: Confirm both people opened the same base and view, then clear filters or switch to an unfiltered grid view. Refresh the browser or reconnect if the session was interrupted. Read-only collaborators can still see permitted record changes; their permission prevents editing rather than suppressing updates.
Verification checklist
- Your CSV file imported successfully with all rows and columns visible in Airtable
- Field types are correctly assigned (emails are Email type, dates are Date type, etc.)
- At least one team member has been invited and can access the base with their assigned permission level
- You have created at least one filtered view that displays a subset of your data
- Your original Excel file has been backed up locally in a safe location (cloud storage or an external drive) as a recovery point
- All records display correctly without missing or corrupted data
- You can edit a record and the change appears immediately to other users with permission
When to consider a different approach
Airtable works well for small-to-medium teams, but it has limits. If your real problem is lead ownership, follow-up tracking, and deal stages rather than flexible database views, you may be better off using our guide on how to move from spreadsheets to a CRM. If your business needs advanced SQL querying (like complex joins across 10+ tables), Airtable’s UI-driven interface can feel restrictive—a traditional database like PostgreSQL or a tool like Retool might be more efficient. If you’re managing over 100,000 records regularly, Airtable’s pricing climbs quickly, and a self-hosted or enterprise database becomes cost-effective. If your immediate need is inventory tracking with scanning and low-stock alerts rather than a general-purpose base, follow our Sortly Inventory Setup: A Simple Step-by-Step Guide instead.
⚠️ Regulated data warning: Don’t put patient health records or similarly regulated data into a free or Team-plan base. Airtable holds SOC 2 Type II and ISO 27001 certifications across all plans, but HIPAA support is only available on the Enterprise Scale plan and requires signing Airtable’s Business Associate Addendum—customers without it aren’t permitted to store electronic protected health information in Airtable at all. Details are on Airtable’s HIPAA page and its Trust & Security page. Airtable is also not FedRAMP-authorized, so government workloads with that requirement need a different platform.
If you need offline-first functionality (editing records without internet, then syncing later), Airtable requires a live connection to sync changes. For offline workflows, consider Notion with offline support or a local database tool.
Frequently asked questions
Will my data be secure in Airtable?
Airtable encrypts data in transit with TLS and at rest with 256-bit AES, and lists SOC 2 Type II, ISO 27001, and ISO 27701 in its current compliance materials. You control who can access your base through permission settings. However, Airtable is a cloud service—your data resides on its infrastructure, and there’s no on-premises option. Health data covered by HIPAA is only permitted on the Enterprise Scale plan with a signed Business Associate Addendum, so keep regulated records out of Free and Team-plan bases.
Can I still use Excel after moving to Airtable?
Yes. You can export any Airtable view as a CSV and open it in Excel. However, changes in Excel won’t sync back to Airtable.
Airtable is designed for collaborative live editing, so if your team switches to Airtable, editing in exported Excel files defeats the purpose. Use Airtable as your source of truth and export only for reports or backups.
How do I switch my team over without disruption?
Run Excel and Airtable in parallel for 1–2 weeks. During this period, your team enters new data in Airtable while keeping Excel for reference. Once everyone feels comfortable, retire the Excel file. Set a clear cutoff date and archive the Excel file locally as a backup. Communicate the change in advance so team members have time to learn Airtable’s interface.
Next steps
- If Airtable is only one option, compare small business database software.
- If the data is inventory-related, prepare it with the inventory management checklist. If your inventory workflow now needs barcode scanning, location tracking, or reorder alerts, compare these inventory management tools before stretching Airtable too far.
- If you are comparing multiple tools, score them with the software evaluation scorecard.
Sources and notes
- Airtable Pricing — used to verify free plan limits (1,000 records/base, 5 editors) and Team ($20/user/mo annual, $24 monthly) and Business ($45/user/mo annual) pricing
- Airtable Support – Plans overview — used to verify per-base record limits are cumulative across tables and Team plan capacity (50,000 records)
- Airtable Support – Importing third-party data — used to verify the current native import path and file-size limits (100 MB for CSV and 5 MB for Excel)
- Airtable Support – CSV import extension — used to distinguish the extension’s separate 25,000-row limit from the native importer
- Airtable Guide – Invite your collaborators — used to verify the four base permission levels (Creator, Editor, Commenter, Read-only)
- Airtable Support – Views — used to verify view creation and filtering functionality
- Airtable Support – Building and sharing forms in Airtable — used to verify paid-plan form Rules such as “Validate email”; for grid-based data entry, use a formula or review workflow when you need additional validation
- Airtable Trust & Security — used to verify SOC 2 Type II, ISO 27001/27701 certifications and encryption practices
- Airtable HIPAA program — used to verify that HIPAA support requires the Enterprise Scale plan and a signed Business Associate Addendum
Disclaimer
This guide is for general informational purposes only and does not constitute professional accounting, tax, legal, or financial advice. Pricing, features, and plan details were verified against Airtable’s official website in July 2026 and may change without notice. Always consult a qualified professional for advice specific to your business situation.
Last reviewed: July 2026 by the PickrTech editorial team.