This article may contain affiliate links. We may earn a commission when you sign up through our links — at no extra cost to you. Our recommendations are based on independent evaluation and are not influenced by commissions.
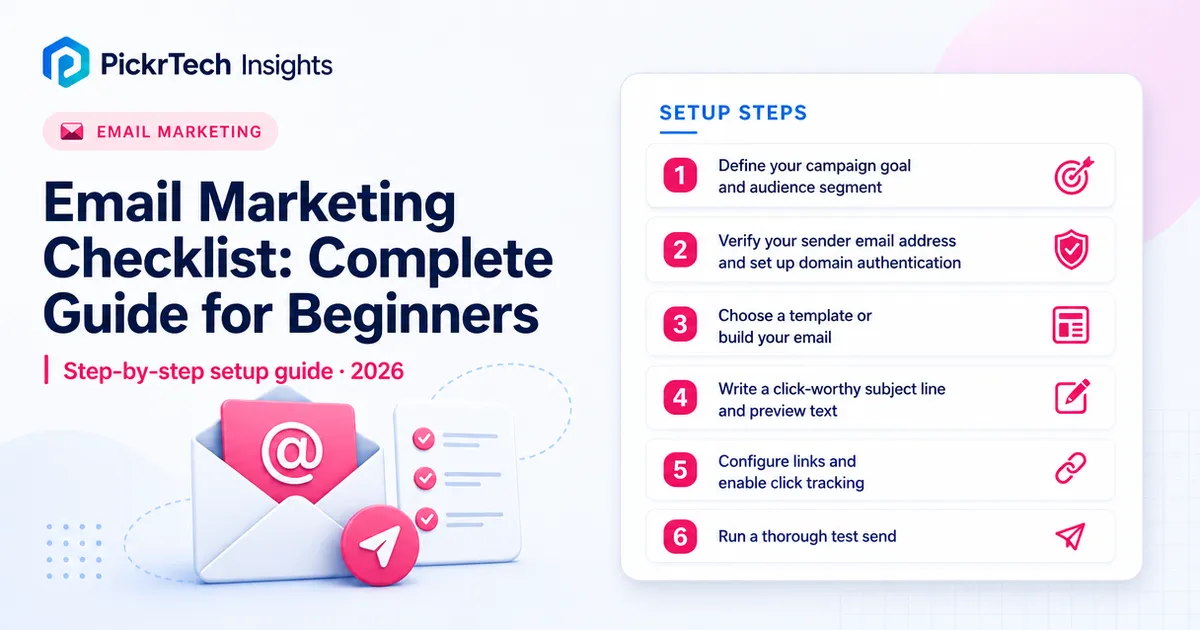
TL;DR: An email marketing checklist is your safety net before sending your first campaign—verify your audience, sender details, content, and links to avoid spam filters and mistakes. Key steps: (1) define your goal and audience segment, (2) verify your sender email and domain authentication, (3) test your email across desktop and mobile devices before sending.
email marketing checklist
Before you begin: What you’ll need
Account requirements
You’ll need a Mailchimp account (free plan available) and at least one contact in your audience with explicit consent to receive emails. Mailchimp requires audiences to have at least one subscribed contact before you can enable sending features.
Data needed
Gather your contact list (CSV or spreadsheet format), a clear campaign goal (e.g., drive clicks to a blog post, announce a promotion), your email copy, any images or graphics you want to include, and your business’s physical mailing address for the email footer (required by anti-spam law).
Estimated time: 20–30 minutes
Difficulty: Beginner
Cost implications: Mailchimp’s free plan allows unlimited campaigns up to 500 contacts and 1,000 sends per day, making it ideal for your first campaign at no cost.
Step-by-step walkthrough
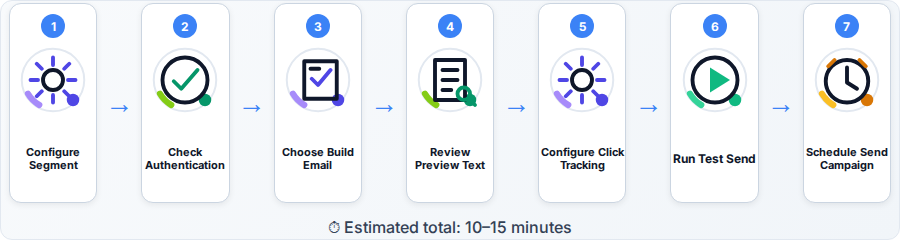
Step 1: Define your campaign goal and audience segment
A clear goal dictates every decision in your campaign. Start by writing down exactly what success looks like. Are you aiming for click-through rates (readers clicking a link), open rates (readers opening the email), or conversions (readers making a purchase)? Mailchimp tracks all three metrics, so deciding in advance helps you evaluate performance later.
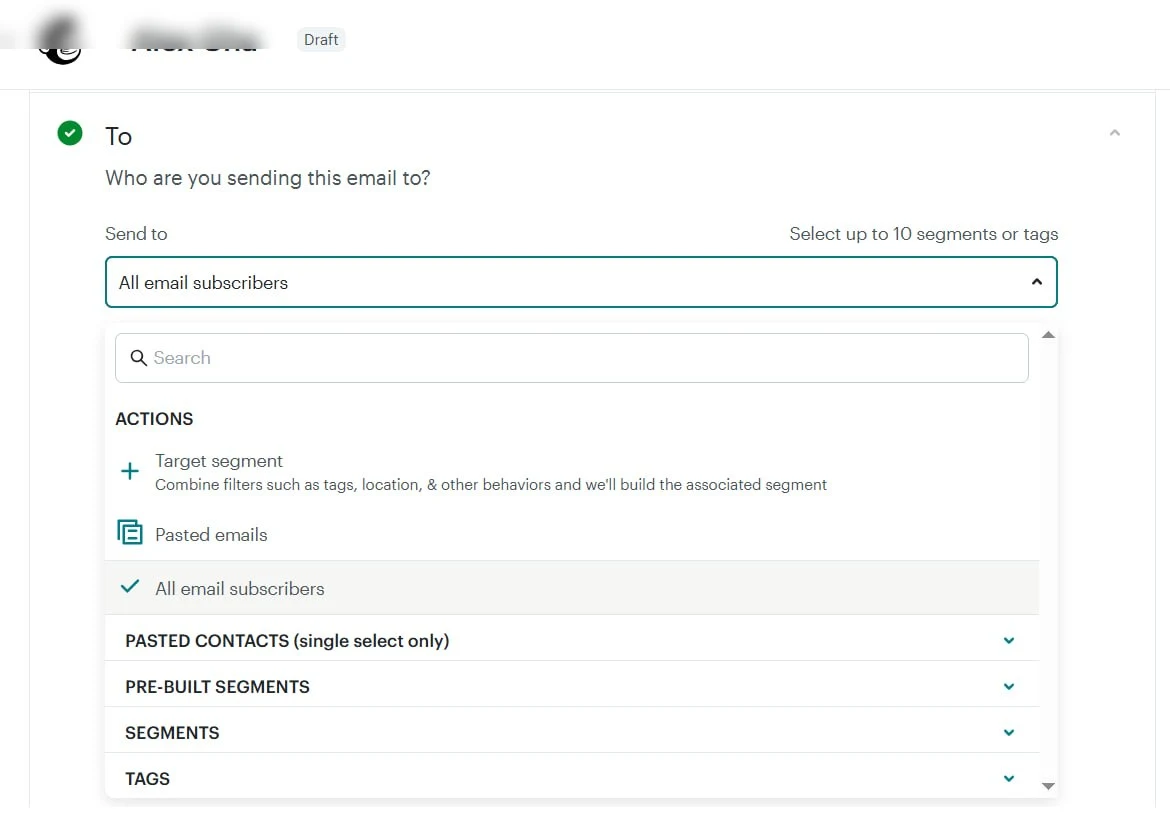
Mailchimp campaign recipient selection showing audience targeting options
Next, decide which subscribers to target. If your list is segmented by tags or groups in Mailchimp, now is the time to choose your specific audience—for example, “subscribers from the last 30 days” or “customers in the Northeast.” Mailchimp allows users to segment audiences based on tags, group subscriptions, and contact data to target specific subsets of subscribers.
Expected result: You have a one-sentence goal written down and you’ve selected your target audience segment in Mailchimp. You can see the number of contacts in your chosen segment displayed in the campaign builder.
💡 Pro tip: Starting small with a single audience segment helps you understand performance. You can always run follow-up campaigns to other groups.
Step 2: Verify your sender email address and set up domain authentication
In Mailchimp, navigate to Settings > Sender identity and verify the email address you’ll send from. Mailchimp requires all sender email addresses to be verified before they can be used to send campaigns.
You’ll receive a verification link in the email you provide—click it to confirm ownership.
Next, set up domain authentication using SPF and DKIM records. This step takes 5–10 minutes but is critical: authenticating your sending domain via SPF, DKIM, and DMARC records improves email deliverability and helps prevent emails from being marked as spam. Mailchimp provides the exact DNS records you need to add at your domain provider (GoDaddy, Namecheap, etc.). Without this step, many of your emails may bounce or land in spam folders.
Expected result: Your sender email shows a green checkmark next to “Verified” and your domain authentication status shows “Complete” or “Authenticated.” If you see “Pending” for authentication, emails may still send but will have lower deliverability.
Step 3: Choose a template or build your email
In your Mailchimp campaign, select Email > Email marketing > Create Campaign. Choose a template from Mailchimp’s library of pre-designed, mobile-responsive templates, or start with a blank canvas. Mailchimp’s drag-and-drop editor supports content blocks for text, images, buttons, and social media links without requiring HTML knowledge.
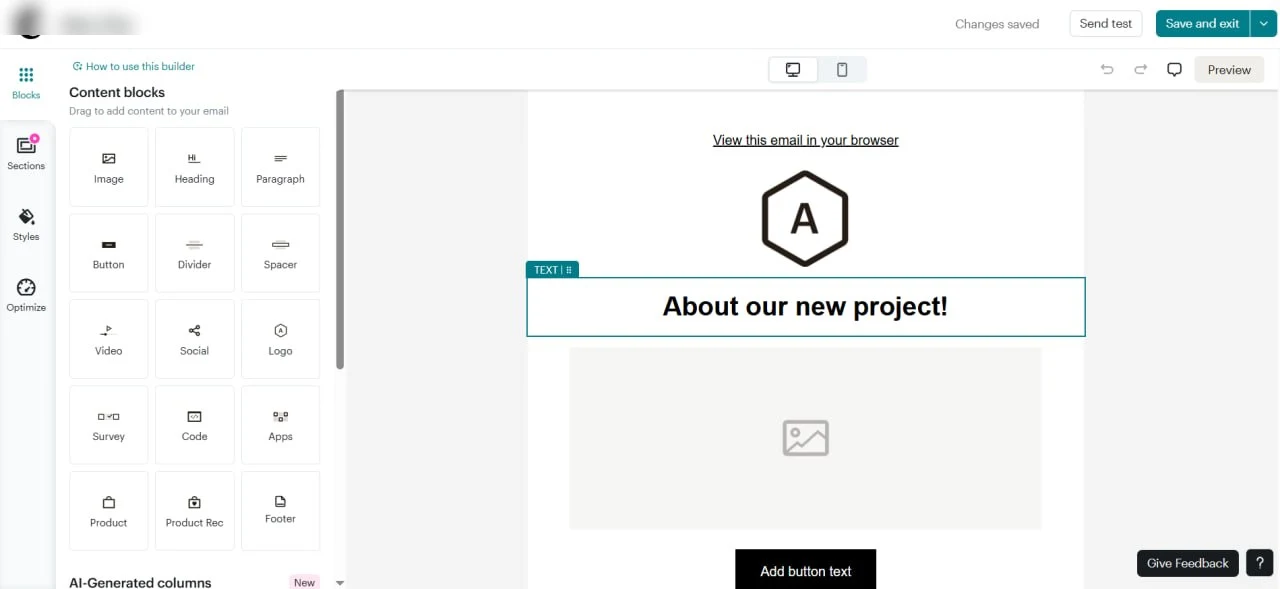
Mailchimp email builder with drag-and-drop content blocks and design canvas
Drag your content blocks into place: add a header image (optional), write your email body text, include a call-to-action button, and paste your business’s physical mailing address at the bottom (required by law). Use short paragraphs and plenty of white space to make the email easy to read on mobile devices.
Expected result: Your email has a subject line placeholder, body text, at least one call-to-action button, and a footer with your business address. The preview on the right shows how it looks on desktop.
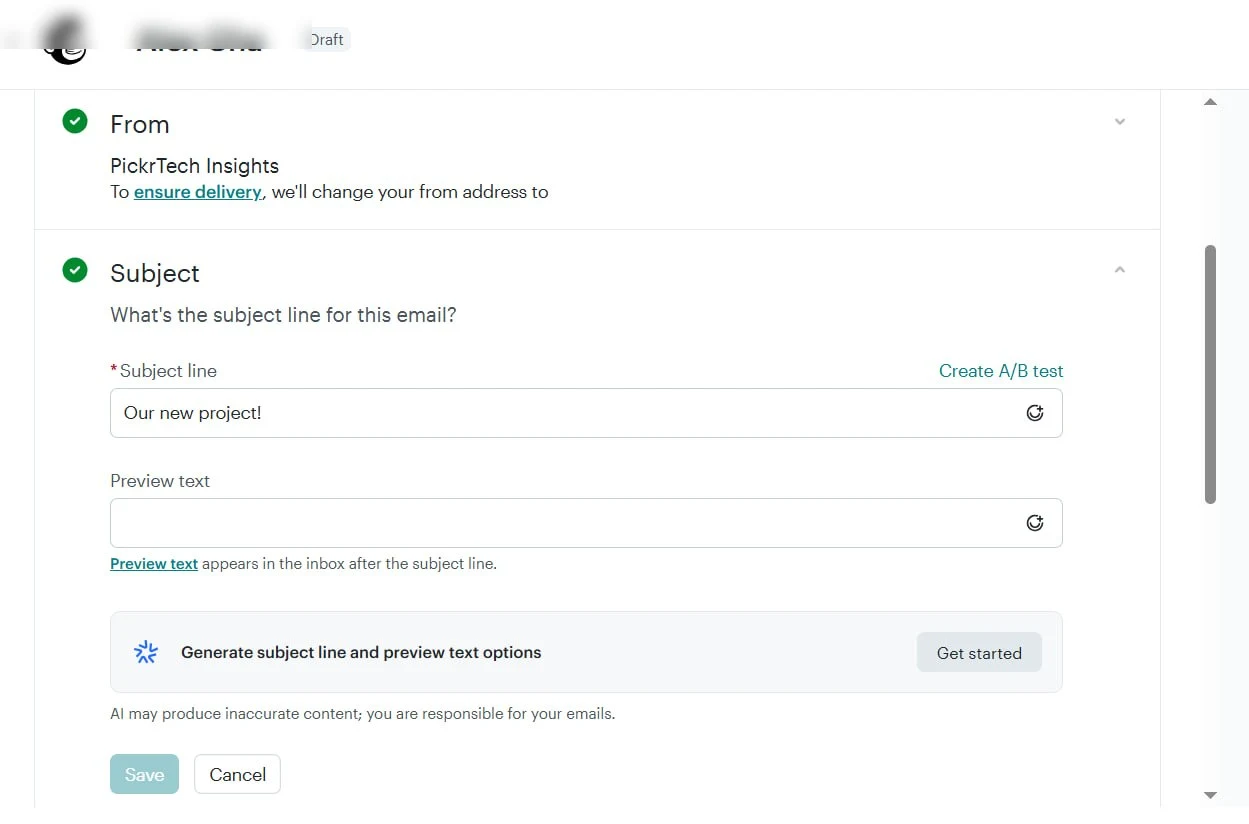
Step 4: Write a click-worthy subject line and preview text
Your subject line is the first thing subscribers see in their inbox. Aim to keep it under 50 characters to ensure it displays fully on most mobile devices, and make it specific and benefit-driven. Instead of “June Newsletter,” try “3 ways to cut your energy bill in half.” Mailchimp allows users to add merge tags to subject lines to personalize emails with subscriber data, such as first names—for example, “Hi [FNAME], check out this offer.”
Mailchimp campaign subject line and from address configuration
Next, write preview text (also called preheader text). This is the 40–50 characters that appear next to your subject line in the inbox. Make it complement your subject line: if the subject is “3 ways to cut your energy bill,” the preview might be “You’ll save money starting this week.”
Expected result: Your subject line and preview text are filled in. You can see them together in the preview pane, and they align with your campaign goal.
💡 Pro tip: Use Mailchimp’s Inbox Preview tool to see how your subject line and preview text appear across different email clients (Gmail, Outlook, Apple Mail, etc.). This helps catch text that gets cut off.
Step 5: Configure links and enable click tracking
Every button and hyperlink in your email should point to a specific landing page or webpage. Click each button in your email and enter the full URL (for example, https://yoursite.com/offer). Mailchimp provides built-in click-tracking that automatically records subscriber clicks on links within an email campaign for performance reporting.
Enable click tracking by going to Campaign > Settings > Tracking and toggling on “Track clicks.” If you use Google Analytics, Mailchimp’s Link Tracking tool lets users add Google Analytics tracking parameters to their campaign links to monitor traffic and conversions directly within Google’s platform. This is optional but helpful for advanced analytics.
Expected result: All buttons and links in your email have URLs entered. The “Track clicks” toggle is turned on. You can see a small link icon next to tracked URLs in the editor.
Step 6: Run a thorough test send
Testing is your safety net against broken links, misaligned images, and typos that could undermine your credibility with subscribers. Send a test email to yourself and at least one colleague. In Mailchimp, go to Preview > Test Send and enter up to 10 email addresses. Mailchimp’s test send feature allows users to send a live preview of their campaign to multiple addresses simultaneously to review formatting and content before final deployment.
Open the test emails on both desktop and mobile devices (smartphone and tablet). Check for:
- Broken links (click every button and link)
- Typos or formatting errors
- Images that didn’t load
- Text that appears cut off or misaligned on mobile
Mailchimp’s Link Checker tool automatically scans a campaign draft for broken links, missing URLs, and redirect issues prior to sending. Run this tool before your final test send—it catches mistakes you might miss.
Expected result: You’ve received test emails, reviewed them on at least two devices, and confirmed all links work. Any typos or broken links have been fixed.
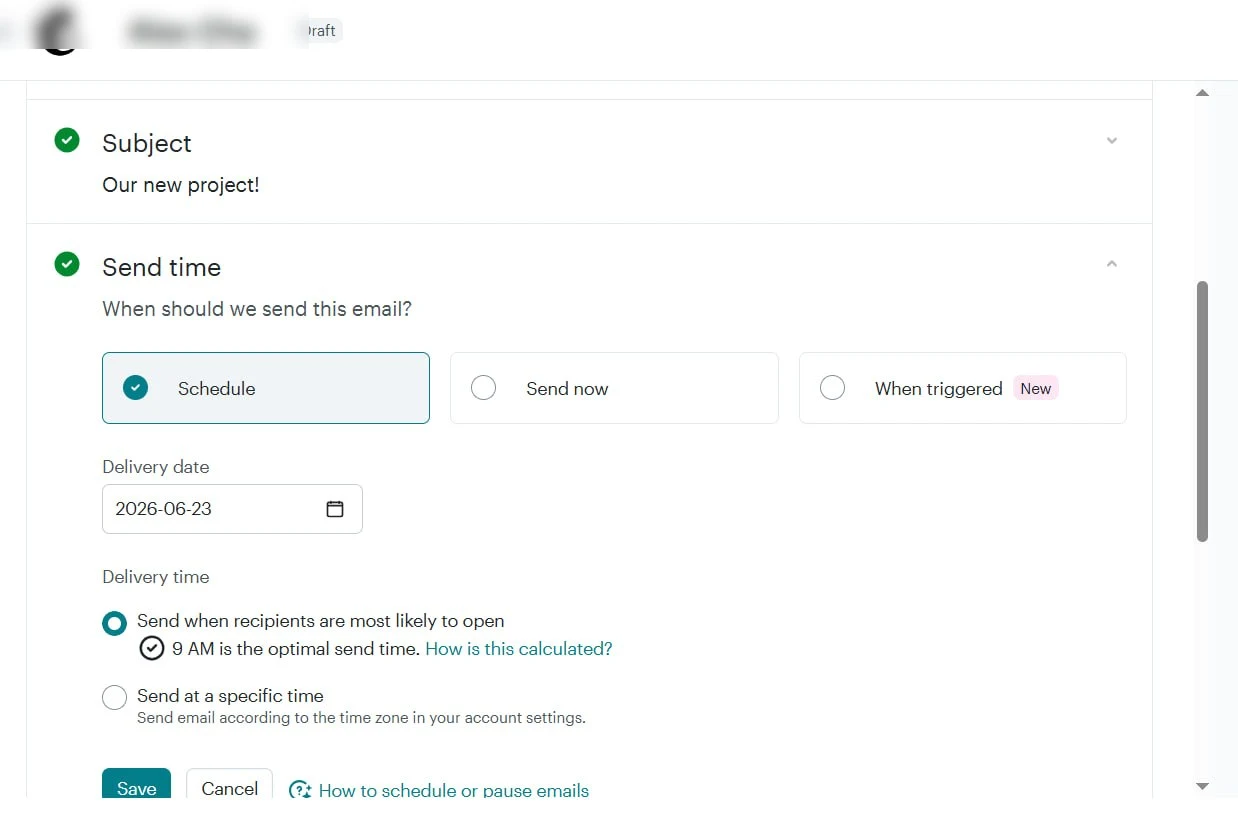
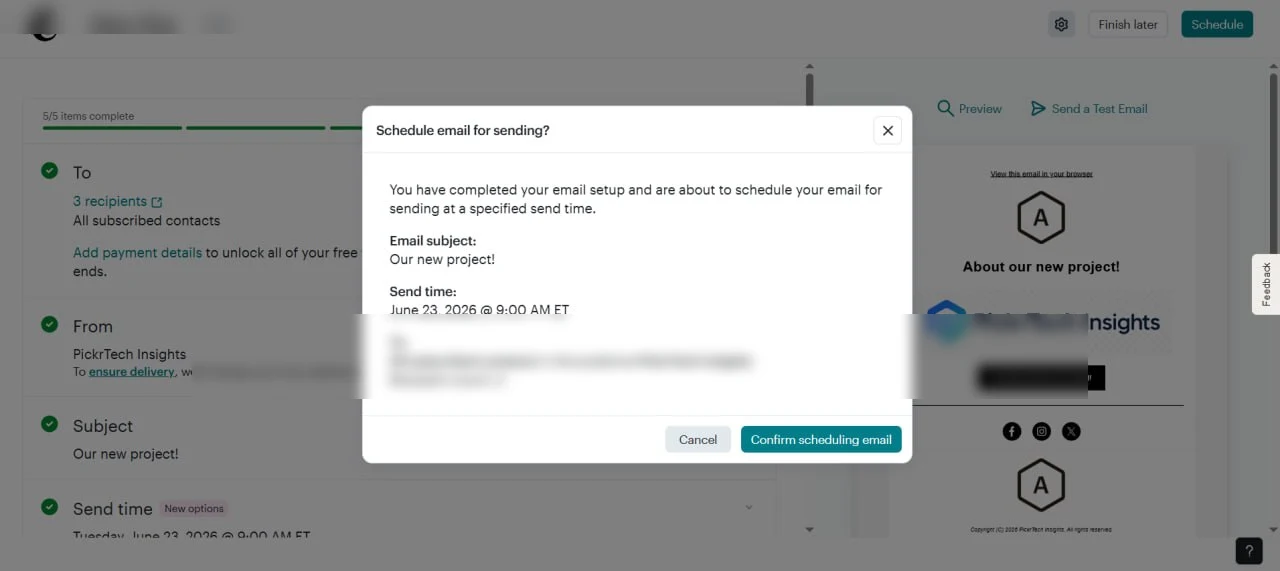
Step 7: Schedule or send your campaign
Confirm your campaign details one last time. In Mailchimp, click Review > Schedule or Send and verify your target audience—you should see the exact number of contacts who will receive the email.
Mailchimp send time scheduling with optimal time recommendation
Choose your send time: send immediately, or schedule it for a specific date and time. Mailchimp allows users to schedule campaigns to send at a specific date and time, automatically adjusting delivery based on the recipient’s local time zone if the feature is enabled.
For more advanced timing, Mailchimp offers a Send Time Optimization feature that analyzes historical subscriber data to automatically suggest the optimal send time for maximum engagement (available on paid plans). Once you confirm, click Send or Schedule.
Mailchimp schedule confirmation dialog showing campaign details
Expected result: Your campaign is sent or scheduled. Mailchimp displays a confirmation message and takes you to the campaign report page. You’ll see delivery progress update in real-time, and metrics (opens, clicks, bounces) begin appearing within minutes.
Recommended first 30-minute setup order
1. Define goal and audience (3 minutes). Write down what success looks like and select your target segment. This prevents sending to the wrong people.
2. Verify sender email (2 minutes). Click the verification link Mailchimp sends you. Without this, your email won’t send at all.
3. Choose template and build (10 minutes). Pick a template, add your text and images, and write your call-to-action button.
4. Write subject line and preview text (3 minutes). Keep it short, benefit-driven, and tested in the preview pane.
5. Add URLs to buttons (3 minutes). Make sure every link points to the right page. Enable click tracking while you’re here.
6. Send test emails (5 minutes). Open them on your phone and desktop. Fix any broken links or typos.
7. Send or schedule (1 minute). Confirm your audience count and hit send.
If you’re very short on time: Skip domain authentication setup for now (you can do it later), but never skip the test send. One broken link or typo can hurt your credibility with new subscribers.
Setup mistakes to avoid
Skipping the test send. One of the most common mistakes beginners make is sending without testing on multiple devices. A broken link, misaligned image, or typo in your email will reach hundreds of people. Spend 5 minutes on test sends—it’s worth it.
Using a “no-reply” sender address. Emails from “noreply@yourcompany.com” feel impersonal and often land in spam. Use a real email address like “hello@yourcompany.com” or “sales@yourcompany.com” so subscribers can reply if they want to.
Forgetting to include an unsubscribe link. By law (CAN-SPAM Act, GDPR), every marketing email must include a working unsubscribe link. Mailchimp adds this automatically, but don’t remove it or hide it. Subscribers who can’t unsubscribe will mark you as spam instead.
Neglecting domain authentication. Skipping SPF and DKIM setup dramatically increases your chance of landing in spam folders. Even if it takes 10 extra minutes, add these DNS records before sending your first campaign. The payoff in deliverability is huge.
Common problems and fixes
Emails bouncing or going to spam folders immediately after sending.
⚠️ Cause: Your sending domain is not authenticated, or your sender email address is not verified. Without SPF and DKIM records, email providers (Gmail, Outlook, Yahoo) treat your emails as suspicious.
🔧 Fix: Go to Mailchimp Settings > Sender identity and verify your email address. Then add the SPF and DKIM DNS records Mailchimp provides to your domain provider’s control panel. This can take 1–2 hours to take effect, but it’s critical for deliverability.
Error message: “You need at least one subscriber before you can send this campaign.”
⚠️ Cause: Your contacts are imported but not marked as subscribed. Manually added subscribers in Mailchimp are saved as unsubscribed by default unless they explicitly checked a consent box.
🔧 Fix: Go to your Audience > All Contacts and check the subscription status of your contacts. If they show “Unsubscribed,” change them to “Subscribed.” Alternatively, re-import your list and ensure the “Subscribe” option is selected during import.
Test email arrives with broken images or misaligned text on mobile.
⚠️ Cause: Your template is not mobile-responsive, or you added custom HTML that doesn’t scale. Many email templates fail to adapt to small screens.
🔧 Fix: Switch to a Mailchimp pre-designed template (they’re all mobile-responsive). If you’ve already built your email, use the Preview pane to check mobile view. Remove any wide images or fixed-width columns. Keep paragraphs short and use Mailchimp’s drag-and-drop blocks instead of custom code.
All links in your test email are broken or point to the wrong page.
⚠️ Cause: You entered incorrect URLs, or URLs were accidentally modified when you pasted them into Mailchimp.
🔧 Fix: Open your email in edit mode and click each button. Verify the URL is complete and correct (it should start with “https://”). Copy URLs directly from your browser’s address bar and paste them into Mailchimp. Run the Link Checker tool to catch any remaining broken links.
Verification checklist
- Sender email address is verified (shows green checkmark in Mailchimp Settings)
- Domain authentication (SPF and DKIM) is complete or in progress
- All links and buttons point to correct URLs and have been tested by clicking them
- Subject line is under 50 characters and is benefit-driven
- Email is tested on at least desktop and mobile and has no broken links, typos, or misaligned images
- Unsubscribe link is present and visible in the email footer
- Physical mailing address is included in the email footer
- Target audience segment is confirmed and shows the correct number of contacts
When to consider a different approach
If your needs are limited to simple, one-off campaigns to a static audience, Mailchimp is a strong fit. However, a few scenarios may require a different tool:
High-volume e-commerce automation: If you’re running an online store and need automated emails when customers make purchases (order confirmations, shipping notifications, abandoned cart reminders), consider Klaviyo or Omnisend. These platforms integrate directly with Shopify, WooCommerce, and other e-commerce systems and automatically trigger emails based on customer behavior. Mailchimp’s automation exists but is more manual.
Enterprise CRM integration: If your business uses Salesforce, HubSpot, or another enterprise CRM to manage customer relationships and you need real-time syncing between email campaigns and customer records, you’ll outgrow Mailchimp’s capabilities. These dedicated CRM platforms include native email tools that stay in sync with your database. If you’re comparing CRM options for a small team, start with our HubSpot CRM evaluation guide.
Complex segmentation and personalization: If your campaigns require deeply personalized content based on purchase history, browsing behavior, or dynamic data fields, platforms like ActiveCampaign or ConvertKit offer more advanced merge tags and conditional logic. Mailchimp’s personalization is solid for beginners but limited for complex use cases.
For a comparison of alternatives, see software reviews to explore other email marketing tools that might fit your workflow.
Frequently asked questions
How do I know if my contact list is opt-in (has consent)?
Check your list source. If contacts signed up through your website, filled out a form, or explicitly requested emails, they’re opt-in. If you bought a list or added names without consent, you’re breaking the law (CAN-SPAM Act, GDPR). Always start with contacts who have chosen to hear from you. In Mailchimp, you can verify this by checking the “Subscription status” column in your audience.
What time should I send my email?
The “best” send time depends on your audience. Generally, weekday mornings (Tuesday–Thursday, 9 AM–12 PM) see higher open rates, but your audience might differ. Mailchimp’s free plan sends immediately, so try sending on a Tuesday morning first. After your first campaign, check your open rates and send times using Mailchimp’s campaign reports to identify patterns. If you upgrade to a paid plan, Mailchimp’s Send Time Optimization feature suggests the optimal time based on your audience’s engagement history.
Will my email be marked as spam?
Spam filtering depends on three factors: sender reputation (your domain authentication), list quality (sending to people who opted in), and content (avoiding spam trigger words like “Free money” or excessive exclamation marks!!!). Follow this checklist: verify your sender email, authenticate your domain with SPF/DKIM, only email opted-in contacts, and avoid spam keywords. If emails still bounce, check Mailchimp’s bounce report to see the specific bounce reason (hard bounce, soft bounce, etc.).
Can I see who opened my email or clicked my links?
Yes. After you send a campaign, Mailchimp displays a report showing open rates (number of people who opened the email), click rates (number of people who clicked links), and subscriber-level detail (you can see which specific subscribers opened it and what they clicked). This data is available in the campaign report immediately after sending and updates for 30 days afterward.
What happens if someone unsubscribes?
They’re removed from your audience’s active subscriber list and moved to “Unsubscribed” status. You cannot send them future campaigns—trying to do so will result in an error. Respect unsubscribes: it’s the law, and unsubscribed users often report emails as spam, which damages your sender reputation. Mailchimp handles unsubscribes automatically when users click the unsubscribe link, so you don’t have to manually remove them.
Sources and notes
- Mailchimp Help Center – About Audiences — used to verify audience and subscription requirements
- Mailchimp Help Center – Verify an Email Address — used to verify sender email requirements
- Mailchimp Help Center – Set Up Custom Domain Authentication — used to verify SPF and DKIM setup process
- Mailchimp Help Center – Getting Started with Email Templates — used to verify template and drag-and-drop editor capabilities
- Mailchimp Help Center – Getting Started with the Email Builder — used to verify drag-and-drop editor features
- Mailchimp Help Center – Preview and Test Your Campaign — used to verify test send and Inbox Preview features
- Mailchimp Help Center – Send a Test Email — used to verify test send functionality and limits
- Mailchimp Help Center – Troubleshoot the Link Checker — used to verify Link Checker tool
- Mailchimp Help Center – Enable Click Tracking — used to verify click-tracking feature
- Mailchimp Help Center – Personalize Subject Lines — used to verify merge tag functionality
- Mailchimp Help Center – Getting Started with Segments — used to verify audience segmentation
- Mailchimp Help Center – About Campaign Reports — used to verify campaign metrics and reporting
- Mailchimp Help Center – Schedule or Pause Campaign Sending — used to verify scheduling functionality
- Mailchimp Help Center – About Send Time Optimization — used to verify Send Time Optimization feature
- Mailchimp Help Center – Avoid Spam Filters — used to verify domain authentication and spam prevention
- Mailchimp Help Center – Add or Import Contacts — used to verify contact import and subscription status
- Mailchimp Official Pricing Page — used to verify free plan availability and features
Disclaimer
This guide is for general informational purposes only and does not constitute professional accounting, tax, legal, or financial advice. Pricing, features, and plan details were verified against Mailchimp’s official website as of June 2026 and may change without notice. Always consult a qualified professional for advice specific to your business situation. PickrTech may earn a commission when you sign up through our links at no extra cost to you. Our recommendations are based on independent evaluation and are not influenced by compensation.
Last reviewed: June 2026 by the PickrTech editorial team.