This article may contain affiliate links. We may earn a commission when you sign up through our links — at no extra cost to you. Our recommendations are based on independent evaluation and are not influenced by commissions.
TL;DR: A free trial evaluation checklist helps you figure out whether HubSpot CRM is worth paying for. Test three core workflows: importing and organizing your contacts, customizing your sales pipeline to match how you actually work, and verifying that email integration and mobile access fit your daily routine.
Free trial evaluation checklist — step-by-step guide for evaluating SaaS tools before subscribing
Before you begin What you’ll need
Account requirements
You’ll need a valid business email address, your first and last name, and your company website URL. The free tier doesn’t ask for a credit card, so there’s zero risk in kicking the tires.
Data needed
Gather a small batch of existing contacts—10 to 20 records—and format them as a CSV file. Include columns for email, first name, last name, and phone number. This approach lets you test the import process without cluttering your account with test data.
Estimated time: 30 minutes
Difficulty: Beginner
Cost implications: Completely free. The free CRM tier includes unlimited contacts, basic deal tracking, and email logging. If you need automated sequences or predictive scoring, you’ll have to pay for Sales Hub Professional or Enterprise.
Step-by-step walkthrough
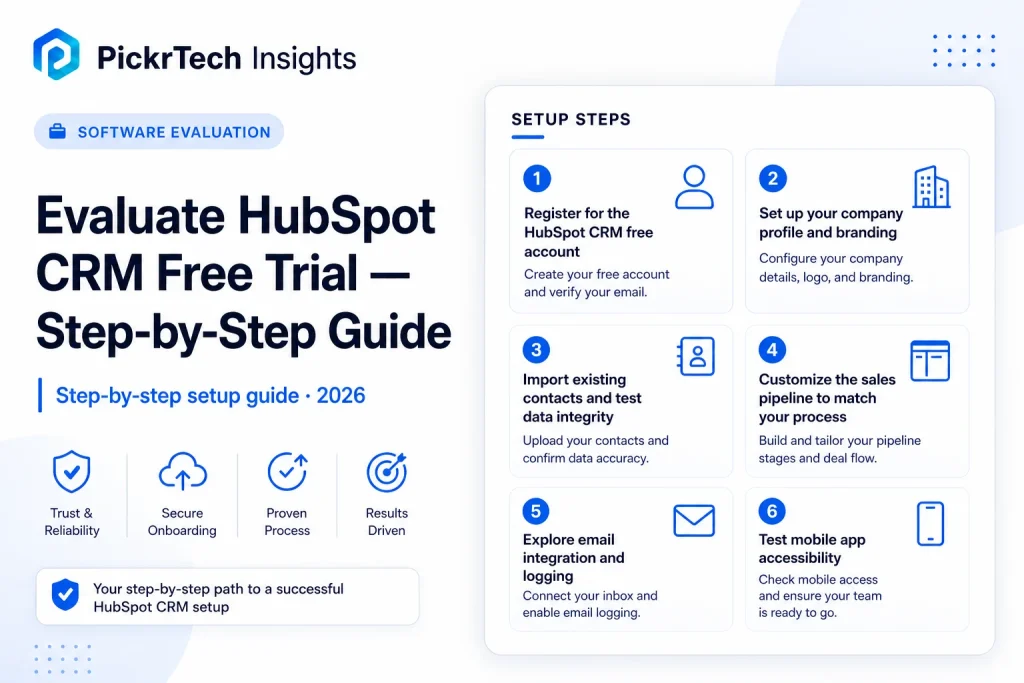
Step 1: Register for the HubSpot CRM free account
Head to the HubSpot CRM pricing page and click “Get started free.” Enter your business email, first name, last name, and company website. Submit the form—HubSpot sends a verification email to your inbox. Click the verification link to activate your account and land on the dashboard.

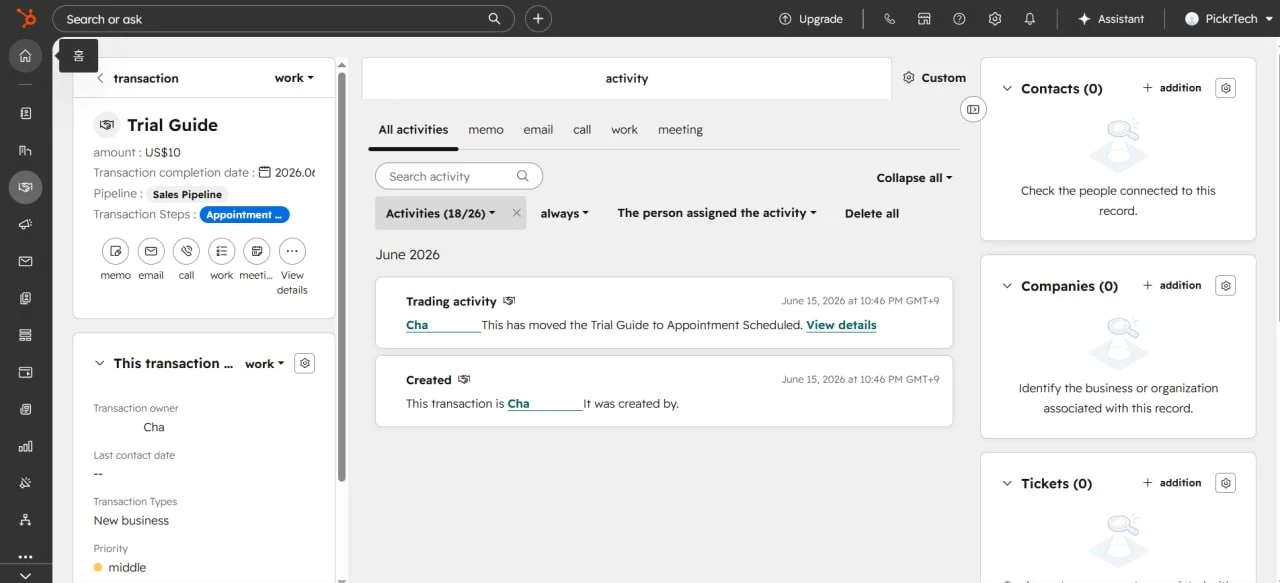
Once you’re in, you’ll see the main CRM dashboard with your contacts, deals, and companies all in one place. This is where you’ll do your evaluation work.
Expected result: You have a working HubSpot account with full access to the free tier. You’re ready to customize your workspace.
💡 Pro tip: Use a team email address instead of a personal one. That way, a colleague can take over the account later if you decide to upgrade.
Step 2: Set up your company profile and branding
Click the Settings icon (gear symbol) in the bottom left, then choose Account defaults. Upload your company logo, enter your official company name, and set your timezone and currency. These details matter because HubSpot uses them to display all dates, times, and deal values correctly in your records.
Getting timezone and currency right now saves headaches later. Wrong settings can throw off your activity logs and confuse your team when they’re reviewing deal amounts.
Expected result: Your company branding shows in the CRM header, and all future dates and deal amounts appear in your local timezone and currency.
Step 3: Import existing contacts and test data integrity
Click Contacts in the main navigation, then select Import. Download the HubSpot contact import template to see the correct column structure. Save your test CSV file with email in the first column—HubSpot uses email as the unique identifier to prevent duplicates. Upload your file and map each column to its corresponding HubSpot field. Double-check that emails, names, and phone numbers are matched correctly, then finish the import.

Start the import flow by uploading a small CSV test file before adding your full contact database.
Head to your Contacts list and verify the records show up with correct data. If any of those email addresses were already in your CRM, HubSpot updated those records instead of creating duplicates.
Expected result: Your test contacts appear in the Contacts list with all fields populated correctly. No duplicate records.
💡 Pro tip: Always include an email column in your CSV. Without it, HubSpot can’t match new contacts to existing ones and will create duplicates.
Step 4: Customize the sales pipeline to match your process
Go to Deals in the main menu. Click Manage next to your default pipeline, then select Edit pipeline. Rename the default deal stages to match your actual sales process—for example, “Negotiation,” “Proposal,” “Closed Won” instead of whatever HubSpot set up by default. You can add new stages, remove ones you don’t need, and set probability percentages for revenue forecasting (like 10% for “Initial Contact,” 50% for “Proposal,” 90% for “Negotiation”).
Create a test deal using one of your imported contacts to make sure deal creation works and your new stage names show up correctly.
Expected result: Your sales pipeline reflects your real-world stages, and you can create and move a test deal through the pipeline without issues.
Step 5: Explore email integration and logging
Click Settings, then go to Inbox. Follow the prompts to connect your primary email inbox—Gmail or Outlook 365. For Gmail, you’ll install the HubSpot Sales Chrome extension; for Outlook, it’s a desktop add-in. Once you’re connected, send a test email to one of your imported contacts. Make sure the Log to CRM checkbox is checked in the email compose window before you hit send.
Check that the email appears in the contact’s activity timeline within HubSpot right away. This confirms that your integration is working and emails will log automatically during normal use.
Expected result: Your inbox is connected to HubSpot, and test emails appear in the contact activity feed within seconds of sending. This is critical for keeping an accurate communication history.
Step 6: Test mobile app accessibility
Download the HubSpot mobile app from the Apple App Store or Google Play. Log in with your HubSpot credentials. Browse your contacts and open one of your test deals. Verify that you can view contact details, change deal stage, and add a note or log a call from your phone.
Mobile access matters if you meet clients outside the office or work from home. Testing it now shows whether your mobile workflow will be smooth or frustrating.
Expected result: You can access your contacts and deals from your phone and make updates that sync back to your desktop account.
Step 7: Evaluate paid features and upgrade triggers
While you’re in the CRM, click on locked features like Workflows (for automation), Quotes (for proposal generation), or Reports (for advanced analytics). A popup tells you which Sales Hub tier unlocks each feature. Check the HubSpot Sales Hub pricing page to see what Professional and Enterprise plans cost.
Decide whether your team needs these paid features right away or whether the free tier is enough for now. This decision shapes your final assessment.
Expected result: You understand which features are free and which cost money, so you can decide whether the free tier meets your needs or if you need to pay from day one.
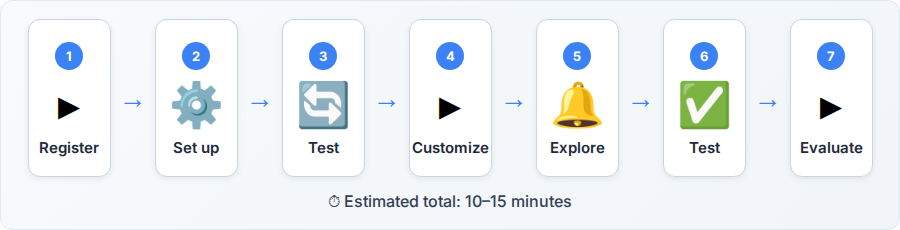
Recommended first 30-minute setup order
1. Register and verify (2 minutes). Sign up for your free account and click the verification email link. Fastest way to get access.
2. Set company defaults (2 minutes). Upload your logo and set timezone/currency. Quick but essential for accurate data display.
3. Import test contacts (8 minutes). Prepare your CSV file and upload 10–20 test contacts. Spend time here because it reveals whether your data structure works with HubSpot.
4. Customize your pipeline (8 minutes). Rename deal stages and create one test deal. This directly impacts your daily workflow, so don’t skip it.
5. Connect your email inbox (5 minutes). Install the email extension and send a test email to verify logging. Email integration can be a dealbreaker if it doesn’t work smoothly.
6. Check mobile app (3 minutes). Download the app, log in, and confirm you can view a contact. Skip this if you only use desktop, but test it if you work remotely.
7. Explore paid features (2 minutes). Skim the upgrade prompts and pricing page to understand what’s missing in the free tier. Use this to decide whether to continue the evaluation or upgrade immediately.
Setup mistakes to avoid
Over-importing data initially. Don’t upload your entire contact database on day one. Import a small test batch (10–20 records) to verify your data structure is compatible. Once you confirm the import works, add more contacts gradually. A large import with mapping errors clutters your account and forces you to clean up duplicates.
Skipping pipeline customization. If you leave the default deal stages unchanged, your sales process won’t map cleanly to HubSpot. Spend five minutes renaming stages to match your actual workflow. Without this step, your team will resist using the CRM because the terminology won’t make sense.
Ignoring email integration setup. Many users skip the email inbox connection and regret it later when they realize they have to manually log every email. Test email logging during the trial so you know whether it adds value or creates extra friction.
Forgetting to test integrations and permissions. If you plan to connect HubSpot to Slack, your website form tool, or other software, test these integrations during your trial. Some integrations require paid plans, and others have surprisingly complex setup steps. Discovering this on day 30 of your trial wastes your evaluation window.
Common problems and fixes
- Sent emails are not logging to the contact record.
⚠️ Cause: The HubSpot email extension is installed but not actively connected, or the “Log to CRM” checkbox wasn’t checked before sending the email.
🔧 Fix: Verify that the HubSpot extension shows a green “Connected” status in your email compose window. Before sending your next test email, confirm the “Log to CRM” checkbox is checked. If the extension still doesn’t work, reinstall it and reconnect your inbox through Settings > Inbox.
- Duplicate contact records appear after importing a CSV file.
⚠️ Cause: Your CSV file lacked an email column, or email addresses weren’t mapped correctly during import. HubSpot uses email as the primary unique identifier; without it, the system treats each row as a new contact.
🔧 Fix: Make sure your CSV includes an “Email” column as the first column. During import, verify that the email column is mapped to the “Email” field in HubSpot (not “Email (alternate)” or any other variation). Re-import the file with the corrected mapping, and HubSpot will update existing records instead of creating duplicates. You may need to manually delete the duplicate records that were created.
- Deal stages in your pipeline are confusing or don’t match your sales process.
⚠️ Cause: You either didn’t customize the default pipeline stages, or you created stage names that your team doesn’t recognize or use in daily conversation.
🔧 Fix: Navigate to Deals > Manage > Edit Pipeline. Rename each stage to match the exact terminology your team uses (e.g., “Qualified Lead,” “Needs Analysis,” “Proposal Sent”). Test the updated pipeline by creating a deal and moving it through each stage. If your team still finds the stages confusing, adjust them again—this is a low-cost change during the trial.
Verification checklist
- Your HubSpot account is created and email verified
- Company logo and timezone are set in account defaults
- Test contacts imported successfully with no duplicate records
- Deal pipeline stages renamed to match your sales process
- Email inbox connected and test email logged to a contact record
- Mobile app downloaded and you can view a contact on your phone
- You identified at least two paid features you need or don’t need for your workflow
- You understand the cost and plan type required for any features your team considers essential
When to consider a different approach
HubSpot CRM is a strong fit for small businesses managing a straightforward sales process with fewer than 50 team members. But HubSpot might not be the right choice if you need advanced project management (task dependencies, Gantt charts, time tracking) or a highly customized database with unique field types and complex relationships.
If your business requires deep integrations with legacy enterprise software, a fully self-hosted solution, or industry-specific compliance features—like HIPAA for healthcare or specialized financial services tooling—you might want to explore alternatives. Check our software reviews for comparisons of CRM tools built for specialized industries.
If your team is already locked into a competing CRM like Salesforce or Pipedrive and switching would demand extensive data migration and retraining, the cost of the switch may not be worth HubSpot’s free tier.
Frequently asked questions
Q: Does the free trial require a credit card?
A: No. HubSpot’s free CRM tier requires only a valid email address and company website. You can use the free plan indefinitely without entering payment information. This makes it ideal for risk-free evaluation.
Q: How long can I use the free tier before HubSpot forces me to upgrade?
A: There’s no time limit on the free CRM tier. You can use it as long as you need. Certain features—like automation, advanced reporting, and predictive scoring—are locked behind paid tiers. Check the HubSpot sales hub pricing page to understand when you’ll need to upgrade.
Q: If I import contacts during the trial, do I lose them if I decide not to upgrade?
A: No. Your contacts and deal records stay in your account indefinitely, even if you never upgrade to a paid plan. You own your data. HubSpot may limit the number of users who can access the account or restrict automation features if you stay on the free tier, but your historical data isn’t deleted.
Q: Can I connect HubSpot to my website forms or other business software?
A: Some integrations are available on the free tier, and others require a paid plan. During your evaluation, explore the Integrations section (Settings > Integrations) to verify that the software you want to connect is supported. If an integration is locked, check the pricing page to see which tier unlocks it.
Q: What happens to my data if I delete my HubSpot account?
A: Once you delete your account, all data is permanently removed after 30 days. You can export your contacts and deals as CSV files at any time before deletion, so you can preserve your data if you switch to another CRM.
Sources and notes
- HubSpot CRM Pricing Page — Used to verify free tier requirements and no-credit-card signup policy
- HubSpot Knowledge Base – Importing Objects — Verified CSV import process and template availability
- HubSpot Mobile App Product Page — Confirmed free app availability on iOS and Android, and mobile contact and deal management features
- HubSpot Sales Hub Pricing — Verified paid tier features including automation, lead scoring, and custom reporting
Disclaimer
This guide is for general informational purposes only and does not constitute professional accounting, tax, legal, or financial advice. Pricing, features, and plan details were verified against HubSpot’s official website as of June 2026 and may change without notice. Always consult a qualified professional for advice specific to your business situation. PickrTech may earn a commission when you sign up through our links at no extra cost to you. Our recommendations are based on independent evaluation and are not influenced by compensation.
Last reviewed: June 2026 by the PickrTech editorial team.