TL;DR: An email marketing checklist is your safety net before sending your first campaign — verify your audience, sender details, content, and links so nothing embarrassing reaches real inboxes. Three steps matter most: (1) define your goal and audience segment, (2) verify your sender address and authenticate your domain, (3) test the email on desktop and mobile before sending. One heads-up before you start: Mailchimp’s Free plan currently supports up to 250 contacts and 500 email sends per month, with a daily send limit of 250. Skip to the reusable pre-send checklist if you just want the final gate before you hit Send.
Where this guide fits: This checklist helps you launch and test a Mailchimp campaign. If you are still choosing between email platforms, start with the email marketing by use case comparison. If your email workflow depends on CRM follow-up, compare options in the CRM guide.
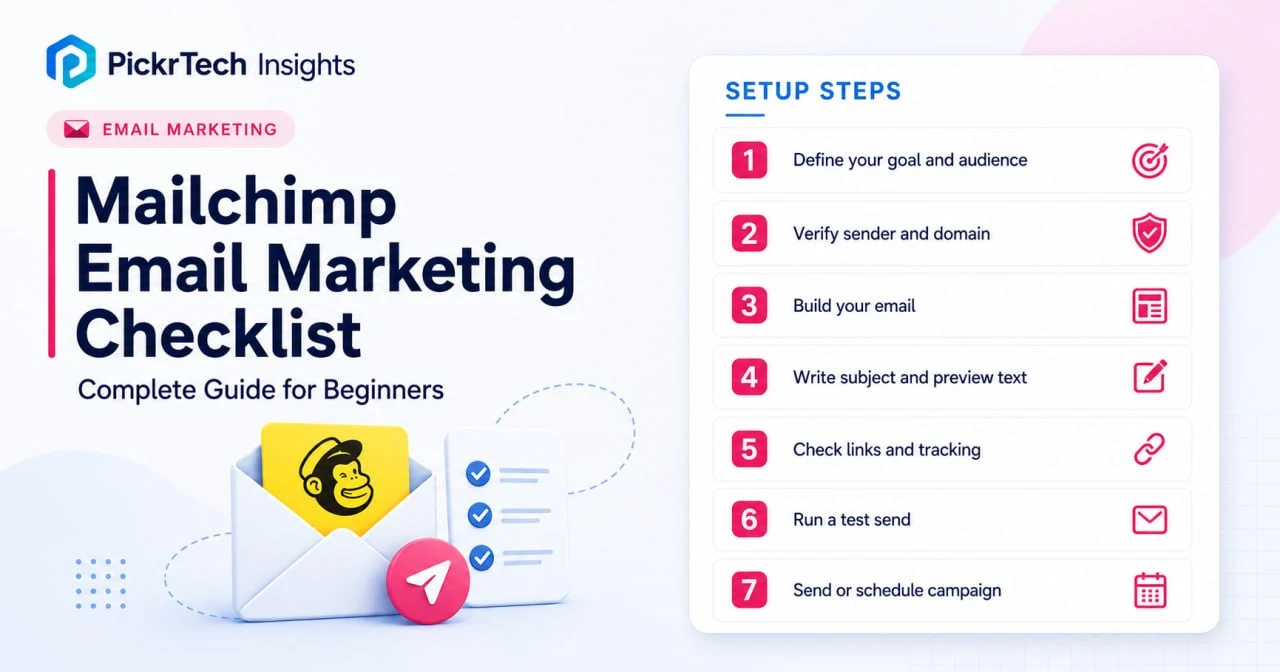
Before you begin: what you’ll need
Account requirements
You’ll need a Mailchimp account (a Free plan exists, with real limits — more on that below) and at least one contact in your audience who has explicitly agreed to receive your emails. An audience needs at least one subscribed contact before Mailchimp will let you send anything to it.
Data needed
Gather your contact list (CSV or spreadsheet format), a clear campaign goal (drive clicks to a blog post, announce a promotion), your email copy, any images you want to include, and your business’s physical mailing address for the footer — the CAN-SPAM Act requires it.
Estimated time: 20–30 minutes for the first campaign, plus a one-time 10–15 minutes for domain authentication. Difficulty: beginner.
Cost implications: Mailchimp’s current Free plan supports up to 250 contacts, 500 email sends per month, and 250 sends per day, and test emails count toward the monthly send limit. That’s enough for up to two full-list sends to 250 contacts before tests or other campaigns use part of the allowance. Here’s how the plans map to this checklist (USD pricing shown on Mailchimp’s main pricing page for up to 500 contacts, checked July 18, 2026; the $13 and $20 rates are introductory prices for the first 12 months, and promotional, regional, and checkout pricing may vary):
| Plan | Displayed price (US, 500 contacts) | What it means for this checklist |
|---|---|---|
| Free | $0 — 250 contacts, 500 sends/month | Supports the seven campaign steps and immediate sending. No scheduling and no Marketing Automation Flows. The Mailchimp badge stays in the footer. |
| Essentials | $13/month for the first 12 months | Adds scheduled sending, higher test-send limits, email and chat support, and Marketing Automation Flows limited to four steps per flow. |
| Standard | $20/month for the first 12 months | Adds Send Time Optimization, Timewarp (delivery by recipient time zone), advanced segmentation, and Marketing Automation Flows with up to 200 steps per flow, plus branching such as conditional and percentage splits. |
Watch the send counter. On the Free plan, every test email you send counts toward your 500-send monthly limit, and if your audience creeps past 250 contacts, Mailchimp pauses all sending — live and test — until you upgrade or trim the list. Archive old or unsubscribed contacts before your first campaign so you don’t hit the wall mid-send.
Build and send your first campaign, step by step
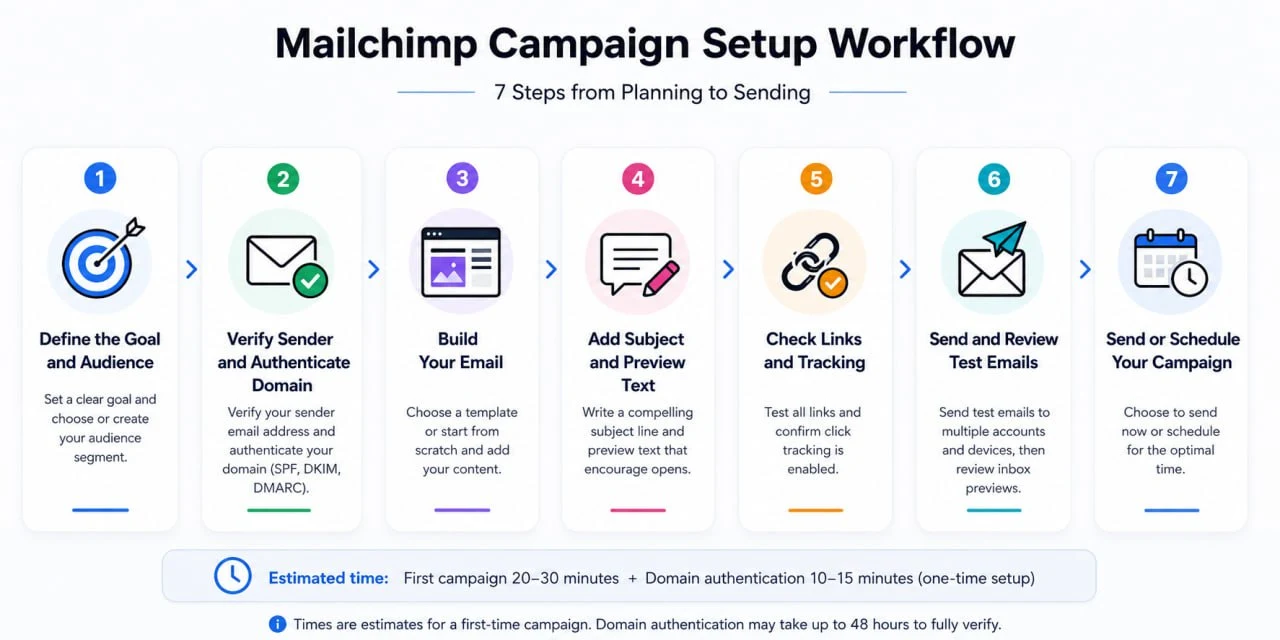
First-party evidence note: The Mailchimp interface screenshots in this guide were captured from a PickrTech test account in June 2026. Account and recipient details are blurred.
Step 1: Define your campaign goal and audience segment
A clear goal dictates every decision in your campaign, so write down exactly what success looks like before you touch the editor. Are you after clicks, opens, replies, or a measurable conversion such as a purchase or form submission? Mailchimp reports track opens and clicks when tracking is enabled. Purchase and revenue data require a connected store or another supported tracking setup, so define a conversion only when your current setup can measure it.
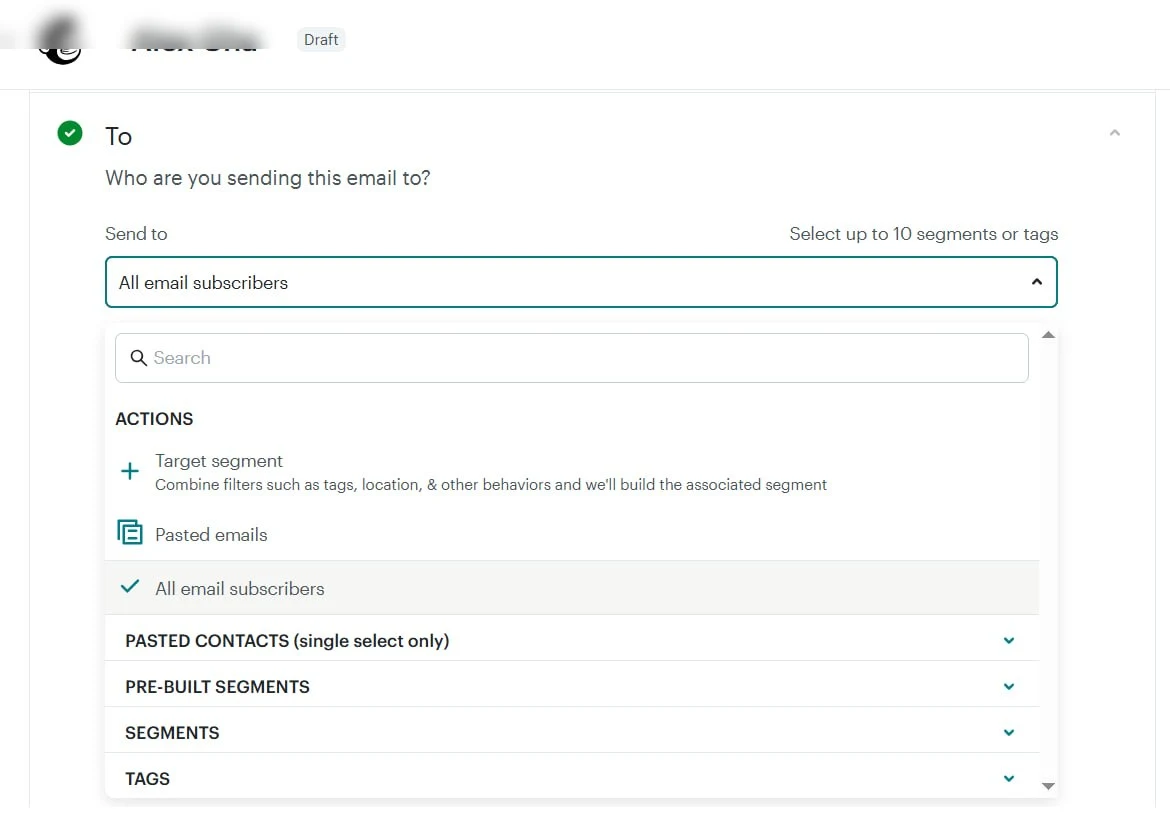
Mailchimp campaign recipient selection showing audience targeting options
Next, decide which subscribers to target. If your list uses tags or groups, pick your specific segment now — say, “subscribers from the last 30 days” or “customers in the Northeast.” Segments work on every plan, including Free, and they’re built from tags, group subscriptions, and contact data.
Expected result: You have a one-sentence goal written down and a target segment selected in Mailchimp, with the contact count visible in the campaign builder.
💡 Pro tip: Start with a single segment. On a 250-contact Free plan, a focused send also stretches your 500 monthly sends further — you can always run follow-up campaigns to other groups.
Step 2: Verify your sender address and authenticate your domain
First, a hard truth that trips up most beginners: you can’t authenticate a free email address. If your From address is @gmail.com or @yahoo.com, Mailchimp will quietly rewrite your sending domain to something like send.mailchimpapp.com to get past DMARC checks. Your emails will still deliver, but they’ll look less like they came from you. If you own a domain — even just for your website — use an address on it (like hello@yourbusiness.com) from day one.
In Mailchimp, click your profile icon, choose Account & billing > Domains, and add the email address you’ll send from. Mailchimp emails you a verification link — click it to confirm you own the address. Sending is blocked until this is done.
Then authenticate the domain itself. Mailchimp’s current manual setup provides two CNAME records for DKIM and one TXT record for DMARC, with the exact values to add at your domain provider (GoDaddy, Namecheap, Cloudflare, etc.). Supported providers can also use Entri to configure the records automatically, which turns a fiddly 15-minute job into two clicks. Validation often completes within minutes but can take up to 48 hours. Gmail and Yahoo apply additional mandatory authentication requirements to bulk senders that send more than 5,000 messages to their users within 24 hours. Smaller senders should still authenticate, because verified, authenticated mail is easier for receiving systems to trust and troubleshoot.
Expected result: Your sender address shows as verified, and the domain status on the Domains page reads “Authenticated.” If it still says “Authentication in progress,” you can keep building your email while DNS propagates.
Step 3: Choose a template or build your email
Go to Create > Email and start a regular campaign. Pick one of Mailchimp’s pre-designed templates — they’re all mobile-responsive, which will save you grief when you test — or start from a blank canvas. The drag-and-drop editor handles text, images, buttons, and social links without any HTML.
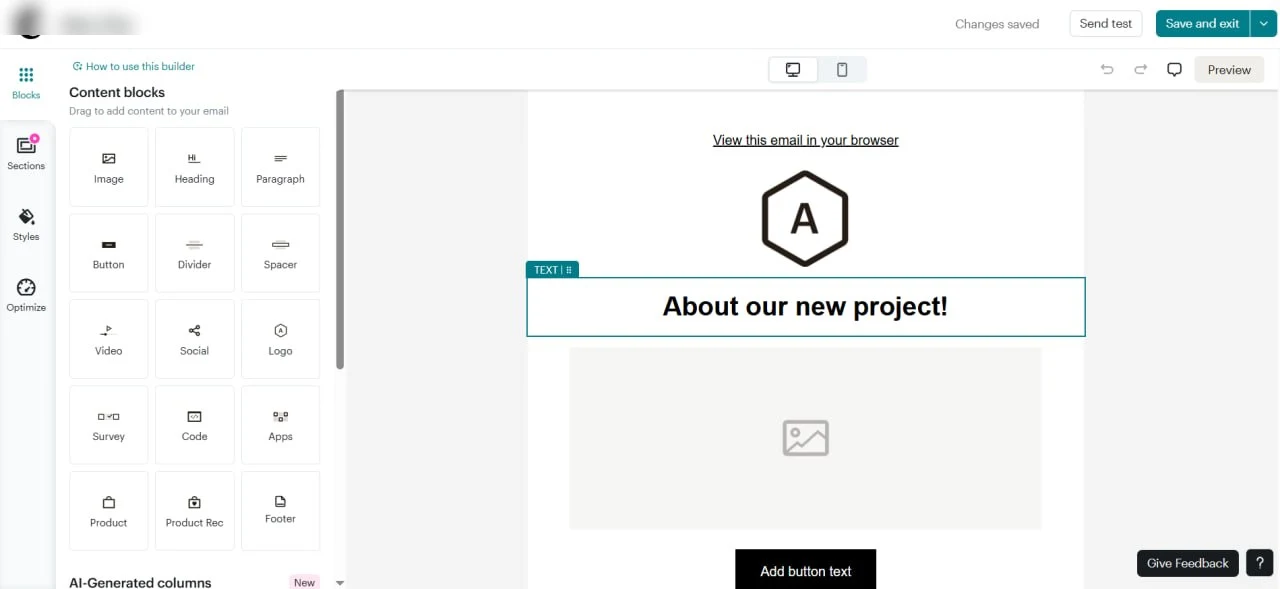
Mailchimp email builder with drag-and-drop content blocks and design canvas
Drag your content blocks into place: an optional header image, your body text, at least one call-to-action button, and your business’s physical mailing address at the bottom (legally required). Short paragraphs and generous white space make the email far easier to read on a phone, which is where most of your subscribers will open it.
Expected result: Your email has body text, a call-to-action button, and a footer with your business address, and the desktop preview looks the way you intended.
Step 4: Write a click-worthy subject line and preview text
Your subject line is the first thing subscribers see. Mailchimp recommends keeping it to no more than nine words and 60 characters. Make it specific and benefit-driven — “3 ways to lower your energy bill” is more useful than “June Newsletter.” You can personalize it with merge tags: Hi *|FNAME|*, check out this offer pulls each subscriber’s first name from your audience data. (That starred syntax is Mailchimp’s — square brackets won’t work.)
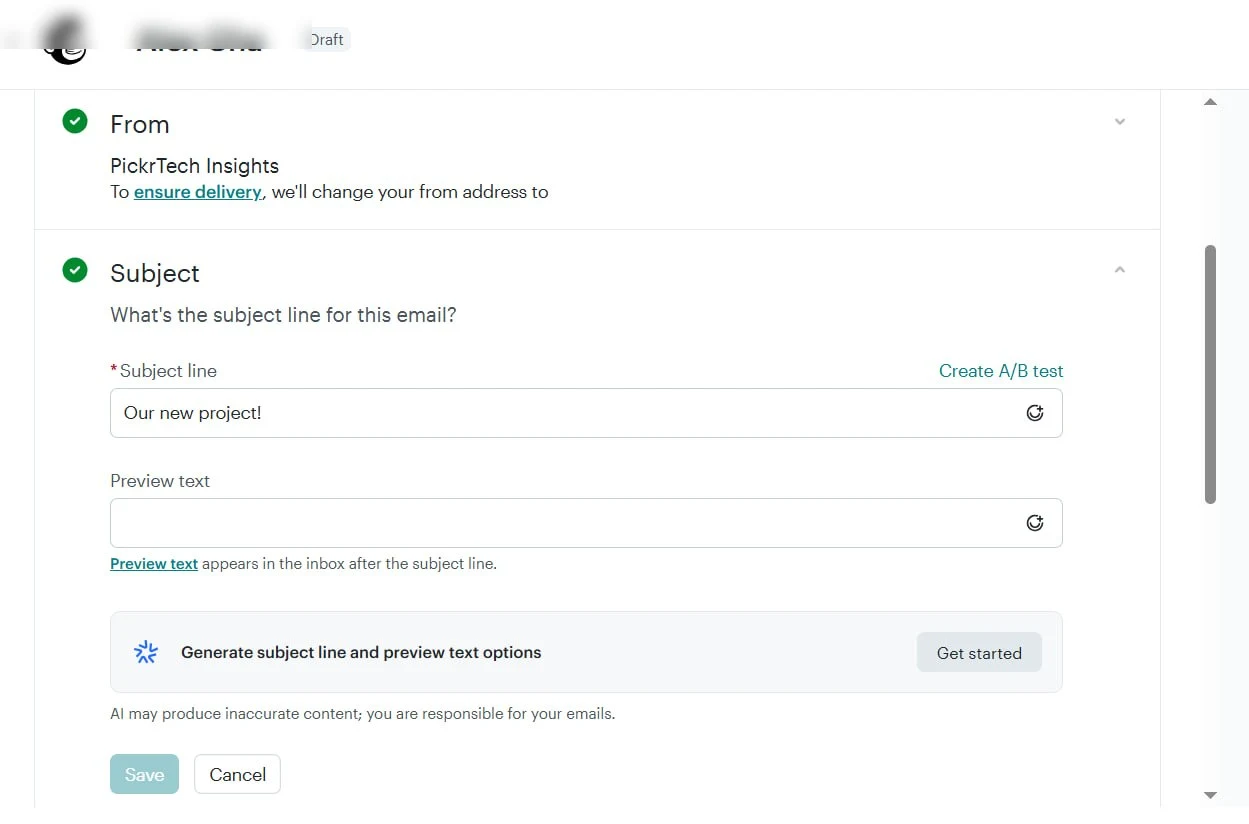
Mailchimp campaign subject line and from address configuration
Then write concise preview text, also called preheader text. It should add context rather than repeat the subject: if the subject is “3 ways to lower your energy bill,” the preview might be “Practical changes you can start this week.” Check the combined subject and preview in the inbox preview, because the visible length varies by device and email client.
Expected result: Subject line and preview text are filled in, read well together in the preview pane, and match your campaign goal.
💡 Pro tip: On paid plans, the Inbox Preview tool can render your email in clients such as Gmail, Outlook, and Apple Mail so you can catch truncated text (availability varies by tier). On the Free plan, the built-in desktop/mobile preview plus a real test send to a Gmail and an Outlook address gets you most of the way there.
Step 5: Configure links and enable click tracking
Every button and hyperlink should point somewhere specific. Click each button in the editor and paste the full URL, including the https:// — copy it straight from your browser’s address bar rather than typing it. Click tracking records who clicked what, and it’s the data your campaign report runs on.
Confirm “Track clicks” is toggled on under your campaign’s Settings & Tracking (it’s on by default). If you use Google Analytics, the Google Analytics link tracking option appends UTM parameters to your campaign links so the traffic shows up in GA — optional, but handy once you’re past your first send.
Expected result: Every button and link has a complete URL, and click tracking is on.
Step 6: Run a thorough test send
Testing is your safety net against broken links, misaligned images, and typos. In the email checklist, open Preview and choose Send a test email. On the Free plan you can include up to 6 addresses per test, with a cap of 12 tests per email and 24 total tests in 24 hours (paid plans get 20 addresses and much higher caps). Send one to yourself and one to a colleague on a different email provider.
Two quirks worth knowing before you burn through tests: merge tags like *|FNAME|* don’t populate in test emails — use the “Enable live merge tag info” toggle in preview mode to check those instead — and on the Free plan, every test counts toward your 500 monthly sends.
Open the test emails on both desktop and mobile, and check for:
- Broken links (click every button and link)
- Typos or formatting errors
- Images that didn’t load
- Text that appears cut off or misaligned on mobile
Before your final test, run the Link Checker (in the same Preview menu). It scans the draft for broken links, missing URLs, and redirect problems — the mistakes your eyes skip over on the fifth read.
Expected result: You’ve reviewed the test emails on at least two devices, every link works, and any typos are fixed.
Short on time? Sender-address verification can’t be deferred — Mailchimp requires it before sending. Domain authentication may remain in progress while you finish building and testing the campaign, but don’t treat it as optional. Complete the DNS records as soon as possible, and never skip the test send: one broken link reaching your whole list costs more credibility than any authentication delay.
Step 7: Send your campaign (or schedule it, on paid plans)
Review your campaign details one last time. The pre-send screen shows the exact number of contacts who will receive the email — confirm it matches the segment you picked in Step 1.
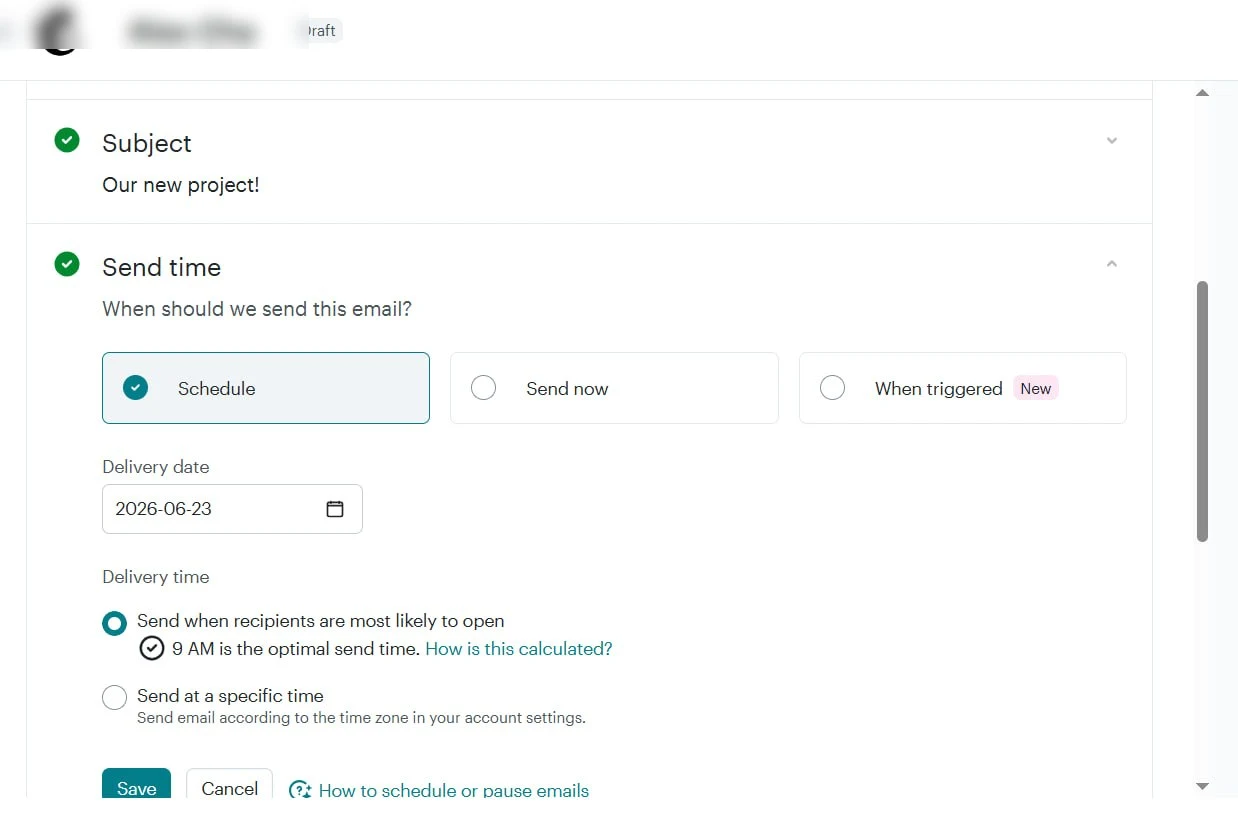
Send scheduling with an optimal-time recommendation — scheduling requires Essentials or higher, and Send Time Optimization requires Standard
How you send depends on your plan. On the Free plan, campaigns go out immediately when you click Send — there’s no scheduling, so just pick a good moment. A weekday mid-morning (Tuesday to Thursday, roughly 9 a.m. to noon in your audience’s time zone) is a safe first bet; check the campaign report afterward and adjust from what you see. On Essentials and up, you can schedule a specific date and time. Standard adds two smarter options: Send Time Optimization, which recommends a send time based on when your subscribers historically click, and Timewarp, which delivers at a set hour in each recipient’s own time zone (schedule Timewarp sends at least 24 hours ahead).
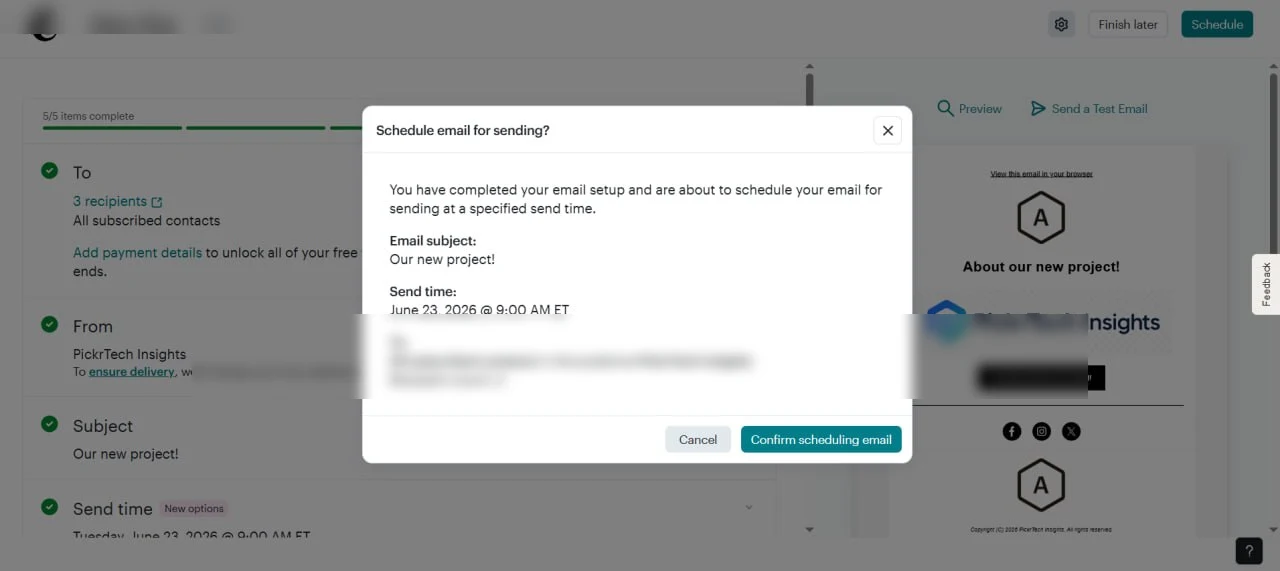
Confirmation dialog before the campaign goes out (schedule view shown — Free plan users see the immediate-send confirmation instead)
Expected result: Your campaign is sent (or scheduled), and Mailchimp drops you onto the report page, where opens, clicks, and bounces start appearing within minutes.
Your reusable pre-send checklist
This is the part worth keeping. Copy the checklist below into your campaign notes and run every item before you press Send — it stays the same whether it’s your first campaign or your fiftieth. It folds in the Mailchimp-specific traps that vendor help pages scatter across a dozen articles: test sends eating your monthly quota, merge tags that stay blank in previews, and unsubscribed contacts that keep counting until you archive them.
Sender and domain
- From address is on a domain you own — not @gmail.com or @yahoo.com, which get their sending domain rewritten
- Sender address shows Verified in Account & billing > Domains
- Domain authentication reads “Authenticated” (or at least “Authentication in progress,” with the two DKIM CNAMEs and one DMARC TXT record added)
Content and rendering
- Subject line is no more than nine words and 60 characters, specific, and benefit-driven
- Preview text adds context rather than repeating the subject
- Email opened on desktop and mobile — no cut-off text, misaligned blocks, or images that fail to load
- Merge tags checked with “Enable live merge tag info” (they stay blank in test sends)
Links and tracking
- Every button and link has a complete URL including
https://, copied from the address bar rather than typed - Link Checker run — no broken links, missing URLs, or redirect problems
- “Track clicks” is on
Compliance
- Working unsubscribe link in the footer — leave Mailchimp’s default in place
- Physical mailing address in the footer (CAN-SPAM)
- Every recipient actually opted in — Subscription status shows Subscribed
Plan and limits (Free plan)
- List is under 250 contacts — archive unsubscribed or dead contacts, which count until archived
- Enough of your 500 monthly sends left, remembering each test send counts too
- Recipient count on the pre-send screen matches the segment you intended
Troubleshooting: bounces, spam, and broken sends
Most first-campaign problems trace back to one skipped step — the test send. Run it every time; there’s no unsend. When something does go wrong, deliverability comes down to three things: sender reputation (authentication), list quality (only emailing people who opted in), and content (no “Free money!!!” territory). The fixes below map to the errors you’re most likely to hit.
Emails bounce or go straight to spam.
⚠️ Cause: Your sender address may be unverified, your domain may be unauthenticated, or you may be using a free email domain that cannot be authenticated through Mailchimp. Gmail and Yahoo impose stricter mandatory requirements on bulk senders above 5,000 messages to their users within 24 hours, but authentication remains a useful deliverability safeguard for smaller senders as well.
🔧 Fix: Under your profile icon, go to Account & billing > Domains, verify your address, and add the two CNAME (DKIM) records and one TXT (DMARC) record Mailchimp gives you — or let Entri set them automatically. Validation usually takes minutes but can run up to 48 hours. If you’re on a free email address, switch to one on a domain you own first. A “no-reply@” address technically works but invites spam reports and feels impersonal — use a real, replyable address like hello@yourcompany.com.
Error: “You need at least one subscriber before you can send this campaign.”
⚠️ Cause: Your contacts imported with the wrong status. Mailchimp only sends campaigns to contacts marked Subscribed — anyone imported as non-subscribed, unsubscribed, or without a status set during import won’t receive email.
🔧 Fix: Open Audience > All contacts and check the subscription status column. If a new import was mistakenly assigned Non-subscribed status and you have documented permission from those contacts, correct or undo the import and add them with the appropriate status. Do not re-import someone who previously unsubscribed as Subscribed. A contact who unsubscribed through a Mailchimp email must resubscribe through your Mailchimp-hosted signup form.
Test email arrives with broken images or misaligned text on mobile.
⚠️ Cause: The template isn’t mobile-responsive, or custom HTML doesn’t scale. Fixed-width layouts and oversized images are the usual culprits.
🔧 Fix: Switch to one of Mailchimp’s pre-designed templates — they’re all responsive. If you’ve already built the email, check the mobile view in the Preview pane, remove wide images and fixed-width columns, and stick to the drag-and-drop blocks instead of custom code.
Links in the test email are broken or point to the wrong page.
⚠️ Cause: A URL was typed by hand, pasted incompletely, or lost its https:// prefix on the way in.
🔧 Fix: Open the email in edit mode and click through each button. Copy every URL directly from your browser’s address bar, then run the Link Checker to catch anything you missed.
When Mailchimp isn’t the right fit
For simple, one-off campaigns to a small static audience, Mailchimp does the job. A few scenarios point elsewhere:
You need automation beyond a short four-step flow. The Free plan doesn’t include Marketing Automation Flows at all. Essentials caps each flow at four steps, and Standard raises that to up to 200 steps per flow and adds branching such as conditional and percentage splits. If longer welcome sequences, complex drip campaigns, or branching are central to your plan and you’d rather not move to Standard, MailerLite and Brevo include automation on their free tiers — see the email marketing by use case comparison.
High-volume e-commerce automation. If you run an online store and need behavior-triggered emails — abandoned cart reminders, order follow-ups — Klaviyo or Omnisend integrate more deeply with Shopify and WooCommerce and trigger from customer behavior out of the box.
Enterprise CRM integration. If your business runs on Salesforce or HubSpot and you need real-time syncing between campaigns and customer records, you’ll outgrow Mailchimp — those platforms’ native email tools stay in sync with the database. Comparing CRM options for a small team? Start with our HubSpot free trial evaluation guide.
Deep personalization. If your campaigns hinge on purchase history, browsing behavior, or conditional content blocks, ActiveCampaign and Kit (formerly ConvertKit) offer more advanced conditional logic. Mailchimp’s personalization is fine for a first campaign but thin for complex use cases.
Frequently asked questions
How do I know my list is opt-in?
Check the list source. Contacts who signed up through your website, completed a signup form, or explicitly requested marketing emails are opt-in. Mailchimp requires permission before you add or import contacts as subscribed, and in Mailchimp the “Subscription status” field confirms which contacts are eligible to receive marketing email.
Legal requirements vary by jurisdiction. The U.S. CAN-SPAM Act sets rules for commercial email and gives recipients the right to opt out, while consent requirements can be stricter under laws that apply in other regions. Do not buy lists or mark people as subscribed without permission.
Can I trust my open and click numbers?
Clicks are generally more useful than opens, but neither metric is perfect. Mailchimp reports opens and tracked clicks, while privacy features and automated security or bot activity can inflate both. Use bot filtering when available, compare trends across multiple campaigns, and treat downstream actions such as purchases, replies, downloads, or completed forms as stronger conversion evidence.
What happens when someone unsubscribes?
They move to “Unsubscribed” status automatically, and future campaigns skip them. Respect it — it’s the law, and people who can’t leave quietly report you as spam instead. One budgeting catch worth knowing: unsubscribed contacts still count toward your contact limit until you archive them, on the Free plan and paid plans alike. Archiving dead contacts is the quickest way to stay under the 250-contact cap.
Next steps
- Building an online store? Read our 6-step preparation guide before setting up email campaigns.
- If your campaign connects to sales follow-up, compare CRM tools for small business.
- Evaluating several tools at once? Use the software evaluation scorecard.
Sources and notes
- Mailchimp Help Center – About Mailchimp Pricing Plans — Free plan limits (250 contacts, 500 sends/month, 250/day), test sends counting toward limits, plan features
- Mailchimp Official Pricing Page — currently displayed Essentials and Standard pricing at the 500-contact tier; offers and regional pricing may vary
- Mailchimp Help Center – About Marketing Automation Flows — automation step limits per plan (Essentials up to 4 steps, Standard up to 200 steps) and Standard-only branching (conditional and percentage splits)
- Mailchimp Help Center – Verify an Email Address — sender verification requirement
- Mailchimp Help Center – Verify an Email Domain — Account & billing > Domains workflow, free email address limitations
- Mailchimp Help Center – About Email Domain Authentication — CNAME (DKIM) + TXT (DMARC) records, Entri
- Mailchimp Help Center – Set Up Email Domain Authentication — validation timing (minutes to 48 hours)
- Mailchimp Help Center – Limitations of Free Email Addresses — DMARC rewriting of Gmail/Yahoo From addresses
- Mailchimp Help Center – About Test Email Sending Limits — 6 addresses / 12 tests per email / 24 per day on Free
- Mailchimp Help Center – Email Testing Tips — merge tags not populating in test emails
- Mailchimp Help Center – Enable Click Tracking — click tracking settings
- Mailchimp Help Center – Schedule or Pause a Regular Email — scheduling gated to Essentials+, STO/Timewarp gated to Standard+
- Mailchimp Help Center – Use Send Time Optimization — Standard plan requirement
- Mailchimp Help Center – Use Timewarp — recipient time zone delivery, 24-hour lead time
- Mailchimp Help Center – Getting Started with Segments — audience segmentation
- Mailchimp Help Center – About Campaign Reports — reporting metrics and open/click reliability caveats
- Mailchimp Help Center – Add or Import Contacts — subscription status during import
- Google – Email Sender Guidelines — SPF, DKIM, and DMARC requirements for bulk senders
- U.S. Federal Trade Commission – CAN-SPAM Compliance Guide — physical postal address and opt-out requirements for commercial email
Disclaimer
This guide is for general informational purposes only and does not constitute professional accounting, tax, legal, or financial advice. Pricing, plan limits, and feature availability were verified against Mailchimp’s official website and help center as of July 2026 and may change without notice. Always consult a qualified professional for advice specific to your business situation.
Last reviewed: July 2026 by the PickrTech editorial team.