TL;DR: Capacity planning in Asana takes about 15 minutes to stand up: create a project with an hour-estimate custom field, give every task an owner plus start and due dates, then open the Workload tab to see who is over capacity and drag work until nobody is. Two plan gates decide what you actually get — custom fields need Starter ($10.99/user/month billed annually), and the Workload view needs Advanced ($24.99/user/month). Before you commit annually, check the seat math: Asana sells seats in blocks of five above five users, which makes your sixth hire the first major seat-cost cliff.
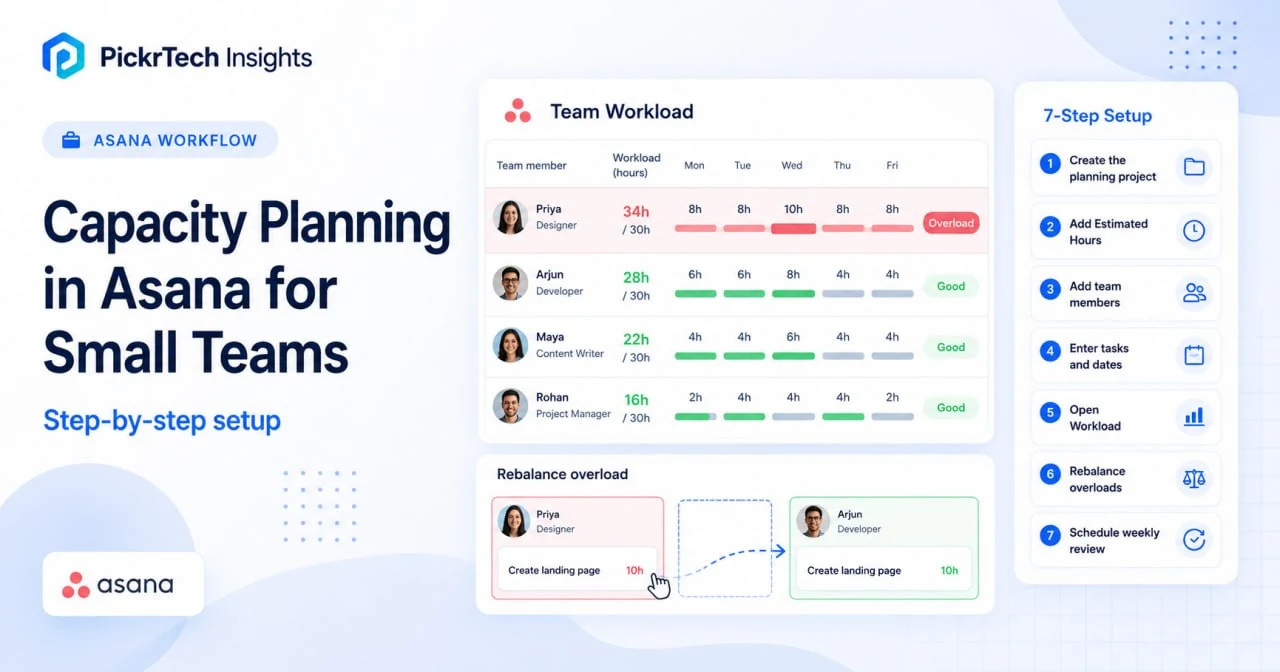
The seven-step Asana setup, from effort fields and task dates to workload rebalancing and a weekly review
Which Asana plan you need before you start
You need a paid Asana account, and it is worth knowing exactly why before you spend the 15 minutes. Asana’s free Personal plan allows only 2 seats per project and team and does not include custom fields at all, so the hour-tracking approach below simply cannot be built on it for a real team. The Starter plan ($10.99 per user/month billed annually, $13.49 billed monthly) unlocks custom fields and lets you run a manual version of this system. The visual Workload view — the part that does the arithmetic for you — requires the Advanced plan ($24.99 per user/month annually, $30.49 monthly), which Asana renamed from “Business” in 2023. If you are following an older tutorial that mentions the Business plan, Advanced is the same tier.
The two gates that will actually stop you: custom fields (Steps 2–4) need Starter or above, and the Workload view (Steps 5–6) needs Advanced or above. The free Personal plan allows only 2 seats per project and team, so a team of three already needs paid seats for everyone. Check the official Asana pricing page before committing to an annual term.
What to have ready
Have three things to hand before you open Asana: a rough task list for the coming week, your team roster (this setup is designed for 3–15 people), and a realistic sense of each person’s weekly availability. On that last point, resist the urge to write 40. Nobody has 40 hours of uninterrupted task time once meetings, email, and ad-hoc requests are counted — 30 or 32 is the number that will actually hold up, and setting it honestly now is what stops the Workload view from crying wolf later.
Budget roughly 15 minutes for the configuration itself, plus however long it takes to type in one week of real tasks. No technical skill is required at any point.
Build the system: seven steps in Asana
Every screenshot below comes from a PickrTech Asana workspace on the Advanced plan, captured in July 2026. Where our observed behaviour differs from Asana’s published documentation, we say so explicitly rather than smoothing over the gap.
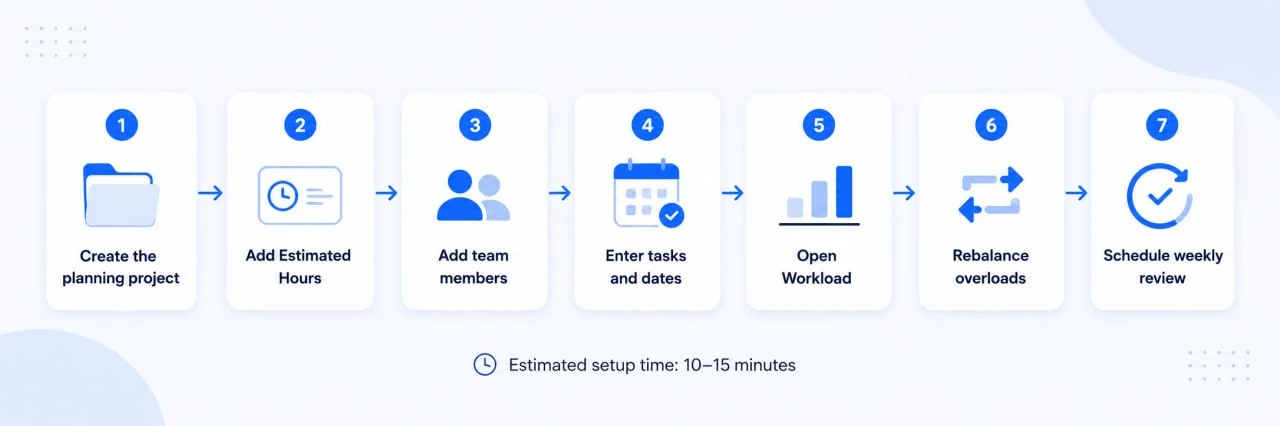
Step 1: Create a dedicated capacity planning project
A single central hub is what keeps capacity data from scattering across inboxes and spreadsheets. Click the + icon in your left sidebar to create a new project. You can start from a blank project, use a template, or import an existing task list by CSV.
Name it something unmistakable, such as “Team Capacity Planning,” and choose List as the default layout. List view is the fastest surface for data entry because it shows every task and custom field in a compact, spreadsheet-like grid. You can switch to Board or Timeline later without losing anything.
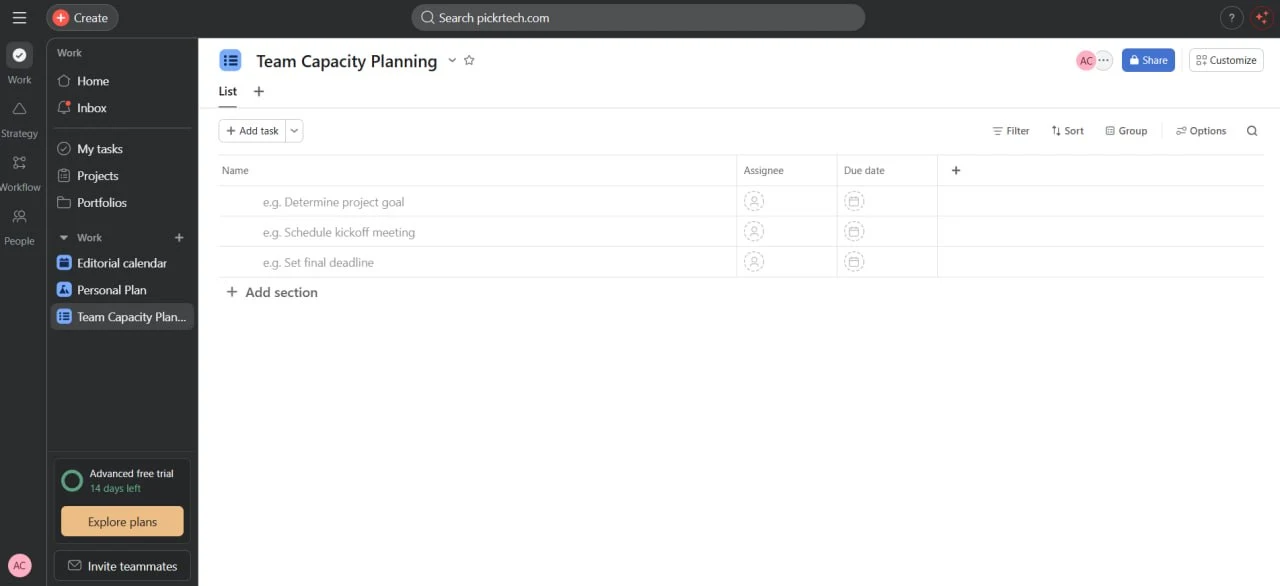
Step 2: Add an “Estimated Hours” custom field
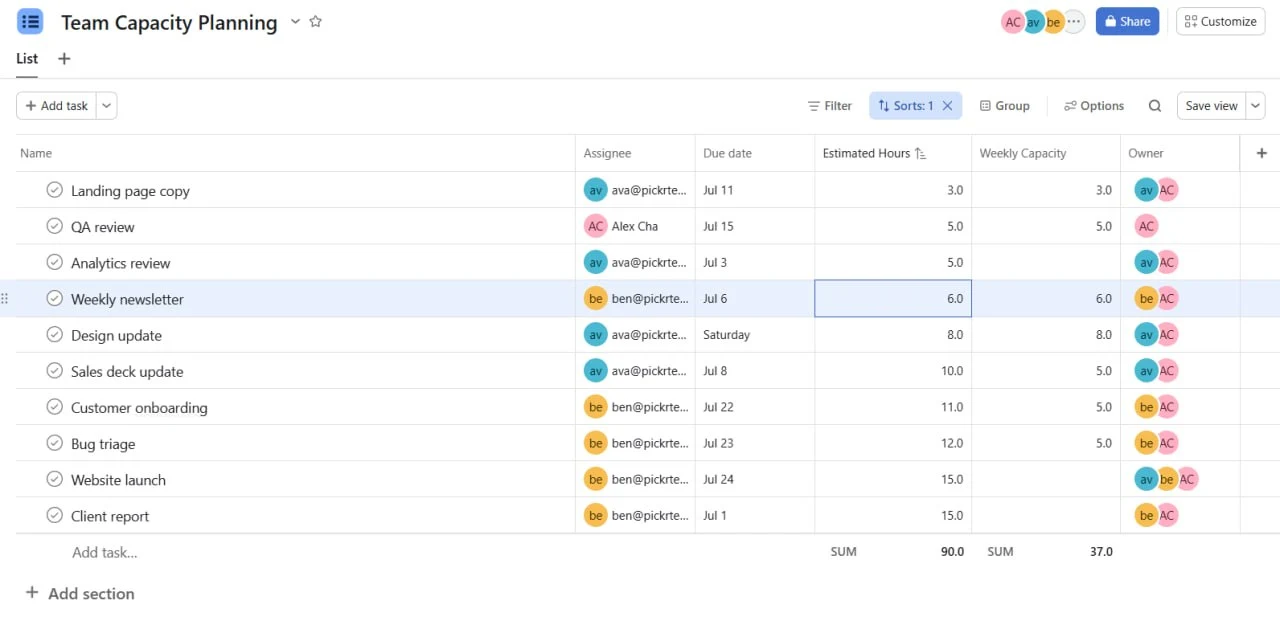
You need exactly one custom field for this system to work. Click the Add Custom Field icon in the project header and create a Number field called “Estimated Hours.” Once created, it applies automatically to every task in the project, so you never have to add it card by card.
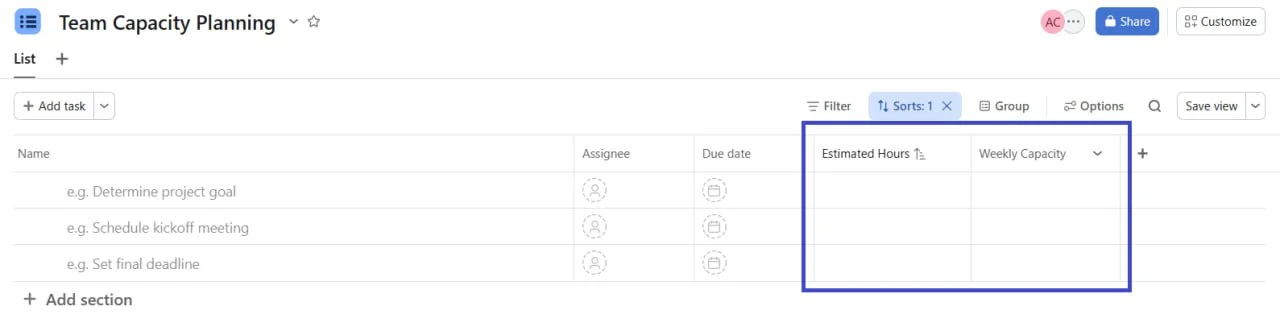
You will notice a second “Weekly Capacity” column in that screenshot. You can add one as a visual reminder, but understand what it is: cosmetic. Capacity is a property of a person, not a task, and nothing in Asana reads a per-task capacity field. Where each person’s weekly limit actually lives depends on your plan — on Advanced you set it per person inside Workload settings (Step 5), and on Starter you keep the number in the project brief and compare it against their summed hours. If an extra column would tempt your team into filling it in task by task, skip it.
Skip the temptation to build a “Remaining Capacity” formula field too. Asana’s formula fields, themselves gated to Advanced, calculate from numbers within a single task. They cannot aggregate the hours assigned to one person across a project, so a per-task formula will never produce a per-person running total. The Workload view is what does that job.
Step 3: Add your team as project members
Click the member avatars in the project header and add everyone who will have work assigned to them, either by email address or by picking existing members of your organization. Anyone added to the project appears automatically in the assignee dropdown when you create or edit a task. If your team already shares an Asana organization, this takes a few seconds per person.
Step 4: Enter this week’s work with dates and estimates
Create tasks for the current week plus any confirmed work for the next one. Each task needs three things: an assignee, a start and due date, and a number in the Estimated Hours field.
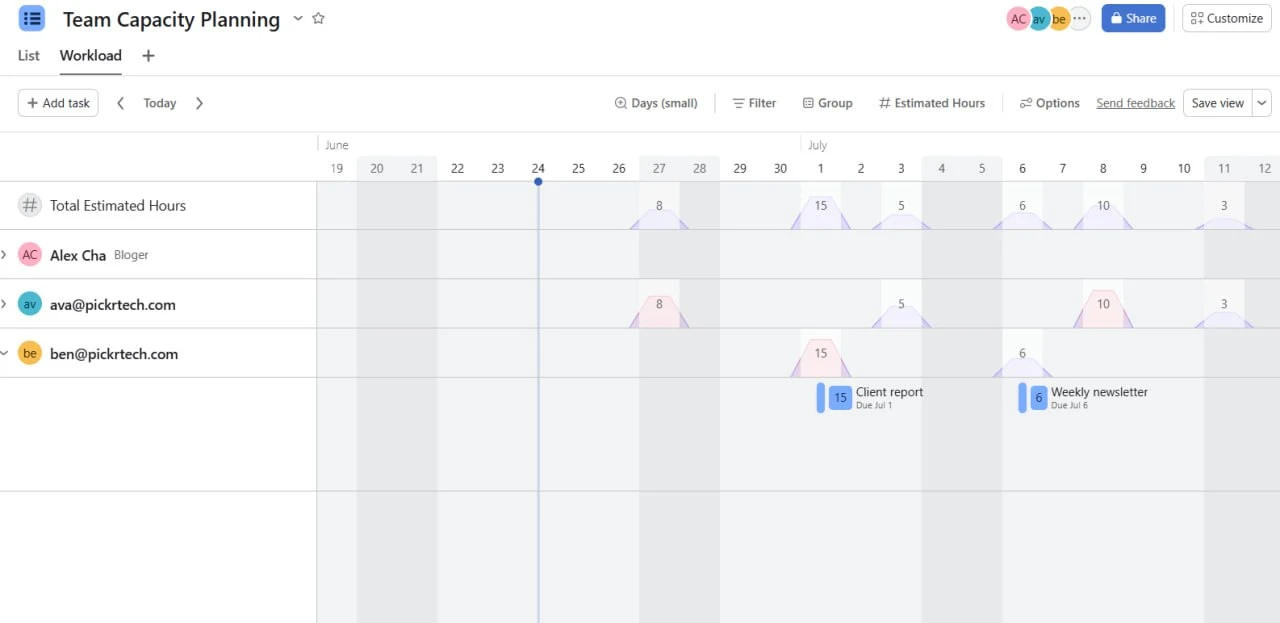
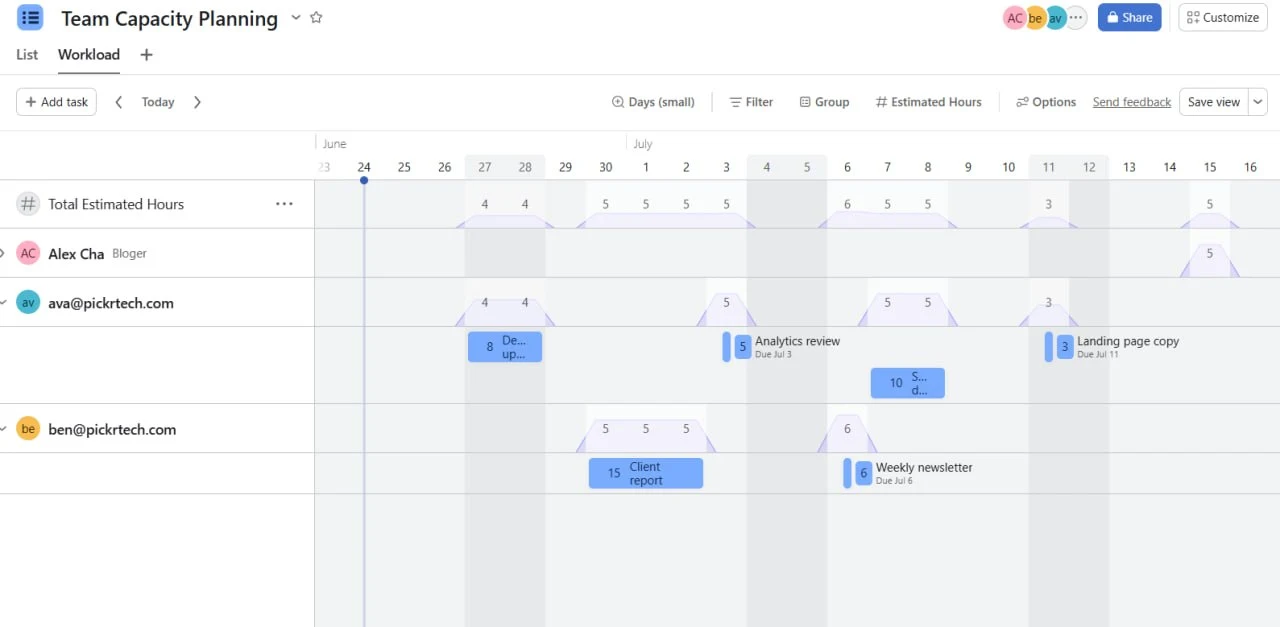
The dates matter more than they look. Workload spreads a task’s hours evenly across the days between its start and due date, so a task carrying only a due date dumps its entire estimate onto one day and manufactures an overload spike that is not real. This single omission causes more false alarms than anything else in this setup. Give a 40-hour task a two-week span and it shows as roughly four hours a day; leave the start date blank and it shows as a 40-hour wall.
Your estimates do not need to be precise, but they do need to be honest. The goal is order of magnitude — 2 hours versus 16 hours — because that is the resolution at which overloads become visible. Refine them as work proceeds rather than agonising up front.
If you have a long backlog, paste directly from a spreadsheet or import a CSV to create tasks in bulk. Every task needs an owner and an estimate; anything left blank is invisible to the capacity math.
Step 5: Open the Workload tab and map it to your hours field
On Advanced and above, click the + at the end of your project’s tab row and select Workload. The view lays out allocated hours per assignee across a timeline.
One thing worth flagging, because it contradicts the documentation you will find if you search: Asana’s own Workload guidance describes Workload as a portfolio feature and instructs you to add projects to a portfolio first, and the pricing page lists the Advanced entitlement as “Portfolio Workload.” In our workspace, Workload appeared directly as a project-level tab with no portfolio involved — which is why this guide can promise 15 minutes rather than sending you off to build a portfolio first. If the option is missing from your project’s + menu, the documented route still works: create a portfolio, add this project to it, and open the portfolio’s Workload tab.
Either way, two configuration steps follow. Click Add effort and point it at your “Estimated Hours” field so the view knows what to count. Then click the effort field, choose Set capacity, and enter each person’s weekly maximum — the 30 or 32 hours you settled on earlier, not 40. Asana then colour-codes whether each person sits under, at, or over that ceiling.
On Starter you do not get this tab, but the manual fallback is workable at small team sizes: in List view, group tasks by assignee and turn on the sum for the Estimated Hours column, then compare each person’s total against the weekly limit you recorded in the project brief. It is a Monday-morning eyeball rather than a live calculation, which for a five-person team is often enough.
Step 6: Find the overloads and rebalance
When someone’s assigned hours exceed the capacity you set, Asana draws a red line across their bar. That is your overload flag, and it is the whole reason for the preceding five steps.
To clear one, expand that person’s row into the drill-down view and drag tasks either to a colleague with headroom or to a different week. Workload recalculates instantly, so you can test several arrangements before settling on one. Keep going until no bar crosses its red line.
One quirk to know before you start dragging: subtasks do not appear in Workload. If someone’s real week is buried in subtasks, their bar will look deceptively empty. Promote that work to full tasks, or convert the parent task into its own project.
Step 7: Lock in a Monday review
A capacity system decays within about two weeks without a standing review. Create a task called “Weekly Capacity Review,” assign it to yourself, and use the repeat option in the due date menu to set it for every Monday. Asana generates the next instance automatically when you complete the current one.
Fifteen minutes covers it: update estimates that turned out wrong, close finished work, and reassign anything that priorities have overtaken. Keep the detailed hour tracking to a rolling two-week window — estimates for work three or four weeks out are guesses that generate rework rather than insight.
What this costs over 12 months
Here is the annual math for a representative 5-person team, using Asana’s published US pricing as of July 2026.
| Plan (5 users) | Per user/month | 12-month total | What it unlocks here |
|---|---|---|---|
| Starter, annual billing | $10.99 | $659.40 | Custom fields — manual capacity planning (Steps 1–4) |
| Starter, monthly billing | $13.49 | $809.40 | Same, without an annual commitment |
| Advanced, annual billing | $24.99 | $1,499.40 | Workload view with per-person capacity (Steps 5–6) |
| Advanced, monthly billing | $30.49 | $1,829.40 | Same, without an annual commitment |
The automated Workload view costs this team $840 a year over Starter. That is the real price of not doing the arithmetic yourself, and for five people running a 15-minute manual review each Monday, Starter is frequently the better trade.
The seat-block math nobody mentions
The per-user table above quietly assumes you can buy exactly as many seats as you have people. Above five users, you cannot. Asana sells seats in blocks — single seats between two and five users, then blocks of five up to thirty, then blocks of ten up to a hundred. For a team in the 3–15 range this guide targets, that turns headcount into a staircase rather than a slope.
| People on the team | Seats you must buy | Starter, 12 months | Advanced, 12 months |
|---|---|---|---|
| 3 | 3 | $395.64 | $899.64 |
| 5 | 5 | $659.40 | $1,499.40 |
| 6 | 10 | $1,318.80 | $2,998.80 |
| 10 | 10 | $1,318.80 | $2,998.80 |
| 12 | 15 | $1,978.20 | $4,498.20 |
| 15 | 15 | $1,978.20 | $4,498.20 |
Two numbers in that table deserve attention. Your sixth hire doubles the bill — on Advanced, going from five people to six adds $1,499.40 a year while adding one person, because you are forced up to a ten-seat block and pay for four empty seats worth $1,199.52. The same cliff repeats at eleven people, where you jump to fifteen seats.
The practical consequence is that team sizes of 5, 10, and 15 are the efficient places to sit, and 6 and 11 are the worst. If you are at five people and hiring within the year, you will move to the ten-seat block as soon as the sixth person is added — so factor it in before signing an annual term, and consider whether the fifth-to-tenth seats justify Advanced or whether Starter plus the manual method carries you until the team fills the block.
When the Workload view shows the wrong numbers
The Workload option is missing from my project
Two causes, in order of likelihood. First, plan: Workload is available on Advanced, Enterprise, and Enterprise+ only, never on the free Personal plan or Starter. Second, entry point: if you are on Advanced and still cannot see it in the project’s + menu, use the route Asana documents — create a portfolio, add this project to it, and open the portfolio’s Workload tab. Staying on Starter, group your List view by assignee and sum the Estimated Hours column instead.
Bars show zero hours even though tasks are assigned
Workload is not reading your custom field, or the tasks have no value in it. Open Workload settings, click Add effort, and confirm the calculation points at “Estimated Hours.” Then filter your task list for blank estimates — a task with an owner but no number contributes nothing to the bar.
Everyone looks overloaded on a single day
Almost always missing start dates. Workload distributes hours across the start-to-due range, so tasks carrying only a due date stack their full estimates on one square. Add start dates and the spikes flatten into something you can act on. If they persist afterwards, check whether you set capacity to 40 hours rather than a realistic 30–32.
I cannot build a formula for remaining capacity per person
You cannot, and you should stop trying. Asana’s formula fields operate on numbers within a single task and cannot sum everything assigned to one person. That aggregation is precisely what Workload exists to do — it totals each person’s effort and measures it against the capacity you set.
New team members are missing from the assignee dropdown
They have not been added to the project, they lack a seat in your workspace, or you are on the free Personal plan and have hit its 2-seat limit for that project or team. Click the member avatars in the project header to invite them directly, confirm their seats are active, and upgrade if the cap is what you are running into.
Verification checklist
Work through these before you call the system done.
- A dedicated capacity planning project exists in your workspace
- The “Estimated Hours” number field appears on every task card
- Everyone who receives work is a project member and appears in the assignee dropdown
- Every task this week has an assignee, a start date, a due date, and an hour estimate
- Workload reads from Estimated Hours, and each person has a weekly capacity set at a realistic 30–32 hours
- No bar crosses its red capacity line for the current week
- A recurring Monday capacity review is scheduled
When Asana stops being the right tool for this
This setup works well for small teams that need hour tracking and a visual overload check. It runs out of road in three specific situations.
- Your team passes 15 people. At that size you need role-based scheduling and visibility across every project at once. Asana does offer Universal Workload and a dedicated Capacity Planning feature, but both sit on Enterprise plans with quote-only pricing — and by then you are also paying for a 15- or 20-seat block, which is the point at which comparing dedicated resource management tools becomes worth the afternoon.
- You need forecasting beyond about four weeks. This system is deliberately built on a rolling two-week window. Long-range pipeline and utilisation forecasting is a different job requiring a different class of tool.
- Your work lives in Jira. If capacity needs to tie to story points and sprint velocity, a developer-oriented resource tool will fit far better than hour estimates typed into Asana by hand.
Next steps
- If scheduling collisions are part of the same workload problem, our double-booking prevention setup guide covers the calendar side.
- If your team also needs a lighter structure for recurring work, see our Trello board templates for small teams.
Sources and notes
- Asana Pricing — official plans page — verified US prices, the 2-seat-per-project-and-team Personal limit, which plan holds custom fields, Workload, formulas, and time tracking, and the seat-block increments used in the cost tables
- Asana Workload — official feature page — verified that Workload is included on Advanced, Enterprise, and Enterprise+, and that Asana documents the portfolio route
- Asana Help Center — Workload and Universal Workload — verified how effort spreads across dates and how drag-and-drop rebalancing behaves
- Asana — guide to Workload — verified effort field mapping, per-person capacity limits, the red overload line, and the subtask limitation
Note: this guide reflects Asana’s interface, plan names, and pricing as of July 2026. Screenshots were captured in a PickrTech Asana workspace on the Advanced plan during the same month.
Disclaimer
This guide is for general informational purposes only and does not constitute professional accounting, tax, legal, or financial advice. Pricing, features, and plan details were verified against Asana’s official website as of July 2026 and may change without notice. Always consult a qualified professional for advice specific to your business situation.
Last reviewed: July 2026 by the PickrTech editorial team.