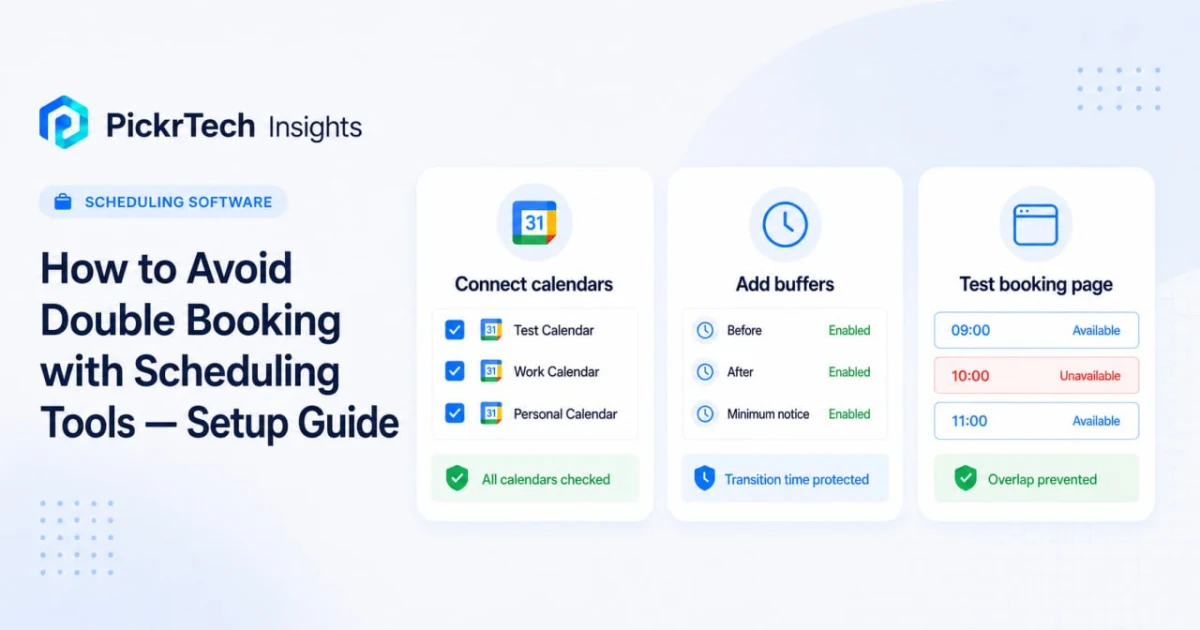
Short version: Double booking stops when one scheduling tool can see every calendar that holds a commitment. Connect those calendars, select each one for conflict checks, set buffers, then book a test meeting on your own link before sharing it. Two catches worth knowing up front: Calendly’s free plan connects only one calendar account, and connecting a calendar is not the same as telling Calendly to check it — we measured both effects on a live account, and the results are further down.
What this setup prevents, and what it does not
A scheduling tool prevents one specific failure: someone booking a slot you have already committed elsewhere. It does that by reading the free/busy status of every calendar selected for conflict checks and hiding times that are already spoken for.
It does not fix overcommitment. If three people book three separate hours on the same afternoon, every one of those bookings was technically valid. Caps and buffers help, but they are a budgeting decision, not a conflict-detection feature.
This guide assumes you manage your own appointments and want the overlap problem closed structurally rather than by remembering to check. It uses Calendly as the working example because the settings are named consistently across its plans; the same four concepts exist in Acuity, HubSpot Meetings, and most competitors under different labels. If your real problem is workload rather than calendar collisions — people are free on paper but already at capacity — the capacity planning setup in Asana is the more useful starting point.
What you need before you start
- A digital calendar you actually use — Google Workspace, Microsoft 365, or iCloud
- Permission to add and edit events on every calendar involved
- An account with a scheduling tool — this guide uses Calendly
- Admin access to the shared account, if you are configuring this for a team
The plan gate, before you spend 20 minutes: two of the five steps below need a paid Calendly tier. The free plan connects one calendar account and keeps one event type active, so connecting multiple calendar accounts directly requires Standard at $10 per seat per month on annual billing ($12 monthly). Paid plans sync up to six calendars. Costs for every path are broken out later in this guide.
Budget 15 to 20 minutes. None of it is difficult.
Step 1: Connect every calendar that holds a real commitment
Start by listing the calendars that actually govern your week, not just the work one. If a dentist appointment lives on iCloud and your scheduling tool only reads Google Workspace, the tool will cheerfully offer that hour to a client (Calendly, Connect your calendar).
- In Calendly, go to Availability > Calendar settings, then select + Connect calendar account and choose your provider.
- Connect your primary work calendar first, then choose it under Calendar to add events to if that is where new bookings should be written.
- Add secondary calendar accounts if your plan allows, then select every relevant calendar under Calendars to check for conflicts. A connected calendar that is not selected there will not block its busy times.
- Confirm the screen shows the expected number of calendars being checked.
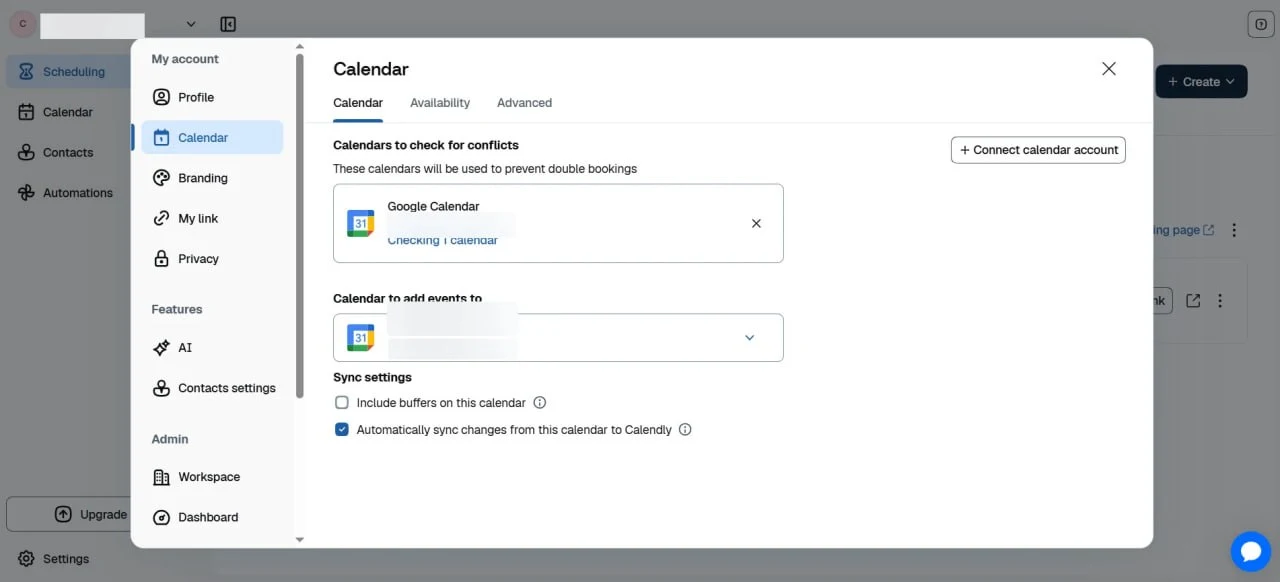
One constraint worth knowing now: calendar connections apply to your whole Calendly account. You cannot point one event type at your work calendar and another at a personal one. If you need that separation, the documented answer is a second user in the organization (Calendly, Manage multiple calendars).
If you are on the free plan and cannot connect a second calendar, do not copy events across by hand. Share the other calendar with your connected one at read-and-write access instead; Calendly then sees those events through the calendar it can already read. It is the same outcome with none of the maintenance.
Step 2: Define your meeting types and working hours
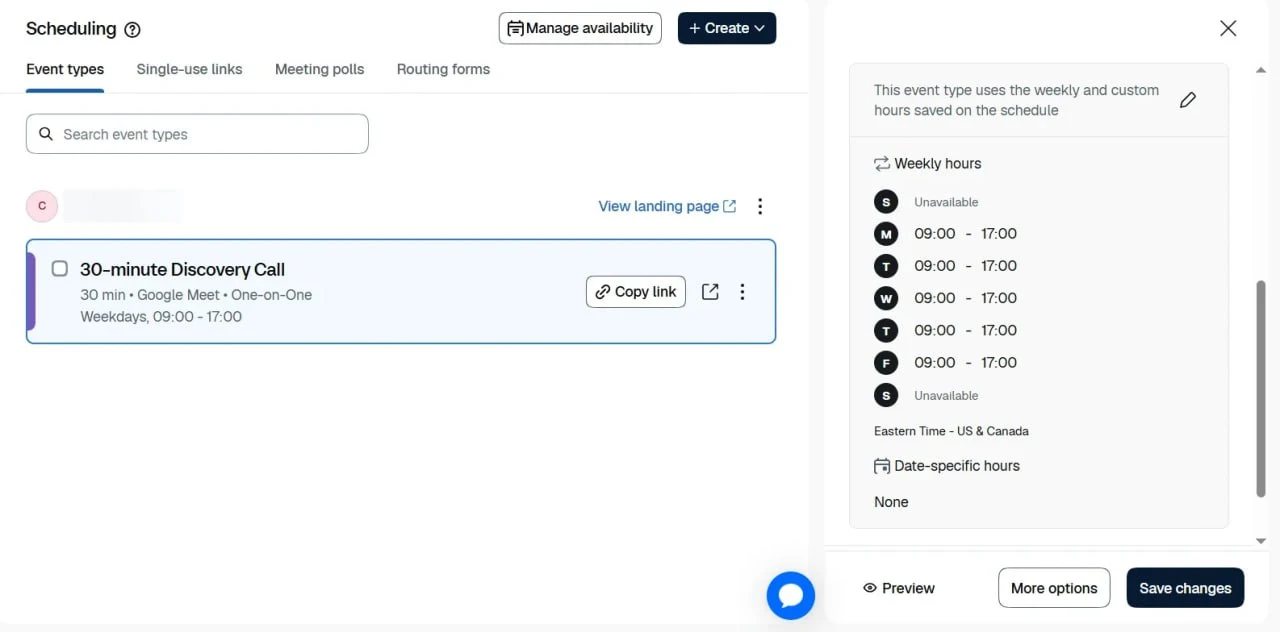
Fixed meeting lengths make availability predictable and reduce fragmented gaps. Working hours define when each meeting type can be booked; actual overlap prevention still depends on checking the correct calendars for conflicts.
- Open your event types and create one per real meeting shape — a 30-minute discovery call, a 60-minute working session, a 15-minute internal sync. Resist the single generic slot.
- Set exact start and end times for each weekday.
- Apply different availability windows per event type where it helps — client calls in the morning, internal meetings after lunch.
Calendly’s free plan keeps one event type active at a time, so this step in full needs Standard.
Step 3: Add buffers and a minimum notice window
Buffers cover the part of a meeting that never appears on the calendar: the walk back, the notes, the overrun. Without them, a meeting that finishes four minutes late has already eaten the start of the next one — which behaves like a conflict even though no two events overlap (Calendly, How to use buffers).
- Open the event type, select More options, then Limits and buffers.
- Set a pre-meeting buffer of 5 to 15 minutes so nobody can book you the instant another commitment ends.
- Set a post-meeting buffer of 10 to 30 minutes. Longer for anything involving travel or a room reset.
- Set a minimum scheduling notice — 24 hours is a reasonable default — so nothing lands on you with an hour’s warning.
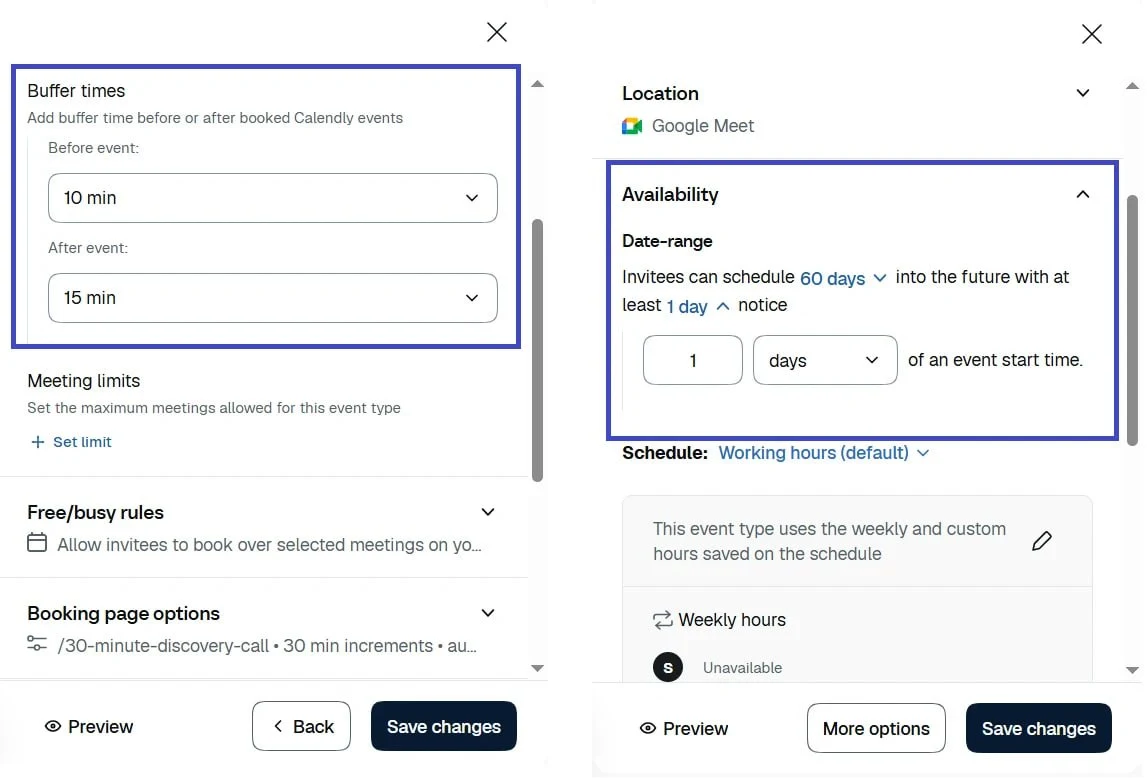
Buffers cost you more availability than the numbers suggest. Exactly how much is measured below.
Step 4: Cap how many meetings one day can hold
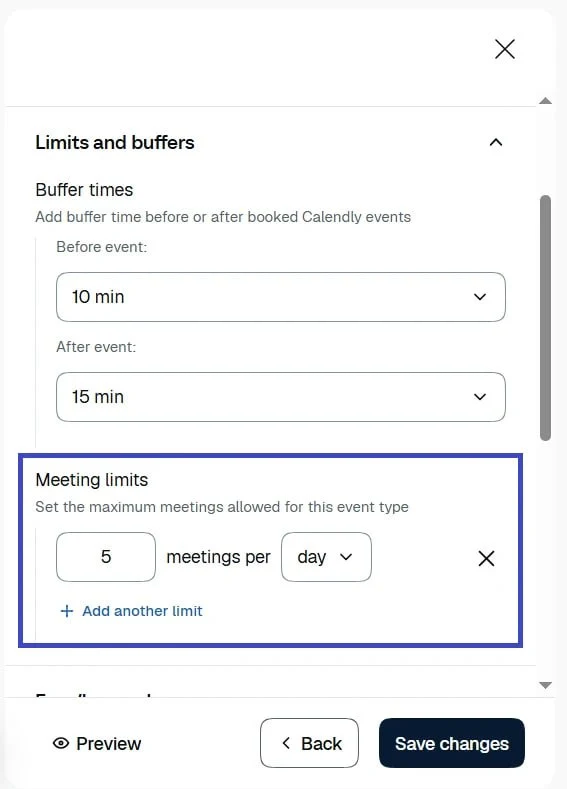
A daily cap can protect your workload, but its scope matters. An event-type limit controls only that booking link; an account-wide host limit is what protects the whole day when several event types are active.
- To limit one event type, open it from Scheduling, select More options > Limits and buffers, then add a meeting limit.
- To limit bookings across all event types, go to Availability > Advanced settings > Meeting limits.
- Set the maximum number per day that you can handle, then save or confirm the setting.
Calendly can enforce both limits, and whichever limit is reached first makes the remaining times unavailable. Use the account-wide limit if the goal is to protect the day rather than one meeting type (Calendly, Set meeting limits).
Step 5: Book a test meeting on your own link
Do not skip this. Every failure described in the diagnosis section below is invisible from the settings screen and obvious from the booking page.
- Open your booking link in a private window so you see what an invitee sees.
- Pick a date and try to book a slot that borders an existing commitment. If the buffer is working, that slot will not be offered.
- Complete a booking using a second email address you control.
- Check that the event landed on the calendar you nominated as the destination.
- Reload the booking page and confirm the slot you just took is gone.
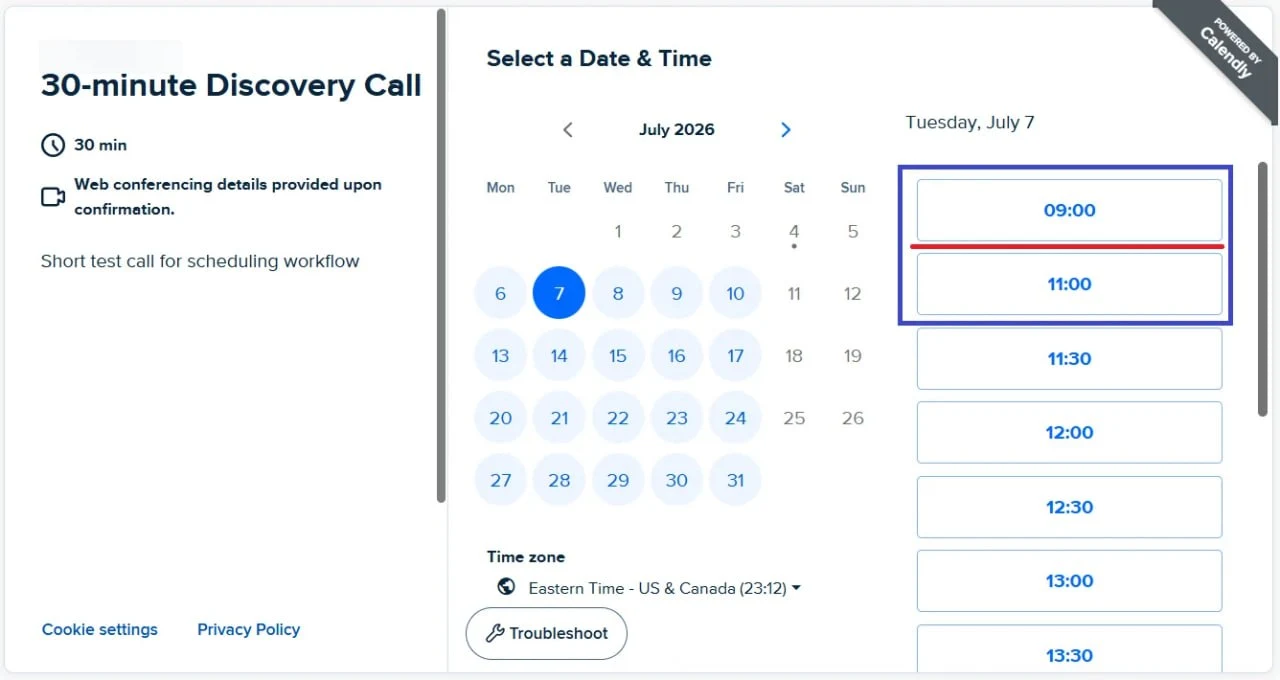
What one 60-minute meeting actually removes from your booking page
A 60-minute meeting does not cost you 60 minutes of bookable time. On our test account it removed four consecutive 30-minute slots and stretched the gap between openings from 30 minutes to two and a half hours.
We set up a 30-minute event type with buffers on both sides, captured the booking page with a clear calendar, added a single 10:00–11:00 event to a connected calendar, and captured the same page again five minutes later.
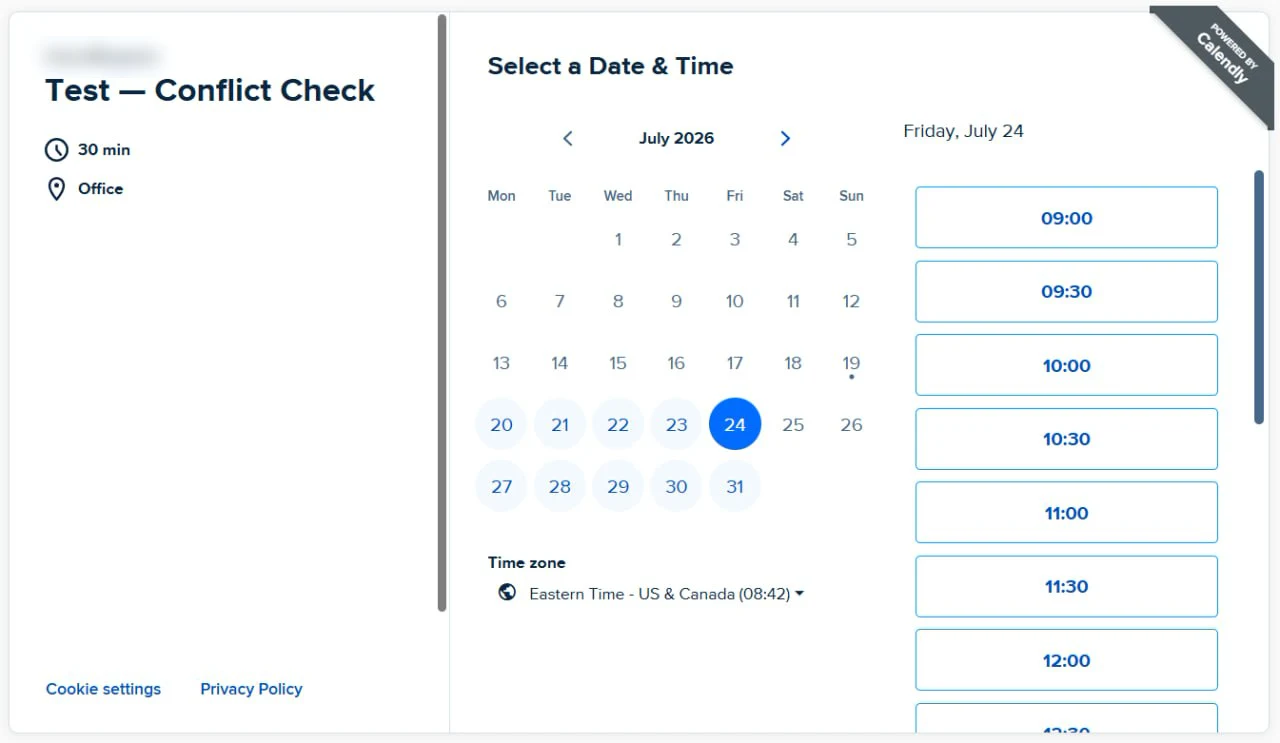
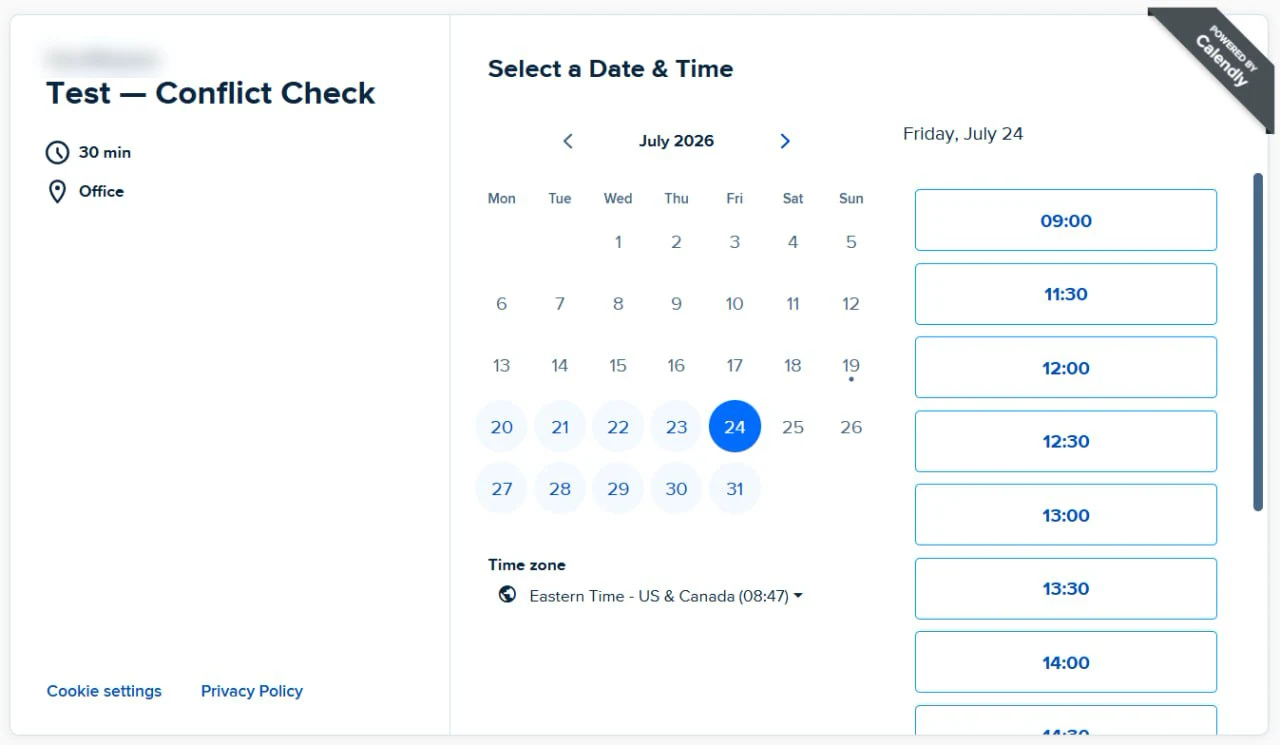
The two slots inside the meeting were expected. The two outside it are the part worth understanding: 09:30 and 11:00 vanished as well, so the blocked span ran from 30 minutes before the meeting started to 30 minutes after it ended.
The reason is that Calendly offers start times on a fixed grid, and a slot disappears if any part of it falls inside the blocked window. The 09:30 slot runs to 10:00. In this test, the configured pre-meeting buffer extended the blocked window into that interval, so Calendly removed the entire 30-minute option. The captures establish the lost slot, but they do not establish the exact buffer value used for this test event type.
Two practical consequences. First, generous buffers on a short-slot event type will thin your calendar faster than the numbers imply — worth checking against a real week before you commit to 15 and 30. Second, if a slot you expected to see has gone missing, a buffer is the most likely explanation and nothing is broken.
In this run, the change appeared immediately: we reloaded the booking page directly after saving the calendar event and the slots had already gone. That rules out a sync delay for these captures, but it does not rule out provider- or account-specific delays in other setups.
Test conditions: one Calendly account with a connected Google Calendar, a 30-minute event type with buffers set before and after, tested in July 2026. The exact buffer values and account plan were not recorded for this run. Both captures cover 09:00 to roughly 12:00; we did not verify afternoon behaviour in this run.
When bookings still overlap: what to check first
A real event is on the calendar, but the slot is still bookable
Check whether that calendar is selected for conflict checks. Connecting a calendar and asking Calendly to check it are two separate actions, and this is the most common reason a correctly configured account still double books.
We tested it on the same account. With a 14:00–15:00 event sitting on a connected calendar that was not selected for conflict checks, the booking page kept offering 14:00 as though the afternoon were free.
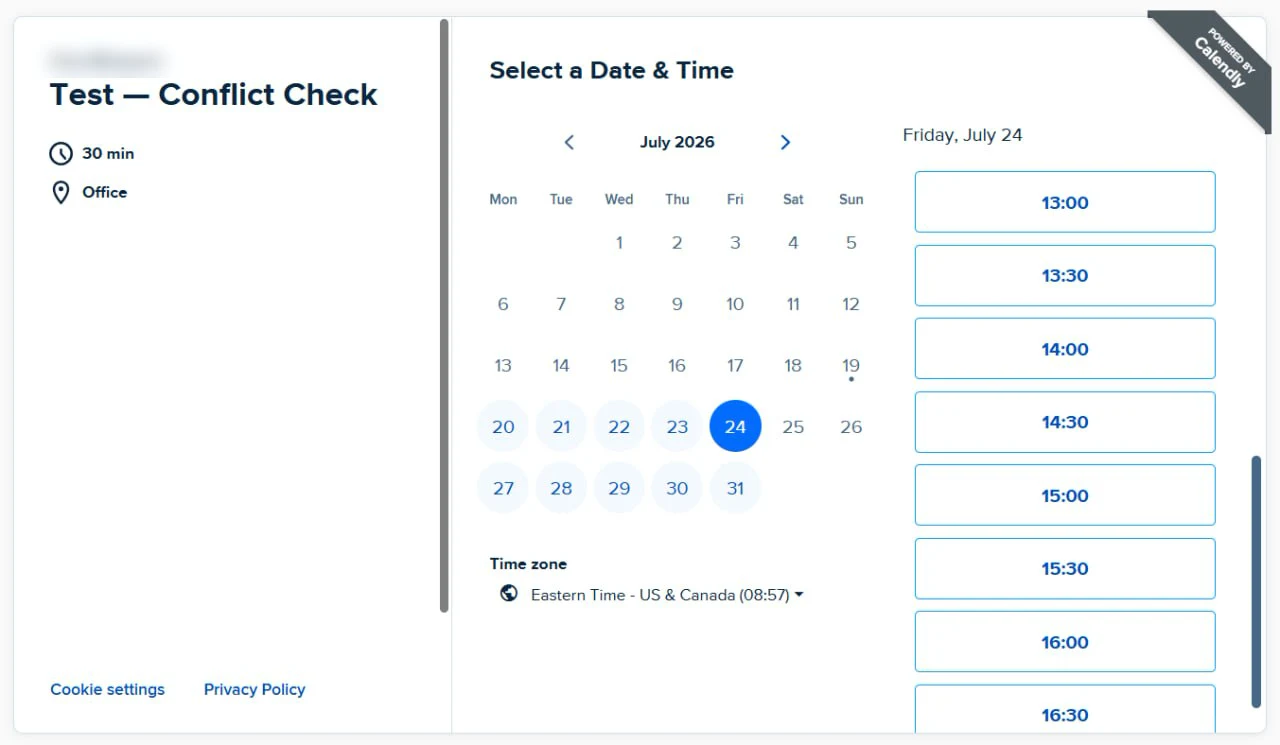
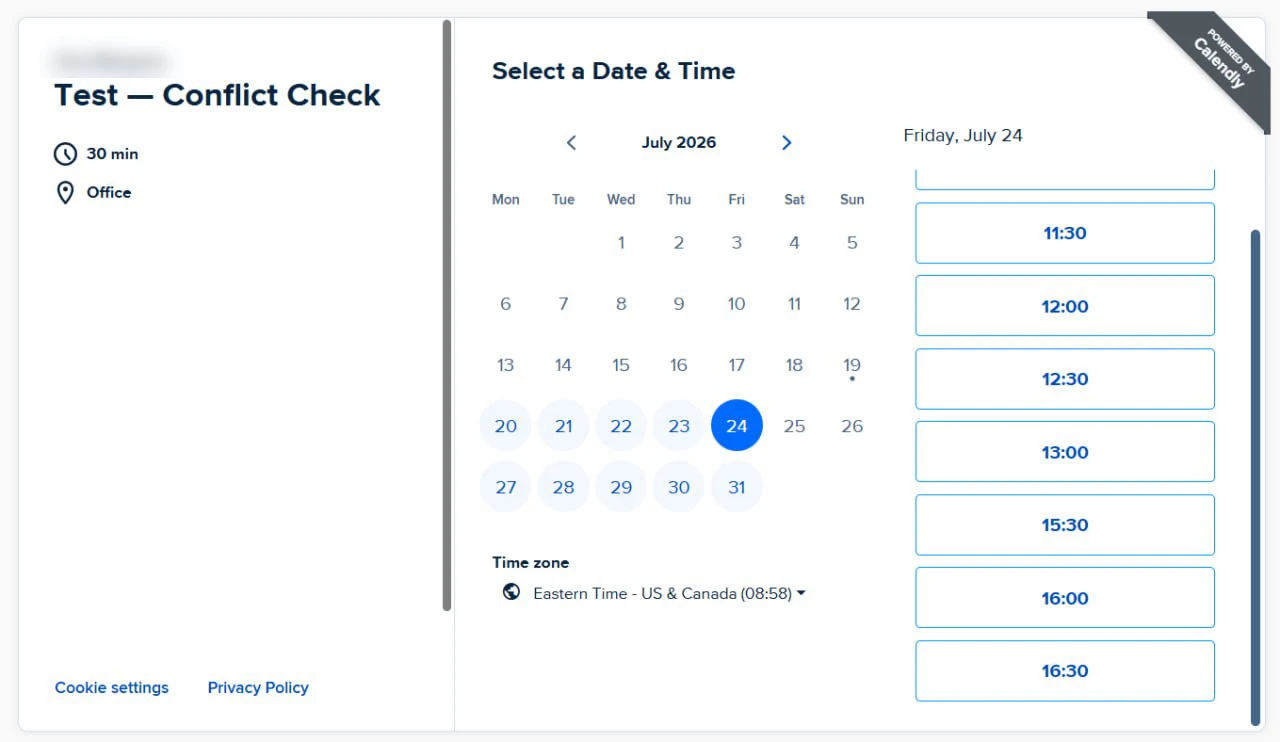
Selecting the calendar for conflict checks closed the gap immediately and removed the same four-slot span seen in the earlier test. Nothing about the calendar connection changed; only its conflict-check selection did.
The event is there, selected, and still not blocking
Check the event’s free/busy status. Scheduling tools read that flag rather than the event itself, so anything marked Free is invisible to conflict detection no matter which calendar it sits on. All-day events and events you have only been invited to but not accepted are the usual offenders. Set the event to Busy in your calendar and reload the booking page (Google Calendar, Change the visibility of events).
You need one booking page to ignore a calendar the others check
This is not configurable. Calendar connections apply across the entire Calendly account and cannot be assigned per event type. If a public booking link must not be constrained by a particular calendar, the documented route is a separate user in the organization rather than a setting (Calendly, Manage multiple calendars).
Slots are missing that should be available
Work down in this order: buffers on the event type, minimum scheduling notice, the daily cap, then the booking window. In our test, the configured buffer removed an entire additional 30-minute slot, so buffers can hide more availability than their nominal length suggests. Calendly also provides a troubleshooting tool on the booking page that reports which rule removed a given time (Calendly, Troubleshoot unavailable times).
What this workflow costs
US rates on annual billing, checked July 2026. Monthly billing runs roughly 20% higher.
| Plan | Price | What it covers for this workflow |
|---|---|---|
| Calendly Free | $0 | One event type and one connected calendar. Workable if one calendar holds everything or other calendars are shared into it |
| Calendly Standard | $10/seat/month | Unlimited event types, up to six connected calendars, and Collective or Group multi-person event types |
| Calendly Teams | $16/seat/month | Adds Round Robin distribution, lead routing, and advanced team administration |
For a solo operator, the cost is $0 if one connected calendar contains — or has shared access to — every relevant commitment. It becomes $120 a year on annual billing when you need Calendly to connect multiple calendar accounts directly.
Adapting the setup for teams, locations, and hybrid meetings
Any available team member can take the meeting
Use Round Robin when any eligible team member can take the meeting; Calendly offers times when at least one host is available. Use Collective when every selected host must attend; only their shared free times appear. Round Robin requires Calendly Teams at $16 per seat per month on annual billing, while Collective is available from Standard. In HubSpot, team scheduling pages require Sales Hub or Service Hub Starter or higher, plus an assigned Sales or Service seat for every person added to the page. Users of HubSpot’s free tools can create one One-on-One scheduling page with default HubSpot branding (HubSpot, Create scheduling pages).
Rooms and chairs need booking, not just people
A salon or clinic can double book a room or piece of equipment even when the practitioner is free. A people-only calendar connection does not track that shared capacity, so the workflow needs resource scheduling. Acuity’s Rooms/Resources feature can limit room or equipment availability across calendars. If the setup needs separate calendars for several staff members or locations, its Standard plan is the practical entry point at $27 per month on annual billing and includes up to six calendars; Starter is $16 per month on annual billing and includes one calendar (Acuity, Use resources to limit bookings).
Some meetings are in person and some are not
Create two event types and give the in-person one a much larger pre-meeting buffer for travel. Given what the buffer test showed, expect that event type to consume noticeably more of the day than its nominal length — a 60-minute in-person meeting with a 30-minute travel buffer will clear most of a morning. Both event types read the same connected calendars, so the two can never overlap each other.
If double booking turns out to be a symptom of chronic over-allocation rather than a calendar problem, compare the options in our resource management tools guide. If you are still choosing between scheduling platforms, our Calendly, Doodle and HubSpot comparison covers that decision.
Questions this setup usually raises
Can I still squeeze in an emergency booking?
Yes. Add the event straight to your connected calendar and the scheduling tool will treat it as busy like any other commitment, blocking the surrounding times. The one thing to watch is that a manual entry does not respect your buffers, so leave the gap yourself.
How do I block personal time without showing what it is?
Mark the event Busy and Private in Google Workspace or Microsoft 365. Scheduling tools read only the free/busy flag, so the time disappears from your booking page while the details stay invisible to invitees (Google Calendar, Change the visibility of events).
Does this handle invitees in other time zones?
Yes. Modern scheduling tools detect the viewer’s local time zone and display slots converted to it, so the overlap logic still runs against your real availability. Worth confirming on your own booking page during the Step 5 test if you book across regions regularly — the time zone selector is visible at the bottom of the invitee view.
Sources and notes
- Calendly Help — Connect your calendar to Calendly — connection flow, conflict-check selection, and the destination calendar for new bookings.
- Calendly — Calendar connections — the six-calendar sync limit on paid plans.
- Calendly Help — Manage multiple calendars and email addresses — account-wide scope of calendar connections, and calendar sharing as the single-calendar workaround.
- Calendly Help — How to use buffers — buffer configuration before and after events.
- Calendly Help — Fine-tune your availability settings — booking window and minimum notice.
- Calendly Help — Set meeting limits — event-type limits versus account-wide host limits.
- Calendly Help — Troubleshoot unavailable times — the booking-page troubleshooting tool and common causes of missing slots.
- Calendly — Pricing — Free, Standard, and Teams pricing and plan limits.
- Acuity Scheduling Help — Use resources to limit bookings — limiting room and equipment availability across calendars.
- Acuity Scheduling — Plans and pricing — tier pricing and included features.
- HubSpot Knowledge Base — Create and edit scheduling pages — subscription and seat requirements for team scheduling pages.
- Google Calendar Help — Change the visibility of events or tasks — event visibility and free/busy status.
Disclaimer
This guide is for general informational purposes only and does not constitute professional advice. Our booking-page observations come from a single Calendly account tested in July 2026 and describe what we saw on that setup, not guaranteed behaviour on every plan, calendar provider, or event configuration. Pricing and feature availability were verified against official documentation in July 2026 and may change without notice.
Last reviewed: July 2026 by the PickrTech editorial team.