Workflow guide for mastering your time tracking and billing workflow
This article may contain affiliate links. We may earn a commission when you sign up through our links — at no extra cost to you. Our recommendations are based on independent evaluation and are not influenced by commissions.
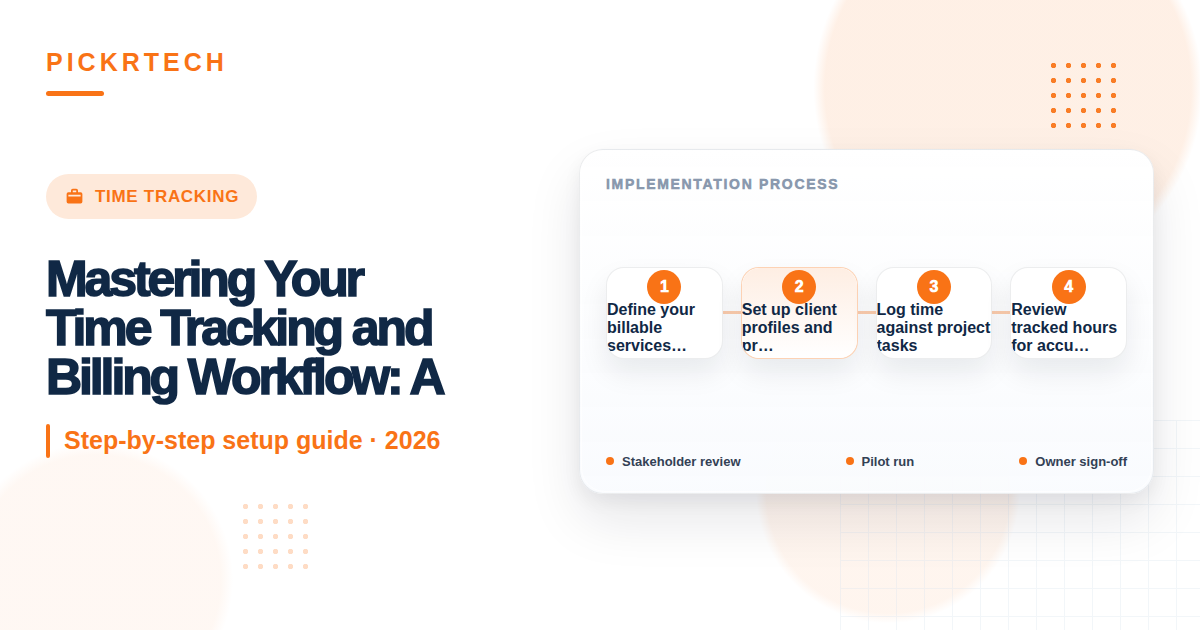
TL;DR: Set up billable services and rates in your tracking tool, create client profiles with project budgets, log time against specific tasks, review hours weekly for accuracy, then generate and send invoices automatically. This five-step workflow ensures you bill clients accurately without leaving money on the table.
Who this guide is for
You’re juggling multiple clients, projects blur together, and invoicing takes longer than the actual work. Maybe you’re a consultant, designer, developer, or service provider who bills hourly or needs precise project cost tracking for fixed-price work.
If you’ve ever forgotten what you worked on, manually calculated an invoice (and second-guessed the math), or suspected you were leaving money on the table, this guide is for you.
This workflow eliminates guesswork by creating a repeatable system that tracks time, monitors budgets, and generates invoices automatically. Whether you’re a solo freelancer or managing a small team, you’ll have an auditable record of every hour billed.
Who should skip this
If you run a purely product-based e-commerce store or manage salaried in-house teams with no client billing, this workflow isn’t the right fit for you. The same applies if your business model involves zero hourly work—for example, pure SaaS subscriptions or one-time flat-rate product sales.
Also skip this if your client base is fewer than three active accounts and you bill only once or twice per year. The overhead of setting up formal time tracking may exceed the benefit for that volume.
The workflow at a glance
- Define services and rates — Enter your billable services (e.g., “UX Design,” “API Development”) and hourly or project rates into your tracking system.
- Create client and project profiles — Set up each client record with contact details, then attach specific projects with agreed budgets or hourly limits.
- Log time daily — Use the timer or manual entry to record billable hours against the correct client and project task.
- Audit hours weekly — Run a time report, review for accuracy, and catch any missing or miscategorized entries before invoicing.
- Generate and send invoices — Convert tracked hours into a formatted invoice with line-item descriptions and send it to the client.
This cycle repeats for each billing period (typically weekly, bi-weekly, or monthly) and creates an auditable record of work performed.
Prerequisites
Before starting this workflow, gather the necessary tools and information.
Tools needed
- A time tracking and invoicing platform (FreshBooks for all-in-one simplicity, Harvest for integrations, or Toggl Track for focused time tracking paired with your own invoicing)
- Client contracts or statements of work that define hourly rates or project budgets
- A list of your billable services and their rates
- Client contact information (email, address, payment terms)
Team setup
- If solo: you manage all time entry and invoicing
- If team-based: assign team members to log their own time; designate one person to audit and generate invoices
Estimated time: 15 minutes to set up initial rates and one client; 2–3 minutes per new client thereafter
Difficulty: Beginner
Step-by-step workflow
Step 1: Define your billable services and rates
Open your time tracking tool and navigate to the Services or Rates section. Create a list of every service you charge for—for example, “Web Design (hourly),” “Project Management,” “Revisions,” or “Rush Delivery Fee.” For each service, set the default billable rate.
This rate should match your client contracts, but most tools allow you to override rates on a per-project basis if one client negotiates a different price.
Why this matters: Having predefined rates ensures that when you log time against a service, the system automatically applies the correct charge to the invoice. This eliminates manual math errors and speeds up invoicing.
Expected outcome: You have a complete rate card saved in your system that covers all your billable work types. When you later log time to “Web Design,” the tool will know to charge your standard web design rate—unless you’ve locked in a different rate for that specific client project.
Step 2: Set up client profiles and projects
Create a new Client record for each organization you bill. Enter their legal name, primary contact email, billing address, and payment terms (e.g., “Net 15”). Save the record.
Next, create a new Project tied to that client. Give the project a clear name (e.g., “Acme Corp – Website Redesign Q1 2026”) and specify the project budget. If the contract is “40 hours at $150/hour,” set the budget to either 40 hours or $6,000 depending on how your tool handles budgets. If the project is a fixed price, set the total budget amount. If it’s open-ended, you can leave the budget blank or set a high threshold as a warning.
Why this matters: Projects isolate work by client and let you monitor if you’re approaching the agreed budget. This prevents scope creep and helps you know when to stop logging hours or request a change order.
Expected outcome: When you open the project, you see the client name, budget (hours or dollars), and a running tally of hours logged so far. If the contract was “40 hours,” and you’ve logged 35, you can see at a glance that you have 5 hours remaining.
Step 3: Log time against project tasks
Each day, as you work on client projects, log your time. Open the project and either use the built-in timer (click “Start” before you begin a task, click “Stop” when done) or manually enter time blocks (e.g., “9:00 AM–11:30 AM, Web Design – Homepage banner revision”).
Always include a task description. Instead of writing “Worked on project,” write “[Revision] Homepage banner CSS alignment for mobile.” Specific descriptions protect you if a client later questions the invoice and help you remember what you delivered.
Make sure the logged time is assigned to the correct project. If you work for two clients in one day, confirm that each time block is tied to the right client and project before moving on.
Why this matters: Accurate time logs create a paper trail that justifies your invoice. Vague entries invite client disputes and make it harder to defend your hours if there’s disagreement.
Expected outcome: By the end of the day, your time tracking tool shows all hours worked, broken down by project and task. The project’s budget tracker updates automatically, showing hours logged and hours remaining.
Step 4: Review tracked hours for accuracy
Once per week (typically Friday afternoon or Monday morning), generate a Time Report from your tracking tool. Filter by client or project, and review every entry for the past week. Check for:
- Missing hours: Did you forget to log time for any work you performed?
- Miscategorized entries: Are all hours assigned to the correct client and project?
- Vague descriptions: Are task names clear enough for a client to understand what was done?
- Double-logged time: Did you accidentally log the same task twice?
If you find errors, edit the time entries before invoicing. If you find unbillable work (e.g., admin tasks, internal meetings) that was logged to a client project by mistake, move it to an internal admin project so it doesn’t inflate the final invoice.
Why this matters: Catching errors before invoicing prevents client disputes, avoids overcharging, and ensures you’re not undercharging either. This weekly habit scales to teams—if you manage multiple team members, their time entries roll into this same report.
Expected outcome: You have a clean, verified list of billable hours for the week. You can confidently say “40 hours were worked on Project X” because you’ve reviewed the data.
Step 5: Generate and send the invoice
Once you’ve verified the hours, open the project or client record and select “Create Invoice” or “Generate Bill.” The tool will pull in all approved time entries and automatically populate line items. Review the invoice layout to ensure it includes:
- Client name and billing address
- Invoice number and date
- Detailed line items (e.g., “Website Redesign – 20 hours @ $150/hour = $3,000”)
- Task descriptions pulled from your time logs
- Total amount due and payment terms
- Your business name, email, and payment instructions
Make any final edits (e.g., adding a thank-you note or adjusting payment terms), then send the invoice via email or download it as a PDF to send separately.
Why this matters: Invoices generated directly from verified time logs are faster to create and less prone to calculation errors. Including detailed task descriptions on the invoice improves transparency and often speeds up client payment because there’s no confusion about what was delivered.
Expected outcome: The client receives a professional invoice that accounts for every hour worked, broken down by task, with no guesswork or manual calculation on your end.
Common pitfalls and how to avoid them
Review these common challenges to maintain accurate billing records.
- Forgetting to start the timer or log time at the end of the day
⚠️ Why: When you’re heads-down in work, it’s easy to skip clicking the timer. By day’s end, you’ve logged 6 hours but actually worked 8, and the missing hours are lost forever.
🔧 Prevention: Set a daily alarm (e.g., 5:00 PM) to prompt you to log or review time. If you use a web-based tracker, install a browser extension with idle detection to remind you to start tracking when you resume work. Better yet, adopt a habit of logging time in 30-minute or hourly blocks as you finish each task, not at the end of the day.
- Inconsistent or incorrect billable rates applied to invoices
⚠️ Why: You define a default rate of $150/hour, but forget to override it for a client who negotiated $125/hour. The invoice goes out with the wrong rate, and the client rejects it or disputes the amount.
🔧 Prevention: Before you log any time on a project, create the project profile and explicitly lock in the billable rate. Review your client contract again and confirm the rate is correct in the system. Use the tool’s “Project Override” feature to set a client-specific rate if needed, and do this before day one of work.
- Vague task descriptions lead to client disputes over what was actually delivered
⚠️ Why: You log “Project work – 5 hours” instead of “[Design] Main navigation menu interactive hover states.” When the client sees the invoice, they don’t know what those 5 hours covered and question whether the work was necessary.
🔧 Prevention: Create a standard task naming format (e.g., “[Action] + [Specific deliverable]”) and enforce it from day one. When you log time, include the task name as part of the entry. Review task descriptions during your weekly audit and rewrite any that are too generic before invoicing.
- Unbillable admin time accidentally logged to client projects, inflating invoices
⚠️ Why: You log 2 hours of internal planning or admin work to a client project because you forgot to switch projects. The invoice now includes work the client didn’t agree to pay for.
🔧 Prevention: Create a separate internal project called “Admin” or “Overhead” and use it for non-billable work (e.g., internal meetings, professional development, invoicing). When you log time, always double-check which project is selected before starting the timer. During your weekly audit, scan for any entries in client projects that should be in admin, and move them.
Scenario fit: When to adapt this workflow
Adjust the base workflow to fit specific business models and team structures.
Scenario 1: Team-based tracking
If you manage freelancers or contractors, each team member should log their own time to their assigned projects. Set up role-based access so each person can only see their own entries and their assigned clients. Designate yourself (or a project manager) as the auditor who reviews all time entries before invoicing. Add a weekly “Time Review Meeting” to discuss any discrepancies or missing entries with the team. The workflow remains the same, but approval happens as a team step before invoicing.
Scenario 2: Hybrid fixed-fee and hourly billing
Some clients pay a fixed project fee, while others pay hourly. For fixed-fee projects, still log time (so you know your actual labor cost), but set the project budget to the fixed amount rather than hourly hours. When you invoice, the tool will show hours logged, but the invoice line item will show the fixed price instead. This lets you track whether you’re profitable on fixed-fee work while still invoicing correctly to the client.
Scenario 3: Retainer or subscription billing
If you bill a client a monthly retainer, create a project called “[Client Name] – Monthly Retainer” and log all work to that project. At month-end, verify that the hours logged justify the retainer fee. If you logged 30 hours and the retainer was $3,000, you know you charged $100/hour—useful for evaluating whether the retainer rate is fair. Use the same invoicing workflow, but set the invoice amount to the retainer fee rather than calculating it from tracked hours.
Templates and examples
Use these templates to standardize your time auditing and invoicing process.
Weekly Time Audit Checklist
Use this template every Friday to verify your time entries before invoicing:
Week of: [DATE]

☐ Generated time report for the past 7 days
☐ Verified all time entries are assigned to the correct client and project
☐ Checked that no time entries have vague descriptions (rewrote any that say "work" or "meeting")
☐ Confirmed no unbillable time (admin, personal, internal meetings) is logged to client projects
☐ Reviewed project budgets—none are over budget or approaching the limit unexpectedly
☐ Checked for duplicate or overlapping time entries
☐ Verified billable rates on each project match the client contract
☐ Total billable hours for the week: ____
☐ Time entries approved and ready to invoice

Notes: [any corrections made or hours moved between projects]
Standard Invoice Line-Item Description Template
Use this format when logging tasks so they’re ready to invoice with zero editing:
[Category] Specific deliverable or task – X hours @ $[rate]/hour

Examples:
- [Design] Homepage hero section layout and mobile responsive testing – 6 hours @ $150/hour
- [Development] Database schema setup and API endpoint documentation – 8 hours @ $175/hour
- [Revision] Logo color adjustments and file export to client specifications – 1.5 hours @ $150/hour
- [Project Management] Weekly status call and scope change discussion – 1 hour @ $100/hour
Frequently asked questions
Q: How do I set my hourly rate if I’m just starting out?
A: Research rates in your industry and location using resources like Glassdoor, Upwork, or industry surveys. Start with a rate you’re confident defending and increase it as you gain testimonials and case studies. Your rate should cover your cost of living, taxes (if self-employed), and unbillable time (admin, marketing, time between projects). For example, if you want to earn $60,000 per year and estimate you’ll bill 1,500 hours per year, your minimum rate is $40/hour—then add a cushion for taxes and overhead.
Q: Should I bill for admin time, meetings, and revisions?
A: This depends on your contract. If you’ve agreed to a fixed fee or retainer, admin and revision time is built into that amount—log it, but don’t bill separately. For hourly work, clarify with the client upfront: some contracts include “unlimited revisions,” while others charge separately for revisions after the first round. Always log the time for your records, but only invoice for it if the contract allows. If a client requests excessive revisions outside the scope, create a separate line item or send a change order rather than absorbing the cost.
Q: What if a client disputes my invoice or claims they didn’t authorize certain hours?
A: This is why detailed task descriptions and weekly audits matter. Send the client a breakdown of the disputed hours with task names and dates. If your descriptions are clear (e.g., “Homepage CSS refinements”), most disputes resolve quickly. If the client still disagrees, review your contract—does it specify what’s included? If you’re consistently running over budget, you may need to renegotiate the scope or rate for future work. For ongoing disputes, consider requiring clients to sign off on milestones before you invoice to prevent misalignment.
Q: How often should I invoice—weekly, monthly, or project-by-project?
A: This depends on your client agreements and cash flow needs. Freelancers typically invoice bi-weekly or monthly. If cash flow is tight, invoice weekly. Project-based invoicing works well if projects last 2–4 weeks. Check your contracts to see if there’s a specified billing schedule. More frequent invoicing (weekly or bi-weekly) reduces the size of individual invoices and speeds up payment cycles, but it also increases your administrative overhead.
Q: What if I work on multiple tasks in one hour—how do I log that?
A: Log each task separately with the time spent on it. For example, if you spend 30 minutes on design work and 30 minutes on email correspondence for the same client, create two separate time entries: one for design (30 min) and one for email/admin (30 min). This gives you and the client visibility into how time was spent. If the admin time is unbillable, log it to your internal admin project, not the client project.
Q: Do I need to charge for the time it takes to invoice the client?
A: Typically, no. Invoicing is a business operation cost and should be built into your rates, not billed separately to clients. However, if a client requires extensive custom reporting or invoicing formats that take significant time, you can negotiate a separate line item for that service. Keep it simple: log billable work, audit it, generate the invoice, and send it without charging for the invoicing process itself.
Recommended tools for this workflow
FreshBooks — Purpose-built for freelancers and small businesses, FreshBooks offers integrated time tracking and invoicing features in one platform. You can log time, set project budgets, and generate invoices without switching tools. Many users report finding the setup process manageable, typically taking around 15 minutes according to vendor documentation. Check the official FreshBooks website for current pricing.
Harvest — A dedicated time tracking and invoicing tool that integrates with numerous other apps. If you use project management software like Asana or Basecamp, Harvest can pull project data automatically. Requires slightly more setup overhead than FreshBooks, but powerful if you’re managing multiple integrations.
Toggl Track — A lightweight time tracking tool designed specifically for effective time tracking but requires a separate invoicing tool or manual invoicing. Good if you want simple, focused time tracking without bundled invoicing features. Best for teams that already use accounting software elsewhere.
Hidden costs and limitations to consider:
- Per-user pricing: If you add team members, most tools charge extra per person. For a solo freelancer, cost is minimal; for a 5-person team, plan for $50–$200/month in additional fees.
- Integration gaps: Not all tools integrate with your existing CRM or accounting software. Verify integrations before committing to a tool.
- Mobile app limitations: Some tools have weaker mobile apps, making it harder to log time on the go. Test the mobile experience before choosing.
- Data export complexity: If you later want to switch tools, exporting historical time and client data may be cumbersome. Ask vendors about export formats upfront.
Disclaimer
This guide is for general informational purposes only and does not constitute professional advice. Workflow steps, tool interfaces, and feature availability were verified against each product’s official documentation as of May 2026 and may change without notice. Always test workflows in a non-production environment first. PickrTech may earn a commission when you sign up through our links at no extra cost to you. Our recommendations are based on independent evaluation and are not influenced by compensation.
Sources and notes
- FreshBooks Support – How to Track Time — used to verify time logging and invoicing workflow steps
- FreshBooks Hub – Guide to Billable Hours — used to confirm best practices for rate setup and time tracking
_Last reviewed: May 2026 by the PickrTech editorial team. We use public sources only unless otherwise stated. Product names, pricing, features, and plan details may change over time — verify current details on official websites before making decisions._